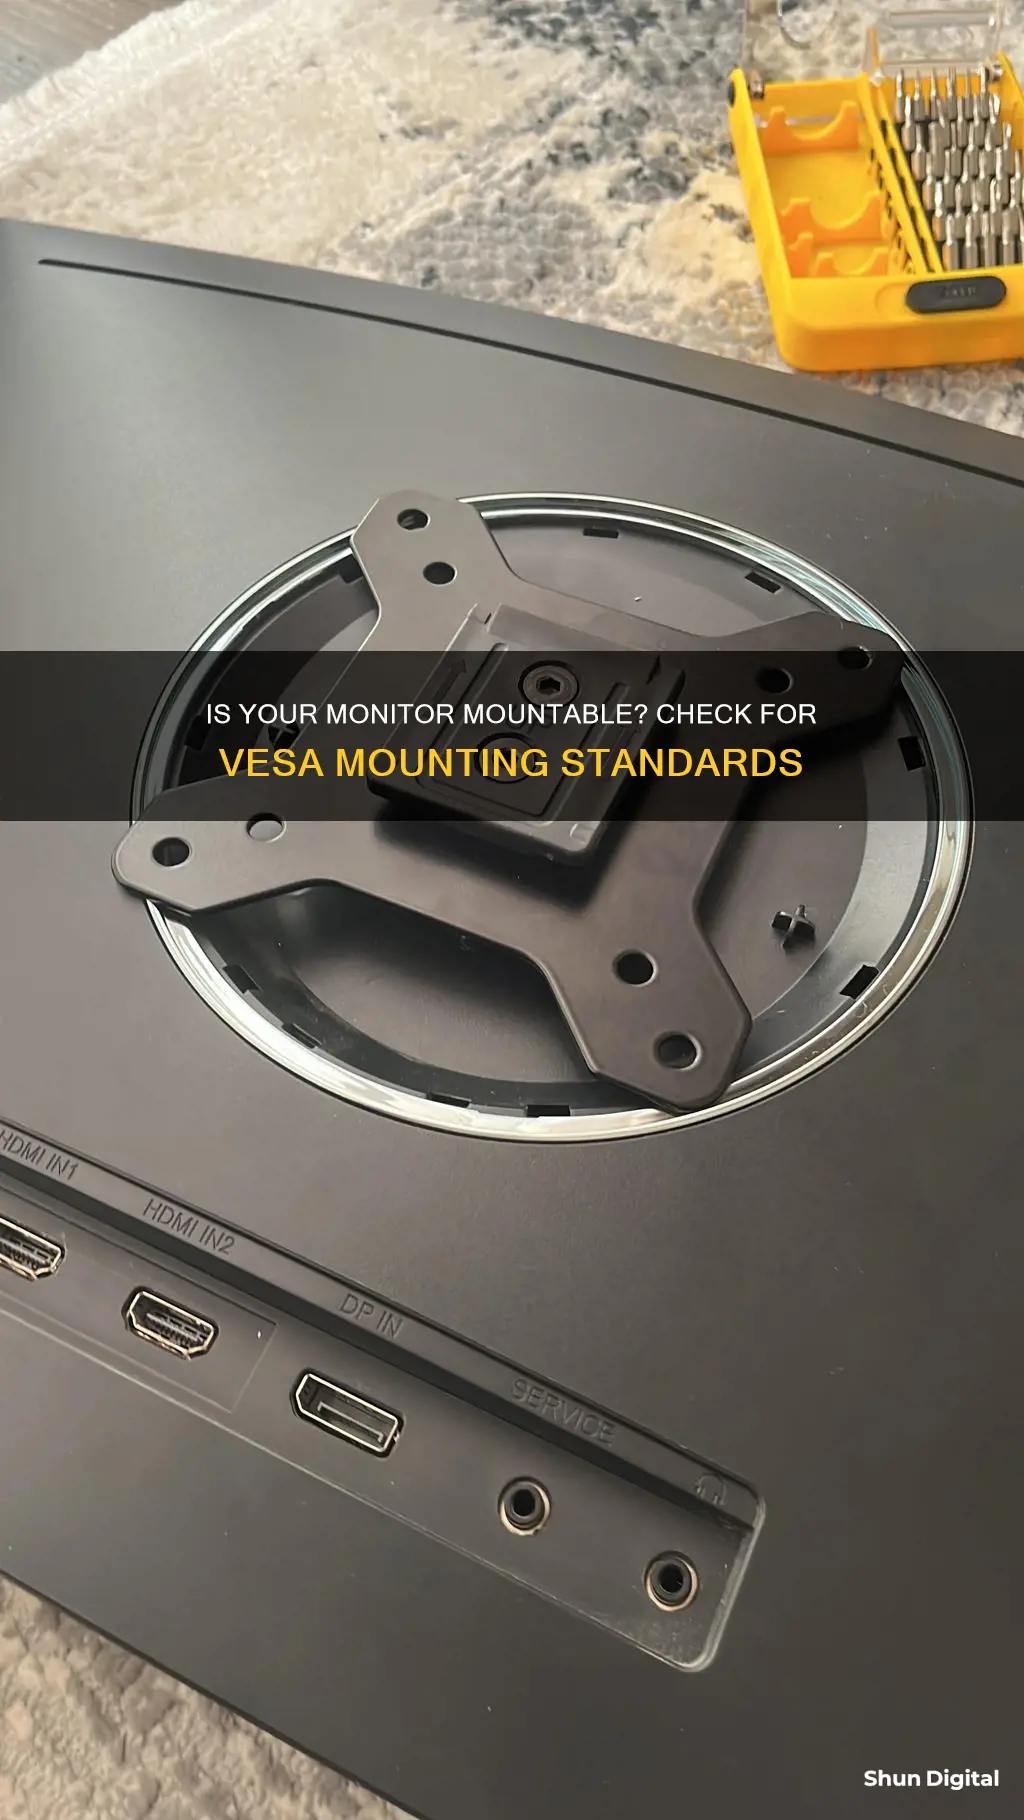
If you're looking to mount your monitor, you'll need to check if it's VESA-compliant. The Video Electronics Standards Association (VESA) is the organisation that defines the standards for mounting computer monitors, TVs, and other flat-panel displays. To check if your monitor is VESA-compliant, simply look at the back of it. If it is VESA-compliant, you should see four holes in a square pattern. The most common pattern for the screw holes is either 75 x 75 mm or 100 x 100 mm, while larger monitors will be 200 x 100 mm. If you can't see the holes, check the monitor's user guide for instructions on how to remove the base or rear panel to reveal them.
| Characteristics | Values |
|---|---|
| Number of holes | 4 |
| Hole pattern | 75 x 75 mm, 100 x 100 mm, 200 x 100 mm, 400 x 200 mm, 600 x 400 mm |
| Hole location | Back of the monitor |
| Hole type | Threaded |
What You'll Learn

Check for VESA compliance
The Video Electronics Standards Association (VESA) is responsible for defining the standards for mounting computer monitors, TVs, and other flat-panel displays. VESA-compliant monitors follow an industry-standard mounting system, which allows for general interchangeability between monitor mounts and brackets, regardless of the monitor brand.
To check if your monitor is VESA-compliant, simply look at the back of the monitor. VESA-compliant monitors will feature four holes on their backs, arranged in a square pattern. The horizontal and vertical distance between the screw centres are labelled as 'A' and 'B' respectively. The most common pattern for the screw holes is either 75 x 75 mm or 100 x 100 mm, while larger monitors will be 200 x 100 mm.
If you cannot see the four holes, it is likely that the monitor has its own stand or mount attached, which may be hiding the holes. In this case, refer to the user manual for instructions on how to remove the attached mount or rear panel to reveal the holes. You can also check your monitor's user guide, which should provide information on VESA compatibility.
If you are still unsure, you can check online or contact the manufacturer directly to find out if your monitor is VESA-compliant. It is important to ensure that both the monitor and the monitor mount have the same VESA standard.
In addition to the standard four-hole pattern, VESA has extended its Flat Display Mounting Interface (FDMI) standard with additional screw patterns that are more appropriate for larger TV screens. The standard now specifies seven sizes, each with more than one variant, ranging from 50 x 50 mm to 900 x 900 mm. These variants are referenced as parts B to F of the standard or with official abbreviations, usually prefixed by the word "VESA".
For example, a 30-inch LCD TV weighing more than 23 kg would need to use a part F mount, which has a hole pattern of 200mm pitch, such as 400 x 200 mm or 600 x 400 mm.
The Standard 24-Inch Monitor: How Big Is It Really?
You may want to see also

Measure the distance between screw holes
To determine the VESA standard of your monitor, you will need to measure the distance between the screw holes. This is done by measuring the horizontal and vertical distance of the screw holes from centre to centre. The horizontal and vertical pitch of the threaded holes result in the VESA standard.
The VESA standard is an industry-standard mounting system. The typical mounting pattern for monitors used at a desk is 75x75mm or 100x100mm. This is the most common pattern for the screw holes, and larger monitors will be 200x100mm.
If the distance between the VESA holes is 400mm wide and the height is 200mm, this corresponds to a VESA measurement of 400x200mm, which complies with the VESA MIS-F standard.
If you are unsure of the VESA standard, you can always check online or refer to the user manual for your monitor.
Monitoring App Usage on iPhone: A Step-by-Step Guide
You may want to see also

Check the monitor's weight
Knowing the weight of your monitor is crucial when it comes to selecting a mount that can safely support it. The weight of your monitor will determine the type of mount you can use and where you can install it.
The first step is to find out the weight of your monitor. You can do this by checking the data sheet or the manufacturer's website. Alternatively, you can simply place the monitor on a scale to get an accurate weight measurement.
Once you know the weight of your monitor, you can start considering different mounting options. Different mounts have different weight capacities, so it's important to choose one that can safely support the weight of your monitor. For example, if you're considering a through-the-desk mount, also known as a grommet mount, keep in mind that these are popular among users who need to mount a significant amount of weight while minimising desktop obstruction.
In addition to weight capacity, the type of mount you choose may depend on other factors such as your budget, the amount of desk space you want to save, and the level of flexibility and adjustability you require. For instance, freestanding mounts are typically the most affordable option, while side-clamp desk mounts offer more flexibility by allowing you to adjust the height, viewing angle, and rotation of your monitor.
When selecting a mount, it's also important to consider the weight of the mount itself. This is particularly relevant if you're choosing a wall mount, as you'll need to ensure that the wall can support the combined weight of both the mount and the monitor. Drywall installations typically include the necessary hardware, but if you're installing on plaster or masonry, you'll need special mounting gear to guarantee the wall can bear the load.
In summary, knowing the weight of your monitor is crucial when selecting a mount. This information will guide you in choosing a mount with the right weight capacity and determining the best installation location to ensure safety and stability.
Heart Rate Monitor: What You Need to Know
You may want to see also

Consider the type of mount
When considering the type of mount, it's important to understand the VESA standards. The Video Electronics Standards Association (VESA) is the organisation that defines the standards for mounting computer monitors, TVs, and other flat-panel displays. VESA compatibility ensures general interchangeability between different monitor mounts and brackets, regardless of the brand.
There are three common VESA standards: VESA MIS-D, VESA MIS-E, and VESA MIS-F. The VESA standard of your monitor and mount should be the same. VESA MIS-D is typically for TVs and monitors up to 14 kg and has a square hole pattern of 75x75 or 100x100 mm. VESA MIS-E monitors can carry up to 23 kg and have a rectangular hole pattern of 200x100 mm. Large televisions usually have the VESA MIS-F standard, with a hole pattern of 200 mm pitch, such as 400x200 or 600x400 mm.
In addition to the VESA standard, you should also consider the specific type of mount that best suits your needs. Freestanding mounts are affordable and allow for adjustments in height, angle, and rotation without clamps or drilling holes. Clamp stands, on the other hand, are more common and offer a full range of motion. They secure to your desk using a clamp and can also be adapted for drilling into the desk.
Monitoring Internet Usage: Boost Mobile's Data Insights
You may want to see also

Check for cable management issues
When it comes to cable management for monitor mounts, there are several things to consider to ensure your setup is both functional and aesthetically pleasing. Here are some tips to address cable management issues:
- Measure your cables: It is important to ensure that your cables are long enough to reach the necessary ports. Cables may need to zigzag across monitor arms and under your desk, so plan their routes accordingly. Cables that are too short or too long can create issues, so measuring the required lengths is crucial.
- Organise and secure cables: Use zip ties, twist ties, or cable clips to bind your cables together and prevent tangling. For a neater appearance, consider using cable management sleeves or special clips to keep cables from straying.
- Get cables off the floor: Cables trailing on the floor not only look messy but can also pose a safety hazard. Utilise cable management racks, such as the IKEA SIGNUM, or mount your power strip under your desk to keep cables tidy and out of the way.
- Consider a desk skirt: If you have a more complex cable setup, a desk skirt can be a great solution. Mounted to the backside of your desk, it provides a large pocket to hide cables, keeping the floor area under your desk clean and hazard-free.
- Choose a monitor arm with cable management features: Some monitor arms come with built-in cable management solutions, such as the Ergotron LX Desk Monitor Arm, which can help simplify the process of organising your cables.
- Plan your setup carefully: Before installing your monitor mount, plan the placement of your monitor and the routes your cables will take. This will help you identify any potential issues and ensure a neat and functional setup.
Hooking Up Five Monitors: The Ultimate Guide
You may want to see also
Frequently asked questions
VESA compatibility refers to the Video Electronics Standards Association's standard for attaching flat-panel displays, monitors, and televisions to mounts. The VESA mounting standards make it easier for manufacturers to deliver on consumers' needs, allowing for general interchangeability between monitor mounts and brackets, regardless of the monitor's brand.
To determine if your monitor complies with VESA standards, check the back for four threaded screw holes. The most common pattern for the screw holes is either 75 x 75 mm or 100 x 100 mm, while larger monitors will be 200 x 100 mm. If the holes are hidden, refer to your monitor's user guide for instructions on how to remove the base or rear panel.
Some brands sell monitors without the standard VESA pattern on the back. These monitors can still be mounted using a VESA mount with an adapter to make them compatible.
Almost all monitors can be mounted. The majority of current monitor models are VESA-compliant, and even older monitors or CRTs that don't have the standard VESA pattern can be mounted with alternative mounting solutions.
Mounting a monitor can improve desk space utilisation, provide ergonomic benefits by minimising neck strain, enhance security by reducing the risk of theft or damage, and offer convenient display options for optimal viewing angles.


