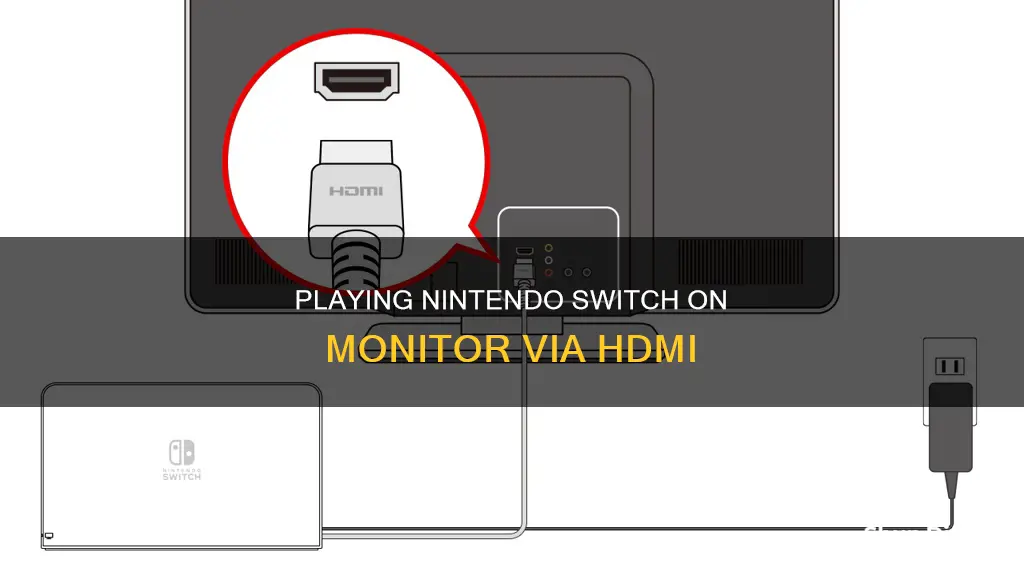
If you want to play your Nintendo Switch on a monitor, you're in luck! It is possible to connect your Nintendo Switch to a monitor, and it's a relatively simple process. Here's a step-by-step guide to help you get set up:
Firstly, make sure you have the necessary equipment: a Nintendo Switch dock, an AC power adapter, an HDMI cable, and, of course, your monitor. If you have an older monitor with a DVI port instead of HDMI, you will also need an HDMI-to-DVI adapter or cable.
Now, let's get started:
1. Connect the AC power adapter to the Nintendo Switch dock.
2. Plug one end of the HDMI cable into the dock, and the other end into the monitor.
3. Close the panel on the back of the dock.
4. Set the dock upright and slide your Nintendo Switch into it.
5. Turn on your monitor and switch it to HDMI mode.
6. Your Nintendo Switch should now be displayed on the monitor!
And that's it! You can now enjoy your favourite Nintendo Switch games on your monitor.
What You'll Learn

Connect the Nintendo Switch dock to a power supply
To connect your Nintendo Switch dock to a power supply, you will need a Nintendo Switch AC adapter (model no. HAC-002).
First, open the back cover of the Nintendo Switch dock. Then, connect the USB Type-C plug from the Nintendo Switch AC adapter into the top terminal of the dock, labelled "AC ADAPTER". After this, connect the other end of the AC adapter to a wall outlet.
Now, connect one end of an HDMI cable into the bottom terminal of the dock labelled "HDMI OUT". Ensure that the other end of the HDMI cable is connected to an HDMI port on your monitor.
Close the back cover of the Nintendo Switch dock.
Switching Monitors for Blizzard Games: A Quick Guide
You may want to see also

Connect the dock to the monitor with an HDMI cable
To connect your Nintendo Switch to a monitor, you will need a Nintendo Switch dock, a Nintendo Switch AC Adapter (model no. HAC-002), and an HDMI cable.
First, open the back cover of the Nintendo Switch dock. Then, connect the USB Type-C plug from the Nintendo Switch AC adapter into the top terminal of the dock labelled "AC ADAPTER", and connect the other end of the AC adapter to a wall outlet.
Next, connect one end of the HDMI cable into the bottom terminal of the dock labelled "HDMI OUT", and connect the other end into an HDMI port on your monitor. Ensure that the HDMI cable is not too tight or trapped behind the monitor, as this could damage the cable and cause a bad signal or image loss.
Once you have connected the HDMI cable, close the back cover of the Nintendo Switch dock.
Now, remove the left and right Joy-Con controllers from the console. Position the console so that the screen faces in the same direction as the front panel on the dock, then insert the console into the dock.
Finally, turn on the monitor and select the correct HDMI input. With the console still docked, turn it on and control it using one of the wireless controllers. You should now see the Nintendo Switch interface on your monitor.
Performing Freely: Unmonitored, Unrestrained, Unbound
You may want to see also

Connect the Switch to the dock
To connect your Nintendo Switch to a monitor, you will need a Nintendo Switch dock. The dock will allow you to hook up the console to a monitor, TV, or projector. Here is a step-by-step guide on how to connect your Nintendo Switch to the dock:
- Open the rear panel of your Nintendo Switch charging dock. The standard and OLED models have a rear panel that only reaches three-quarters of the way up, allowing you to slide your finger behind and pop it open.
- Connect the power adapter and HDMI cable to the dock. Plug the power adapter into the AC Adapter port and the HDMI cable into the HDMI port.
- Close the back of the dock. There is a hole in the back panel that the cables should pass through.
- Place your Nintendo Switch dock in a convenient location, preferably in line of sight of where you plan to sit and play. This will help ensure a strong connection between the dock and the console.
- Slide your Nintendo Switch into the dock. Be careful not to scratch the screen and ensure that the dock connector fits into the port on the bottom of the Switch. The Nintendo Switch logo should be facing the front side of the dock.
- Turn on your Nintendo Switch. If the Switch was off when you placed it into the dock, a battery icon should appear on the screen, indicating that the device is receiving power. Press the power button to turn it on.
- Check for a green light on the bottom left side of the dock. This indicates that the Nintendo Switch has been successfully connected to the dock and a signal is being sent through the HDMI cable.
Now that your Nintendo Switch is connected to the dock, you can follow the remaining steps to connect it to your monitor or TV.
Monitoring Energy Usage: A Guide to Understanding Your Consumption
You may want to see also

Turn on the Switch and monitor
Now that you have assembled all the required equipment and connected the Nintendo Switch to the monitor, it's time to turn on the devices.
First, turn on the monitor. Depending on your model, you may need to select the correct HDMI input. If you are using a computer monitor, you may need to turn on your PC and then the monitor. If the Nintendo Switch is not recognised, you may need to change the input on your computer. This can be done by locating the correct button on your monitor or tower, or by referring to the manual for your monitor.
Next, turn on the Nintendo Switch by pressing the power button on the console or a linked Joy-Con controller. If you are using a Nintendo Switch dock, you will need to insert the console into the dock before turning it on. Ensure that the console screen faces in the same direction as the front panel on the dock. When the console is docked, the screen will shut off, and the display will be transferred to the monitor.
If the image disappears from your Switch but does not appear on the monitor, you may have selected the wrong source. Check that you have selected the correct HDMI input on both the monitor and the Switch. You can do this by opening the "System Settings" menu on your Switch and navigating to the "TV Output" menu item. Adjust the display and resolution settings to match the specifications of your monitor. Most monitors support 1080p (Full HD).
Once you have turned on both devices and selected the correct input, you can start playing your Nintendo Switch games on the monitor.
Monitoring Bandwidth Usage: Strategies for Effective Network Management
You may want to see also

Adjust the display settings
Once you've connected your Nintendo Switch to your monitor, you might need to adjust the display settings to match the specifications of your monitor.
First, turn on both the Nintendo Switch and the monitor. Then, open your Nintendo Switch's "System Settings" menu and navigate to the "TV Output" menu item. Here, you can change the display and resolution settings to take advantage of the capabilities of your monitor. Most monitors have 1080p (Full HD) support. Confirm the settings when you're done.
Next, you might need to adjust the monitor's optional settings to maximise your gaming experience. Use the buttons on the monitor to navigate the on-screen display (OSD) menu and adjust parameters such as contrast, brightness, colour calibration, and gaming mode to suit your preferences.
Now that everything is configured, test the connection by opening any app or game on your Nintendo Switch and verify that it is displayed on the monitor. Play for a few minutes to test the audio output, visual quality, and performance.
If you want to configure the audio, consider using an external audio solution if the speakers on your monitor are not built-in or if you prefer higher audio quality. You can use the audio jack on your Nintendo Switch to connect external speakers or headphones, or use an audio cable or HDMI to connect your home theatre system or soundbar.
Studio Monitor Setup: Horizontal for Better Stereo Imaging
You may want to see also
Frequently asked questions
To connect your Nintendo Switch to a monitor using HDMI, you will need a Nintendo Switch dock, a Nintendo Switch AC adapter (model no. HAC-002), and an HDMI cable. First, open the back cover of the Nintendo Switch dock and connect the USB plug from the AC adapter into the top terminal of the dock labelled "AC ADAPTER". Then, connect the other end of the AC adapter to a wall outlet. Next, connect one end of the HDMI cable to the bottom terminal of the dock labelled "HDMI OUT" and connect the other end to an HDMI port on your monitor. Close the back cover of the dock, remove the Joy-Con controllers from the console, and insert the console into the dock. Finally, turn on the monitor and select the correct HDMI input.
No, it is possible to connect your Nintendo Switch directly to a monitor without a dock. You will need a USB-C to HDMI adapter and the necessary cables. Connect the USB-C power cable and HDMI cable to the adapter, and then plug the adapter into your Switch.
If your Nintendo Switch is not displaying on your monitor, try the following:
- Ensure that your monitor supports PD charging and DP alt mode.
- Confirm that your accessories and cables are compatible and support fast charging and audio/video signal transmission specifications.
- Check that your Nintendo Switch is turned on.


