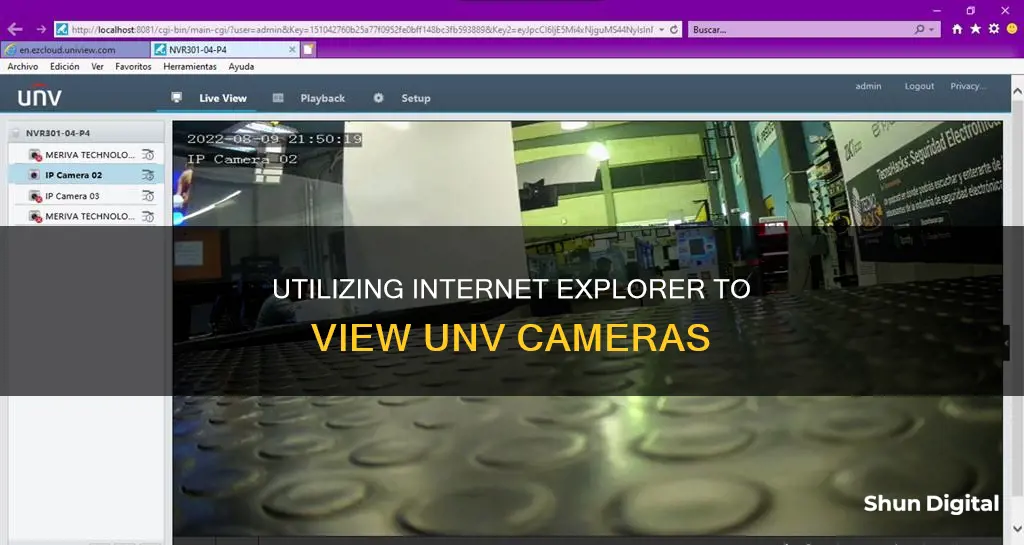
Uniview is a popular CCTV manufacturer that produces recorders and IP cameras. To view Uniview cameras on a web browser, you need to use a Windows computer/laptop and Internet Explorer. This is how you can set up Internet Explorer to allow ActiveX controls and view Uniview cameras:
First, enable your browser's compatibility mode. Then, add your camera's IP address to the list of websites to be opened. After that, install ActiveX and check that it has been enabled. Finally, add your URL as a trusted site.
| Characteristics | Values |
|---|---|
| Web browser | Internet Explorer |
| Computer/laptop OS | Windows |
| IP address format | http://xxx.xxx.xxx.xxx |
| Plugin | UwareWebPlayer |
| Plugin provider | Zhejiang Uniview Technologies Co., Ltd. |
| Minimum Internet Explorer version | 9.0 |
What You'll Learn

How to enable compatibility view
To view Uniview cameras on a web browser, you need to use a Windows computer/laptop and Internet Explorer. It won't work with other browsers like Mozilla or Chrome, or on Mac machines.
To enable compatibility view in Internet Explorer, you need to ensure that the website you are trying to access is compatible with the browser. Here are the steps to enable compatibility view:
- Open Internet Explorer and select the Tools button (or the gear icon).
- Choose "Compatibility View settings" from the menu.
- In the "Compatibility View settings" window, you can modify the settings to either enable or disable Compatibility View for specific websites.
- To add a website to the Compatibility View list, enter the URL of the site under "Add this website" and then select "Add".
- Click "Close" when you have finished making changes.
Note that not all website display problems are due to browser incompatibility. Interrupted internet connections, heavy traffic, or website issues can also affect how a page is displayed.
Now, here are the steps to view Uniview cameras in Internet Explorer:
- Access the recorder's web interface by typing the IP address in the address bar of Internet Explorer. It should look like this: "http://xxx.xxx.xxx.xxx" (for example, http://192.168.1.100).
- If the HTTP port has been changed from the default, add the port number after the IP address by inserting a colon, like this: http://192.168.100:82.
- Install all requested web plugins prompted by Internet Explorer. You can do this by selecting "Run".
- After installing the plugins, you may need to refresh or restart the web browser.
- Once the installation is complete, log in to your Uniview account.
- You should now be on the Live View page. Click the Play button at the bottom left-hand corner of the page to display all available cameras connected to the system.
LCD TVs: Cameras Included?
You may want to see also

Installing ActiveX
To view Uniview cameras on a web browser, you need to use a Windows computer or laptop and Internet Explorer. The first step is to access the recorder's web interface by typing in the IP address on the address bar of Internet Explorer. The path should look like this: "http://xxx.xxx.xxx.xxx" (e.g. http://192.168.1.100).
Once you have accessed the interface, you will need to install the requested web plugins. This will allow you to view the Uniview cameras. However, before you can install these plugins, you may need to adjust your security settings to enable ActiveX controls.
To enable ActiveX controls in Internet Explorer, first, open Internet Explorer and select the Tools button. Then, click on "Internet Options" and select the Security tab. Click on "Custom Level" and scroll down to "ActiveX controls and plugins". Here, you will need to enable the following options:
- Run ActiveX controls and plugins
- Script ActiveX controls marked safe for scripting
- Automatic prompting for ActiveX controls
- Binary and script behaviours
- Download signed ActiveX controls
- Download unsigned ActiveX controls
- Initialize and script ActiveX controls not marked safe
Once you have enabled these options, click "OK" to close the dialog boxes and then restart Internet Explorer. For Internet Explorer 9 and later versions, you must also disable ActiveX Filtering if it is turned on. To do this, click on the null icon in the address bar and select "Turn Off ActiveX Filtering".
After enabling ActiveX controls and disabling ActiveX Filtering, you can return to the Uniview camera setup. Install the requested web plugins by selecting "Run". Once installed, you may need to refresh or restart your web browser. After this, you will be able to log in and view the Uniview cameras.
Hooking Up Your RAM Camera: Seeing Behind the Trailer
You may want to see also

Using Microsoft Edge IE mode
Microsoft Edge IE mode allows users to access older cameras that require plugins, as well as newer cameras that offer added features through plugins. This is especially useful as Internet Explorer, which was required for these functions, has been discontinued by Microsoft as of June 15, 2022.
To enable Microsoft Edge IE mode, follow these steps:
- Open Microsoft Edge.
- Click the three dots at the top right of the window to access the menu.
- Click on "Settings".
- Click on the "Default browser" tab.
- Look for the "Allow sites to be reloaded in Internet Explorer mode (IE mode)" option.
- Click the dropdown menu and select "Allow".
- Close and reopen Edge, or click "Restart" if prompted.
Once IE mode is enabled, you can access it by clicking the three dots at the top right of the Edge window after accessing your camera's web interface. Select "Reload in Internet Explorer Mode".
You can then type in your camera's IP address. For example, if your camera's IP address is 192.168.1.109, type this into the address bar and press Enter. Then, click the three dots at the top right of Edge and select "Reload in Internet Explorer Mode".
It is important to note that Microsoft Edge IE mode is not available on Windows 8.1 or earlier. Additionally, make sure that your Microsoft Edge is updated to version 93.0.961.47 or later.
Integrating Alcidae Cameras with Alexa: A Step-by-Step Guide
You may want to see also

Accessing the camera interface
To access the camera interface of a Uniview (UNV) camera, you will need to use a Windows PC or laptop and the Internet Explorer browser. This method won't work on other browsers like Mozilla or Chrome, or on Mac machines.
Step 1: Access the Web Interface
Type the IP address of the camera into the address bar of Internet Explorer. The path should look something like this: "http://xxx.xxx.xxx.xxx". For example, http://192.168.1.100. If the HTTP port has been changed from the default, you will need to add a colon followed by the port number after the IP address. So, if you changed the HTTP port to 82, you would type: http://192.168.100:82.
Step 2: Install Web Plugins
Install any web plugins that are requested or prompted by Internet Explorer. You can do this by selecting "Run". Once installed, you may need to refresh or restart the web browser.
Step 3: Log In
After installing the necessary plugins, log in to the Uniview camera interface using your username and password.
Step 4: Access Live View
After logging in, you will be taken to the Live View page. Click the Play button at the bottom left-hand corner of the page to display all cameras available and connected to the system.
Split-Screen View
You can modify the number of cameras showing up on your UNV recorder by adjusting the split-screen view. This allows you to divide the cameras into different layouts, such as 2x2, 3x3, or 4x4.
Full-Screen View
To view a single camera in full-screen mode, simply double-click on the desired camera. To exit the single-camera view and return to the default screen, double-click again.
Accessing Home Camera Footage on Your Mobile Device
You may want to see also

Uniview's Auto Search function
Uniview is a popular CCTV manufacturer that produces recorders and IP cameras. To view Uniview cameras on a web browser, you need to use a Windows computer/laptop and Internet Explorer.
To use the Auto Search function, follow these steps:
- Login to your Uniview NVR using a computer by typing in the IP address of your Uniview NVR in your web browser and logging in. You can also use EZTools 2.0 to find the IP address of your NVR.
- Navigate to Setup -> Camera -> Camera and click the "Auto Search" button.
- You will see a list of cameras available on your network, along with important information such as the IP address, model number, and serial number of each device.
- Make a note of the un-added camera's IP address, as you will need it in the next step.
- Use the Modify function on an empty channel to add the IP camera. Click on an empty channel so the arrow is checked, and click Modify.
- Change the Add Mode from "Plug-and-Play" to "IP Address", and enter the IP address of your camera, followed by the password.
- If you are using a third-party camera, change the Protocol to "ONVIF". If you are using a Uniview camera, keep the Protocol set to "Uniview".
- Click Save to finish adding the camera.
By following these steps, you will be able to use Uniview's Auto Search function to quickly add and view cameras on your network.
Viewing Histograms: In-Camera LCD Screen Guide
You may want to see also
Frequently asked questions
To see a UNV camera in Internet Explorer, you need to access the camera's web interface by typing its IP address into the address bar. You will then need to install the requested web plugins. Once installed, you may need to refresh or restart the web browser.
If you can't find the IP address of your UNV camera, you can go to the Network Settings of the camera and locate the IP address on the interface. Alternatively, you can scan the network via your laptop using EZtools.
There could be a few reasons why you can't see your UNV camera in Internet Explorer. Firstly, check that you have enabled the compatibility view and installed ActiveX controls in Internet Explorer. Additionally, make sure that you have the correct IP address for the camera and that the camera is receiving power and is connected to the NVR.
Yes, you can use Microsoft Edge to access your UNV camera by enabling the Internet Explorer mode in the browser settings. However, some older models or firmware of Uniview products might not be compatible with non-IE browsers.


