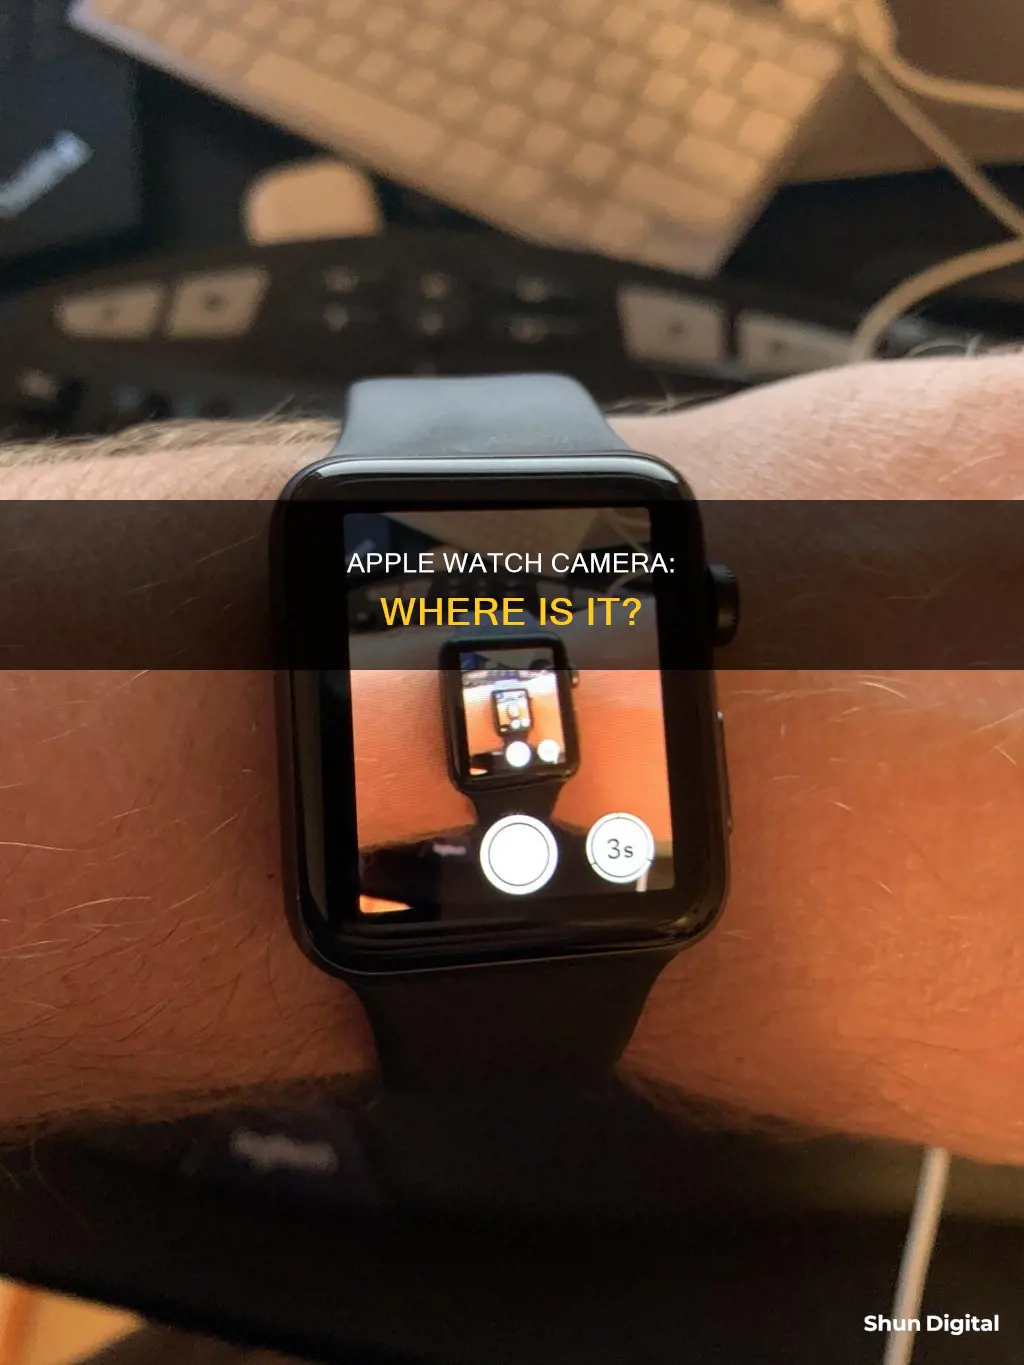
The Apple Watch does not have a built-in camera. However, it can be used as a remote for your iPhone camera with the Camera Remote app. This allows you to use your Apple Watch as a viewfinder for your iPhone camera and take photos and videos from a distance. You can control the flash, set a shutter timer, and review your shots directly on your Apple Watch. To use this feature, your Apple Watch needs to be within the normal Bluetooth range of your iPhone (about 33 feet or 10 meters).
What You'll Learn

Using the Camera Remote app on Apple Watch
The Apple Watch does not have a camera. However, you can use the Camera Remote app on your Apple Watch as a remote to take photos and videos with your iPhone camera.
To use the Camera Remote app, your Apple Watch must be within the normal Bluetooth range of your iPhone (about 33 feet or 10 meters).
Here's how to use the Camera Remote app on your Apple Watch:
Taking a Photo
- Open the Camera Remote app on your Apple Watch.
- Position your iPhone to frame the shot, using your Apple Watch as a viewfinder.
- Turn the Digital Crown to zoom in or out.
- Tap the key area of the shot in the preview image to adjust the exposure.
- Tap the Shutter button to take the photo.
- By default, the photo is taken with a 3-second timer. You can tap to turn off the timer or change other settings.
- The photo is saved in the Photos app on your iPhone, but you can review it on your Apple Watch.
Reviewing Your Photos on Apple Watch
- Open the Camera Remote app on your Apple Watch.
- Tap the thumbnail at the bottom left to view a photo.
- Swipe left or right to see more photos.
- To zoom, turn the Digital Crown.
- To pan a zoomed photo, drag the image.
- To fill the screen with the photo, double-tap the photo.
- To show or hide the Close button and the shot count, tap the screen.
- When you're finished, tap Close.
Recording a Video
- Open the Camera Remote app on your Apple Watch.
- Position your iPhone to frame the shot, using your Apple Watch as a viewfinder.
- Turn the Digital Crown to zoom in or out.
- Touch and hold the Shutter button to start recording.
- Release the Shutter button to stop recording.
Switching the Camera and Adjusting Settings
- Open the Camera Remote app on your Apple Watch.
- Tap the screen, then choose from the following options:
- 3-second timer (on or off)
- Camera (front or rear)
- Flash (auto, on, or off)
- Live Photo (auto, on, or off)
To see which iPhone models support Live Photos, refer to the iPhone User Guide.
Galaxy Watch: Camera Functionality Explored
You may want to see also

Adjusting the camera mode
The Apple Watch does not have a camera, but it can be used as a remote to take pictures and videos with your iPhone. The Camera Remote app on the Apple Watch allows you to adjust the camera mode and other settings on your iPhone camera.
To adjust the camera mode, follow these steps:
- Open the Camera Remote app on your Apple Watch.
- Tap firmly on the display.
- Swipe to choose your desired camera mode: Time-Lapse, Slo-Mo, Video, Portrait, or Square.
- Take your photo or video as you normally would, either through the Camera app on your Apple Watch or iPhone.
It's important to note that adjusting the camera mode can only be done through the Camera app on your iPhone. The Apple Watch allows you to view and select the available modes, but the actual adjustment is made on the iPhone itself.
Other Camera Settings
In addition to adjusting the camera mode, you can also control other settings such as the flash, shutter timer, Live Photo, and HDR using the Camera Remote app on your Apple Watch. Here's how you can adjust these settings:
- Open the Camera Remote app on your Apple Watch.
- Tap firmly on the display.
- Choose from the available options: Auto, On, or Off for the flash and HDR settings. For the shutter timer, you can enable or disable the 3-second timer.
- Tap "Done" in the top-right corner to save your changes.
By utilising the Camera Remote app, you can conveniently adjust the camera mode and various settings on your iPhone camera, allowing you to capture photos and videos from a distance using your Apple Watch as a remote control.
Plot Watcher Game Cameras: What You Need to Know
You may want to see also

Viewing photos on Apple Watch
The Apple Watch does not have a camera, but it can be used as a remote to take photos and videos with your iPhone. The Camera Remote app on the Apple Watch allows you to control the flash, set a shutter timer, and review your shots. To use this feature, your Apple Watch must be within the normal Bluetooth range of your iPhone (about 33 feet or 10 meters).
Here's a step-by-step guide on how to use the Camera Remote app on your Apple Watch:
- Open the Camera Remote app on your Apple Watch.
- Position your iPhone to frame the shot using the preview on your Apple Watch as a viewfinder. You can turn the Digital Crown to zoom in or out.
- Tap the key area of the shot in the preview to adjust the exposure.
- Tap the Shutter button to take the photo. By default, the photo is captured with a 3-second timer, but you can turn it off or adjust the timer settings.
- To take a Live Photo, press firmly on the Apple Watch display.
- The captured photo will be saved in the Photos app on your iPhone, but you can also review it on your Apple Watch.
Now, let's move on to viewing photos on the Apple Watch. The Photos app on the Apple Watch allows you to browse through your photo albums and view your pictures directly on your wrist. Here's how you can set up and use the Photos app:
- Create an album in the Photos app on your iPhone by tapping "Albums" and then the add icon (+) to create a new one. Name the album and select the photos you want to include.
- Open the Apple Watch app on your iPhone and go to "My Watch."
- Scroll down and select the Photos app from the list.
- Tap "Synced Album" and choose the album you want to sync to your Apple Watch. You can select the pre-existing Favorites album or any other album.
- Photos will automatically sync to your Apple Watch, and you can view them even when your iPhone is out of range.
- To view the synced photos on your Apple Watch, open the Photos app. The first screen will show a collage of all the pictures in your album.
- Rotate the Digital Crown to zoom in on the collage. Tap a picture to view it fullscreen.
- In fullscreen view, you can use the Digital Crown to zoom in further, drag your finger on the screen to pan, or double-tap to fill the screen with the photo.
- To view another photo, swipe left or right to navigate through your album.
- To remove a photo from your Apple Watch, open the Photos app on your iPhone and remove it from the synced album.
By following these steps, you can easily view your cherished moments directly on your Apple Watch and even use it to capture new memories with the help of the Camera Remote app.
A Simple Guide to Watching Yi Camera Footage in Real-Time
You may want to see also

Using Apple Watch as a viewfinder
The Camera Remote app on the Apple Watch allows you to use your Apple Watch as a viewfinder for your iPhone camera. You can then take photos and videos from a distance.
To use your Apple Watch as a viewfinder, follow these steps:
- Open the Camera Remote app on your Apple Watch.
- Position your iPhone to frame the shot using your Apple Watch as a viewfinder.
- To adjust exposure, tap the key area of the shot in the preview image.
- To take the shot, tap the Shutter button.
The photo will be saved in the Photos app on your iPhone, but you can review it on your Apple Watch.
School Bus Cameras: Monitoring Student Behavior?
You may want to see also

Troubleshooting camera preview issues
The Apple Watch does not have a camera. However, you can use the built-in Camera app or the Camera Remote app on your Apple Watch as a viewfinder for your iPhone camera. This allows you to take photos and videos from a distance, adjust the flash, set a shutter timer, and review your shots.
To use the Camera app on your Apple Watch as a remote, ensure that your Apple Watch is within the normal Bluetooth range of your iPhone (approximately 33 feet or 10 meters).
If you are experiencing issues with the camera preview on your Apple Watch, try the following troubleshooting steps:
- Force restart both your iPhone and Apple Watch: Press the Digital Crown and the side button simultaneously on your Apple Watch until you see the Apple logo. For your iPhone, refer to the official Apple Support page for instructions on how to force restart your specific iPhone model.
- Change the auto-lock settings on your iPhone: Go to Settings > Display & Brightness > Auto-Lock, and adjust the timing from 30 seconds to 1 minute. Then, switch it back to 30 seconds if desired.
- Check the "Mirror My iPhone" setting: Open the Watch app on your iPhone, go to Photos, and ensure that "Mirror My iPhone" is enabled under Notification Settings.
- Reinstall the Camera app: Try deleting the Camera app on your Apple Watch and then reinstall it.
- Update your devices: Ensure that both your iPhone and Apple Watch are updated to the latest software versions.
- Contact Apple Support: If none of the above steps resolve the issue, reach out to Apple Support for further assistance. They may provide additional troubleshooting steps or confirm if there is a known issue with the camera preview function.
View Reolink Cameras on Desktop: A Step-by-Step Guide
You may want to see also
Frequently asked questions
No, the Apple Watch does not have a built-in camera. However, you can use the Camera Remote app to take photos and videos from a distance by connecting to your iPhone's camera.
First, make sure your Apple Watch is unlocked and connected to your iPhone via Bluetooth. Then, open the Camera Remote app on your Apple Watch and use the watch screen as a viewfinder to position and frame your iPhone. Tap the shutter button on your Apple Watch to take a photo or press and hold to record a video.
You cannot switch camera modes directly from the Apple Watch. To change modes, adjust the settings on your iPhone, and the change will be reflected on your watch.
Open the Camera app on your Apple Watch and tap the photo preview thumbnail in the bottom left corner to view your recently captured photos and videos.
No, you cannot edit or delete photos directly from the Apple Watch. To make these changes, you will need to use your connected iPhone.


