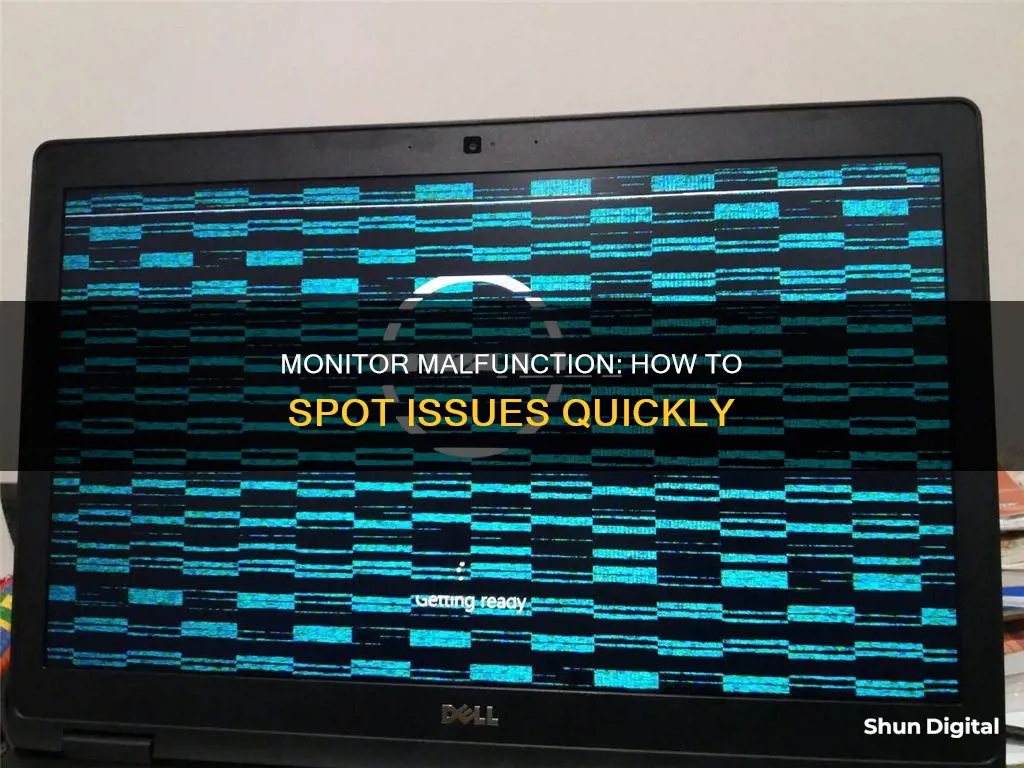
If you're experiencing issues with your monitor, there are several troubleshooting steps you can take to identify and resolve the problem. Common issues include a blank or black screen, colour fade, fuzzy or blurry image, geometric distortion, light leakage, flickering, horizontal or vertical lines, and dead or stuck pixels. First, ensure that your monitor is turned on and that your computer is not asleep. Check all connections, including power and data cables, and try rebooting your computer. If the problem persists, you may need to adjust display settings, update drivers, or test your monitor with different hardware.
What You'll Learn

Check power and cable connections
If you're experiencing issues with your monitor, it's important to check your power and cable connections. This is often the first step when a computer isn't receiving power or is experiencing display issues.
First, check that your monitor is turned on. Some monitors have more than one power button or switch, so make sure they're all switched on.
Next, verify that the power cable is securely connected to the monitor and the power source. The power cable often connects to the rear of the monitor and should fit firmly into the port. Check that the power source, such as a surge protector or power strip, is securely plugged into the wall outlet.
Additionally, inspect the cable connections between the monitor and the computer. Ensure that the video or data cable is securely connected at both ends. Common types of data cables include HDMI, VGA, and DisplayPort. Check that the cable is not loose or damaged, and make sure it is compatible with the ports on your monitor and computer.
If your monitor has integrated speakers, there may be an additional cable for sound. Also, check for any cable adapters, such as connectors that join an HDMI or DVI cable to a VGA plug, and ensure they are fully secured.
If you're still experiencing issues, try testing the monitor with a different power or data cable to determine if the issue lies with the cable itself.
Florida's Water Watchdogs: Who's Minding the Sunshine State's Usage?
You may want to see also

Test on another device
If you're experiencing issues with your monitor, it's a good idea to test it on another device. This will help you determine whether the problem lies with the monitor itself or with the device it's connected to.
To test your monitor on another device, start by disconnecting it from your current computer and connecting it to another properly functioning computer. Ensure that you use the same connection and power cables that you were using with the original computer. Once connected, turn on the test computer and see if the monitor displays what it's supposed to. If the monitor turns on and displays correctly, then the issue is likely with your original device, not the monitor.
If the monitor doesn't turn on within a few seconds, try the following steps:
- Reboot the test computer to eliminate any variables other than the monitor itself.
- If that doesn't work, try using the working monitor's connection and power cables.
- If the monitor still doesn't turn on, it is most likely faulty.
It's important to note that this test may not work for laptops. If you're using a laptop, try connecting your monitor to a different port on the laptop, or, if the laptop has a secondary video card, connect the monitor to that and remove the primary video card. If the monitor works with one of these methods, it's not blown.
Additionally, if you're experiencing issues with your LCD monitor, such as stuttering or flickering, dead or stuck pixels, cracks, spots, or blotches, or incorrect resolution, testing it on another device can help narrow down the issue. If the problem persists on another device, it's likely an issue with the LCD panel and you may need to replace it.
Monitoring Toilet Usage: Smart Solutions for Efficient Management
You may want to see also

Check for physical damage
To check for physical damage to your monitor, look for any cracks, scratches, or other signs of impact on the screen. If you use a notebook LCD screen, be on the lookout for lines, blotches, bleeding, cracks, moisture, or colour distortion. These issues can also be signs of physical damage.
If you suspect that your monitor may have internal damage, there are a few things you can try. One suggestion is to do some colour test patterns to check for any dead pixels or backlight inconsistencies. This can help you determine if there is any internal damage affecting the screen's performance.
Additionally, if your monitor has been physically impacted, such as by a falling object, it is important to check for damage to the display cables. Performance issues and LCD screen problems can be caused by faulty display cables. These issues may include symptoms such as the screen not working, working intermittently, colour mismatch, flickering, or displaying horizontal or vertical lines.
If you find any signs of physical damage, it is recommended to seek professional assistance or refer to the manufacturer's support services for further guidance and repair options.
Troubleshooting a Monitor: How to Know It's Broken
You may want to see also

Verify display or video issue in Windows Safe Mode
If you are experiencing display or video issues, it is important to verify if the problem is with the monitor, video card (GPU), or video settings on your PC. To do this, connect your PC to an external monitor or TV and ensure that the display cables are securely connected to both the PC and the monitor. If the issue persists on the other monitor, it may be due to the video card or video settings. In this case, you can proceed to verify the issue in Windows Safe Mode.
Safe Mode is a diagnostic feature in Windows that starts Windows with a minimal set of drivers and services, allowing you to identify if the issue is related to the operating system, video settings, device drivers, or third-party software. To boot your PC into Safe Mode, follow these steps:
- Press the Windows key + I on your keyboard to open the Settings. Alternatively, click Start and then select Settings.
- Click on Update & Security, and then select Recovery from the left pane.
- Under Advanced Startup, click on Restart Now.
- After your computer restarts, select Troubleshoot > Advanced Options > Startup Settings > Restart.
- When the computer restarts again, select 4 or F4 to start the computer in Safe Mode. If you need internet access, select 5 or F5 for Safe Mode with Networking.
Once your PC is in Safe Mode, you can observe whether the display or video issue persists. If the issue remains, it is likely related to the operating system, video settings, device drivers, or third-party software. If the issue goes away in Safe Mode, it may be caused by a specific driver, service, or plugin that loads automatically during normal startup.
To further troubleshoot, you can open the System Configuration tool and select the Boot tab. From here, you can enable additional Safe Mode options such as Minimal, Alternate Shell, Active Directory Repair, or Network to narrow down the source of the problem.
Motherboard Monitor Connection: How to Check?
You may want to see also

Update the video card driver
Updating your video card driver can help resolve common video issues and improve the stability of your system. Here is a step-by-step guide on how to do it:
Find Your Graphics Card's Name:
- Click the Windows logo in the bottom-left corner of your screen.
- Type "dxdiag" and click the purple-and-yellow "dxdiag" icon at the top.
- Click "Yes" when prompted. This will open a new window with information about your graphics card.
- Click the "Display" tab at the top of the window to see your graphics card's name.
Open Device Manager:
- Click the Windows logo again.
- Type and select "Device Manager" at the top of the Start window.
Expand "Display Adapters":
In the Device Manager, click the arrow icon to the left of "Display adapters" to expand the list.
Select Your Graphics Card:
Under "Display adapters", click the heading that matches your graphics card's name.
Click the "Update" Button:
At the top of the Device Manager window, click the "Update" button (a black box with an upward-facing green arrow).
Search Automatically for Updated Driver Software:
In the pop-up window, click "Search automatically for updated driver software." Your computer will now search for and install any available updates for your graphics card.
Confirm the Update:
After the update is installed, you can confirm the new driver version by right-clicking on your desktop background, selecting "Display settings," then "Display adapter properties," and finally the "Driver" tab, where you can see the driver date.
Additionally, you can check your PC or laptop manufacturer's website for the latest video card driver updates and follow their provided steps to install them. It is recommended to restart your computer after installing any updated drivers.
LED vs LCD: Which Monitor is Superior?
You may want to see also
Frequently asked questions
If your monitor is faulty, it may display a black screen or nothing at all. First, check that your monitor is on and that your computer is not asleep. Next, check your connections, including the power cable and data cable. If your monitor still doesn't work, try rebooting your computer.
Some common issues with LCD monitors include stuttering or flickering, dead or stuck pixels, cracks, spots, and blotches, and incorrect resolution.
If your monitor is flickering, first check your video and power cables to ensure they are not loose or faulty. Next, check your refresh rate settings and update your video drivers if necessary. If the problem persists, it is likely due to a power deficiency or a loose or malfunctioning component in the screen assembly.
If your monitor is displaying a black screen, first check that it is turned on and that your computer is not asleep. Next, check your power and data cable connections. If you still cannot turn on the monitor, try replacing the power cable with another one. If none of these steps work, your monitor is likely broken and should be replaced.


