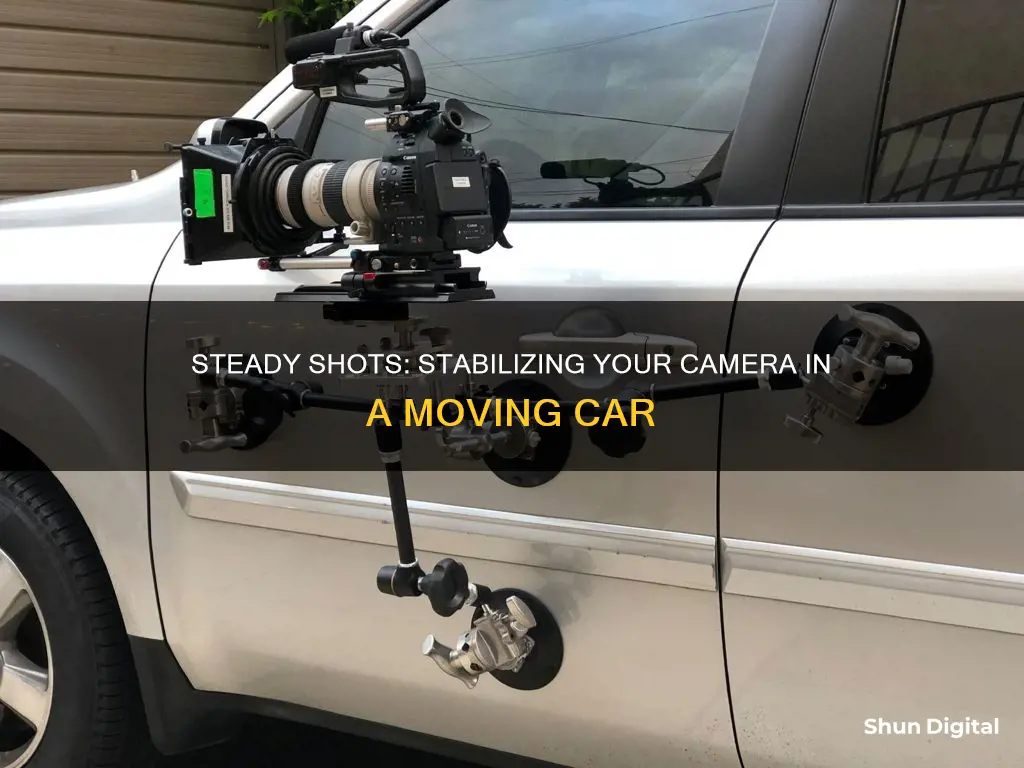
Stabilizing a camera in a car is essential for capturing smooth and stable shots while driving. Shaky and jerky footage can be frustrating and detract from the overall quality of your video or photo. While it is challenging to achieve perfect stabilization in a moving vehicle, several techniques and equipment can help minimize vibrations and unwanted movements. This includes using camera stabilizers, such as handheld stabilizers, gimbal stabilizers, or vest stabilizer systems, as well as setting up a sturdy tripod or using suction cups to fix the camera to the car. Let's dive into the world of camera stabilization and explore the options available to capture stunning visuals on the go.
| Characteristics | Values |
|---|---|
| Camera Stabilization Method | Gyro-stabilizing camera mounts, 3-axis gimbals, handheld stabilizers, vest stabilizer systems, suction cups, tripods, pipe insulators, anti-vibration tripod pads, gimbal heads, dash cams, motorized gimbals, steady cams, bungee cords, camera/lens with optical image stabilization, phone camera stabilizers, DSLR rigs, spider stabilizers |
| Camera Type | DSLR, mirrorless, smartphone |
| Camera Weight | Heavier cameras may require a more stable platform |
| Camera Accessories | Extra lights, mics |
| Camera Mount Type | Handheld, attached to a dolly or automobile |
| Camera Movement | Static, dynamic |
| Camera Angle | Straight ahead, sideways |
What You'll Learn

Use a gimbal or a Steadicam
Using a gimbal or a Steadicam is a great way to stabilize your camera in a car. These tools can help eliminate shake from your camera shots, giving you smooth and steady footage. Here's how you can use them effectively:
Choosing the Right Stabilizer
Gimbals and Steadicams are both effective tools for stabilizing your camera, but they have some key differences. A gimbal is an electronic solution that uses motors to detect and negate camera shake. It is relatively cheaper, easier to set up, and suitable for smaller and lighter cameras. On the other hand, a Steadicam is a mechanical solution that relies on inertia to stabilize the camera. It is more expensive, takes longer to set up, and is often used for heavier camera setups. Consider your camera weight, budget, and the length of your shots when choosing between a gimbal and a Steadicam.
Setting Up Your Gimbal
If you choose to use a gimbal, ensure that it is properly balanced and calibrated for your camera. Practice moving with the gimbal to get a feel for its movement and learn how to make smooth adjustments. Keep in mind that you may need to bend your knees and adopt a shuffling walk to minimize up-and-down movement when walking with the gimbal.
Operating a Steadicam
Steadicams typically involve an operator wearing a vest to distribute the weight of the camera setup across their shoulders and hips. The camera is attached to an Iso-elastic arm, which isolates the operator's movements from the camera. Steadicams can be more physically demanding, so ensure that your operator is comfortable and well-practiced with the equipment.
Additional Tips
- Use a wide-angle lens: A wider lens will help minimize the appearance of shakes and vibrations in your footage.
- Minimize reflections: Filming through a windshield can cause reflections, especially in low-light conditions. Consider using a piece of black cloth around the camera, taped to the windshield, to reduce reflections.
- Experiment with different car positions: Try placing the camera on the back seat or in the rear hatch of the car to find the most stable position.
Dayton, OH: Are Camera Tickets Still Issued?
You may want to see also

Try a camera with optical image stabilization
If you're looking to stabilize a camera in a car, one option is to use a camera with optical image stabilization (OIS). This is a technology used in cameras and smartphones to reduce blurring caused by camera shake and other types of motion blur. OIS is particularly useful when shooting without a tripod, with a long lens, or in low-light conditions.
OIS uses sensors and microprocessors to detect and correct camera movement, resulting in sharper, more stable images. It works by detecting the movement of the camera or lens and then moving the optical elements in the opposite direction to compensate for the movement. This can be done through a gyroscope or miniature motor components.
OIS is generally considered the most effective type of image stabilization on the market. It allows you to take sharper images when shooting by hand and can prolong the shutter speed possible for handheld photography. It also helps the autofocus function more accurately and provides a more stable image in the optical viewfinder.
When choosing a camera with OIS, keep in mind that different camera and lens companies use different names for the technology. For example, Nikon calls it Vibration Reduction (VR), Canon calls it Image Stabilizer (IS), and Sigma calls it Optical Stabilization (OS).
It's also important to note that OIS is not as effective when using a tripod, as it is designed for times when camera shake is present. In addition, OIS cannot compensate for image blur caused by the subject moving or if the camera is being bumped around or violently shaken.
Overall, if you're looking to stabilize a camera in a car, a camera with optical image stabilization can be a great option to consider. It will help you capture sharper and more stable images, especially when shooting handheld or in low-light conditions.
Mastering the Mavic Pro Camera: Focus Techniques
You may want to see also

Use a tripod on the passenger seat
Using a tripod on the passenger seat is a great way to get stable footage from your car. Here are some tips to get the best results:
Firstly, position the tripod so that two legs point forward and the third points towards the rear of the seat. This provides a stable base for your camera. You can use a bungee cord to secure the tripod to the seat. Stretch the cord across the two tripod struts forward of the centre mast and hook the ends onto any available part of the seat's undercarriage. Avoid hooking onto anything that could cause the seat to move.
Use a compact camera to avoid the setup becoming top-heavy. If your vehicle has bucket seats, the tripod will tilt rearward. You can square the shot using the tripod head instead of extending the rear leg.
Power your camera with a car battery adapter to avoid the issue of a dying camera battery interrupting your shooting.
Make sure your windows are clean, as dirt and smudges can show up in your footage. Remove any objects from the floor and dash in front of the passenger seat to avoid unwanted reflections.
If you're shooting through the windshield, you may want to use your zoom to eliminate the tinted band of glass at the top. You can also get rid of the radio antenna, windshield wipers, and portions of the hood that may be in the frame.
Keep the windows nearest the camera closed while driving to prevent debris from hitting the lens.
When shooting through the windshield, consider the camera angle you want. For a clean shot without car parts showing, you can line up just left of the radio antenna to just right of the rearview mirror. If you want to maximise the view of the sidewalk on the right, use the end of the windshield as the right edge of your frame.
If you want to include the driver in your shot, try shooting through the passenger-side window. Be careful when shooting at a 90-degree angle from the direction of travel, as this can result in a blurry image.
With these tips, you'll be well on your way to capturing stable and compelling footage from your car!
Focusing Camera on Yourself: Tips for Perfect Self-Portraits
You may want to see also

Use a suction cup to fix the camera to the windshield
Using a suction cup to fix your camera to the windshield is a great way to stabilise your camera in a car. Here are some detailed steps and tips to help you achieve optimal results:
Cleaning the Surface:
Start by cleaning the area of the windshield where you plan to attach the suction cup. Use a mild cleaning solution, such as rubbing alcohol, and a microfiber cloth to remove any dirt, grease, or debris. Ensure that the surface is completely dry before moving on. This step is crucial for achieving maximum adhesion.
Inspecting the Suction Cup:
Before attaching the suction cup, inspect it for any signs of damage, including cracks, tears, or wear and tear. If the suction cup shows any defects, it is recommended to replace it with a new one to ensure optimal performance and a strong seal.
Using a Stronger Suction Cup Mount:
Consider investing in a stronger and more reliable suction cup mount. Look for a mount with a larger diameter, as it will provide a greater surface area of contact with the windshield, resulting in a stronger hold. Additionally, opt for a mount with an adjustable arm or ball joint mechanism, allowing you to position your camera at the optimal angle for recording.
Applying Heat:
Enhance the adhesion of your suction cup by applying heat to it. Use a hairdryer or heat gun to warm up the suction cup for about 30-60 seconds, maintaining a safe distance to avoid melting. Then, firmly press the heated suction cup against the desired area of the windshield for about 30 seconds to create a strong bond. Finally, release any excess air by activating the suction mechanism, further improving the suction power.
Alternative Techniques:
If you're looking for alternative methods, you can try wetting the suction cup with water before attaching it to the windshield. Another approach is to wash the suction cup with soap and water and then use a small amount of soapy water to stick it to the surface.
Transferring Camera Photos: What Cables to Connect to Your Computer
You may want to see also

Use a pipe insulator as a mount
Using a pipe insulator is a great way to stabilise your camera in a car. Pipe insulators are long pipes made of soft foam, which can be easily cut along the "long side". This cut then allows the pipe to be connected to the car's window—a perfect, stabilised mount for your camera.
To use a pipe insulator as a mount, place the insulator on the window's edge. You can then rest your camera lens comfortably on the insulator. Elevating the window will help you get a better angle. This method is particularly useful when you want to photograph something outside the car, but don't want to get out of the car to set up a tripod.
Using a pipe insulator is a simple, yet effective way to stabilise your camera setup and can be a fun DIY project.
Camera Night Vision: Blurry Focus, Here's Why
You may want to see also
Frequently asked questions
You can use a suction cup to fix the camera to the windshield or the window. Alternatively, you can use a pipe insulator as a mount by placing it on the window's edge and resting the camera lens on it.
Set up a sturdy tripod on the passenger seat. Position the tripod so that two legs point forward and the third points toward the rear of the seat. Use a bungee cord to stabilize the tripod and prevent it from rocking with changes in speed or direction.
In addition to using a tripod or other camera mount, you can utilize image stabilization software in post-processing to reduce shakes and tremors in the video. Some examples of software include ffmpeg's "vidstabdetect / vidstabtransform" filter, and the "deshake" and "deshake_cl" algorithms.
Yes, there are various types of camera stabilizers available, including handheld stabilizers, 3-axis gimbals, and vest stabilizer systems. Handheld stabilizers are devices that add steadiness to a camera and are typically used in conjunction with a 3-axis gimbal or a vest system. 3-axis gimbals help stabilize shots during filming by smoothing out shakiness, especially when filming on uneven surfaces or with an unsteady hand. Vest stabilizer systems, often referred to as Steadicams, are commonly used with large, high-end film production cameras. They consist of a vest, an arm, and a sled that work together to stabilize the camera even when the camera operator is in motion.
In addition to stabilizing your camera, there are a few other considerations to keep in mind. First, make sure your window is clean to avoid dirt and debris from appearing in your footage. Remove any objects from the floor and dashboard in front of the passenger seat to avoid unwanted reflections. Power your camera with a car battery adapter to ensure you don't run out of power during long trips. Finally, familiarize yourself with your camera controls so that you can operate them with one hand without looking, as your primary focus should be on driving safely.


