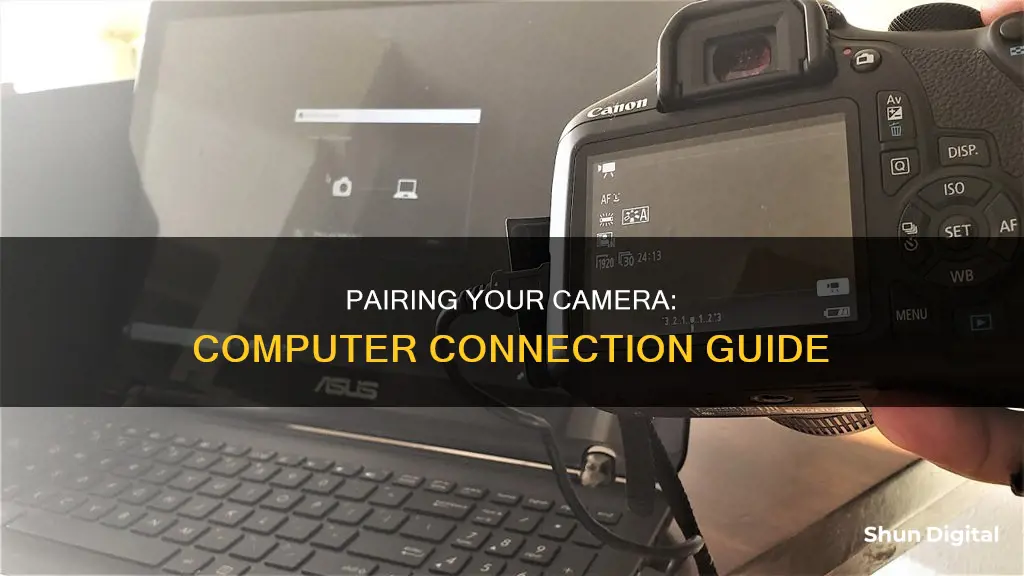
Pairing your camera to your computer is a straightforward process that can be done in several ways. The most common method is to use a USB cable, connecting one end to your camera and the other to your computer. This will allow you to transfer photos and videos from your camera to your computer. Before connecting, ensure your camera is turned on and set to the correct mode, such as Play mode, so that your computer can recognize it. Additionally, you may need to install specific software to access your camera's features and functions, such as transferring photos or editing videos.
| Characteristics | Values |
|---|---|
| Connection type | USB cable, wireless Wi-Fi, wired LAN, HDMI cable |
| Camera power | On |
| Computer power | On |
| Camera mode | Play mode or PC mode |
| USB cable connection | Small end of the cable into the camera, large end into the computer |
| Camera drivers | Install if it's the first time connecting your camera |
| Camera name | Should appear under "Devices and Drives" on your computer |
| Camera storage folder | Usually "DCIM" |
| Photo transfer | Copy photos to a file on your computer |
What You'll Learn
![]()
Connect camera and computer with a cable
To connect your camera to your computer with a cable, you will need to check that you have the correct type of cable and that your camera and computer have the correct ports. Most digital cameras have a USB port, but some may also have an HDMI or mini-HDMI port.
Once you have the right cable, follow these steps:
- Ensure your computer is on.
- Turn on your camera. This will often be done with a dial near the top of the camera, but the process may vary depending on the model.
- Plug the small end of the camera's cable into the camera. The port may be hidden under a plastic flap, which may say something like "Video Out".
- Plug the other end of the USB cable into your computer. The USB end is rectangular and should fit into a port on the side of your computer or CPU for desktop units. Ensure that the hollow side of the USB is on top.
- Wait for your camera's drivers to install. If this is your first time connecting your camera, this may take a few minutes.
- A pop-up window may appear, asking what you want to do with the device. You can choose to import photos, open a folder, or launch software.
Now that your camera is connected, you can transfer photos, edit videos, or use your camera as a webcam.
Blocking Infrared on Surveillance Cameras: A Step-by-Step Guide
You may want to see also
![]()
Check camera and computer ports
When pairing your camera to your computer, it is important to check that the ports on both devices are compatible.
Camera Ports
Most camera models have a port shaped like the small end of a USB cable. This is usually hidden under a plastic flap with "Video Out" written on it. The USB cable will slide into the camera's port with ease, so be careful not to use too much force when plugging it in.
Computer Ports
The other end of the USB cable should be rectangular and will fit into a port on the side of your computer (or CPU for desktop units). The hollow side of the USB end should be facing up.
Online Port Checkers
If you are pairing a security camera or CCTV system, you can use online port checkers to confirm that your ports are open and correctly forwarded. You will need to know the IP address of the device that will be forwarded and the port numbers.
Changing the Port Number
In some cases, you may need to change the port number. For example, if your ISP blocks port 80, the default HTTP port. After changing the port number, you will need to reboot the camera to save the changes.
Focusing a Studio Camera: The Ultimate Guide
You may want to see also
![]()
Use software to access your camera
Pairing your camera to your computer can be done in several ways, depending on your camera model and computer type. Here is a step-by-step guide on how to pair your camera to your computer using software:
Step 1: Check Your Camera's Connection Options
Before you begin, it's important to determine how your camera can connect to your computer. Most cameras offer a USB connection, while some newer models may also support wireless connections like Wi-Fi or wired LAN. Check your camera's user manual or the manufacturer's website for detailed information on its connection options.
Step 2: Gather the Necessary Components
To establish a connection between your camera and your computer, you will need the appropriate cables or adapters. For a USB connection, use the USB cable that came with your camera or purchase a compatible one from an electronics store. If you're connecting via Wi-Fi, ensure your camera and computer are connected to the same network.
Step 3: Connect Your Camera to the Computer
If you're using a USB connection, simply plug the small end of the USB cable into your camera and the other end into an available USB port on your computer. For a wireless connection, follow the specific instructions provided by your camera manufacturer to connect your camera to the same Wi-Fi network as your computer.
Step 4: Install Necessary Software
Once your camera is connected, your computer should automatically detect and install the necessary drivers. If it doesn't, you may need to install the software manually. Check if your camera came with an installation CD, or visit the manufacturer's website to download the required software.
Step 5: Access Your Camera on the Computer
After successfully connecting and installing any necessary software, you can now access your camera on your computer. On Windows, open the Camera app or go to "My Computer" and locate your camera under "Devices and Drives." Double-click on your camera's name to access its storage and view or transfer your photos and videos.
Step 6: Adjust Camera Settings (Optional)
Depending on your needs, you can adjust various camera settings on your computer. This includes changing the photo aspect ratio, video quality, turning location services on or off, showing or hiding grid lines, and more. These settings can usually be found within the Camera app or through your computer's settings menu.
By following these steps, you should be able to successfully pair your camera to your computer using software and take advantage of features like remote shooting, photo transfer, and more. Remember to refer to your camera's user manual or the manufacturer's website for specific instructions pertaining to your camera model.
Charging Your PowerShot S110: A Step-by-Step Guide
You may want to see also
![]()
Turn on your camera
Turning on your camera is the first step to pairing it with your computer. This is a simple step, but it may vary depending on your camera model. Most cameras can be turned on by using a dial located near the top of the device. Once your camera is on, you can proceed to pair it with your computer using a USB cable, a Wi-Fi connection, or a wired LAN connection.
If you are connecting your camera to your computer for the first time, you will need to attach the camera's USB cable to both your camera and your computer while both devices are on. The small end of the cable connects to the camera, while the rectangular USB end connects to the computer. Once connected, your camera's drivers will install, and you will be able to access your camera's storage folder and review your photos.
If you are connecting via Wi-Fi or wired LAN, you will need to follow specific instructions for your camera model, which may involve selecting certain settings on your camera and computer.
Powering Your FPV Camera: 1S from 2S
You may want to see also
![]()
Troubleshooting common issues
- If you're having trouble connecting your camera to your computer, check that you are using the correct USB cable. Your camera manufacturer should have included the right cable in the box. If not, you may need to purchase one with the correct size USB connector.
- Next, locate the USB slot on your camera. Camera manufacturers sometimes hide this behind a panel or door, so check your camera's user guide if you're unsure.
- When connecting the USB cable to your camera, be gentle. The connector should slide in fairly easily. Ensure that the connector is the right way around and that the panel or door is completely out of the way.
- Check that the USB cable is inserted into the USB slot and not the HDMI slot, which may be located behind the same panel.
- Once you've connected the cable to your camera, connect the other end to your computer.
- If your camera has a "photo playback" button, you may need to press this.
- If your camera isn't working in Windows, it might be missing drivers after a recent update. Try running the automated camera troubleshooter in the Get Help app, which will run diagnostics and attempt to fix any issues.
- If your camera still isn't working, check for updates and restart your PC.
- Test your camera with the Camera app. If this works, the problem may be with the app you are trying to use.
- Some laptops and portable devices have a physical switch or button that turns the camera on or off. Ensure that this is in the "on" position.
- If you recently updated Windows, you might need to give apps permission to use the camera. Go to "Settings" > "Privacy & Security" > "Camera" and allow access.
- Check your antivirus software for any settings that might be blocking access to your camera.
- If you're using an external camera, try using it with a different USB port on your device.
- In "Device Manager", find your camera under "Cameras", "Imaging devices", or "Sound, video and game controllers". If you can't find your camera, select "Scan for hardware changes".
- If the above steps don't fix the issue, try rolling back or uninstalling your camera driver and scanning for hardware changes.
- If you're still having issues, switch to the UVC driver, which is included in Windows.
- If your camera is not getting detected, try connecting it to another device to confirm it is not a hardware problem.
- If your camera is working but you can't access it from a specific application, revise the privacy settings. On Windows 10, the system can automatically limit apps access to the camera to protect your privacy.
- If the camera stops working after installing a new version of Windows, there may be a compatibility issue with the camera driver. Update the driver to fix the problem.
- If the problem appeared after installing a system update, try removing the update.
- If the camera stopped responding after installing the latest version of Windows, try rolling back to the previous version.
- If the camera was working before a recent driver update, restore the previous version to resolve the problem.
- When the camera stops working due to a damaged driver or problem with the configuration, you can use "Device Manager" to reinstall the peripheral.
- Some antivirus and other third-party security software have privacy settings that can prevent apps from accessing the webcam. Check your antivirus software and adjust the settings if necessary.
Best Long-Lasting Camera Batteries: Power Your Photography
You may want to see also