Batch editing in Adobe Photoshop is a way to apply the same action or effect to multiple photos at once. This is especially useful when you have multiple images shot under similar lighting conditions or at the same time of day.
To batch copy adjustments in Camera Raw, first, select the image files you want to edit. The Camera Raw editor will automatically open when using raw images. Edit your first photo in the sequence, as this will apply to the rest of the photos. Once you are satisfied with the edit, scroll to the last photo in the sequence and Shift-Click to select all the photos. Then, either right-click or use the shortcut Option-S to bring up the synchronise dialogue box. This will allow you to copy and paste all of your adjustments from the first photo. Hit OK, and the same settings will be applied to all the photos in the sequence.
| Characteristics | Values |
|---|---|
| Software | Adobe Photoshop, Adobe Bridge, Camera Raw |
| File format | Camera Raw, JPEG, TIFF, DNG |
| Keyboard shortcuts | Ctrl + A (select all), Shift-Ctrl+C (copy), Shift-Ctrl+V (paste), Ctrl+R (open in Camera Raw) |
| Mouse shortcuts | Right-click (copy), Right-click (paste) |
What You'll Learn
![]()
Using the Filmstrip view in Camera Raw
The Filmstrip view in Camera Raw is a useful feature that allows you to scroll through multiple images quickly and apply adjustments to a group of images simultaneously. This feature is particularly handy when you want to perform similar edits on a batch of photos.
To access the Filmstrip view, you need to open multiple RAW images together in Photoshop. You can do this by selecting multiple RAW files and using the Open command in Photoshop or by opening multiple images from Adobe Bridge into Camera Raw. Once you have multiple images open, you will see the Filmstrip on the left side of the Camera Raw window.
If the Filmstrip is collapsed, you can expand it by dragging the divider between the Filmstrip and the main workspace to the right. Conversely, if you want to hide the Filmstrip when working on a single image, you can collapse it by dragging the divider to the left or double-clicking on the bar between the Filmstrip and the preview window.
With the Filmstrip view, you can easily navigate between images and apply adjustments to multiple images at once. To apply adjustments to a group of images, simply highlight the thumbnails of the desired images in the Filmstrip and make your adjustments. These adjustments will be applied to all the selected images.
The Filmstrip view in Camera Raw is a powerful tool for batch editing photos, saving you time and effort in your photo editing workflow.
Charging Your Panasonic Lumix DMC-FZ70 Camera Battery: A Guide
You may want to see also
![]()
Copy and paste adjustments
Copying and pasting adjustments in Camera Raw is a great way to edit multiple photos at once. Here is a step-by-step guide on how to do it:
Step 1: Open the Raw Images
First, open the raw images you want to edit in Photoshop. When you click "Open" in your file window, the Camera Raw window will automatically open.
Step 2: Edit an Image
Edit one image as you would like to copy and paste to the other images. Once you are satisfied, make sure the photo is selected. If you have multiple photos open, the selected photo will have a white border around its thumbnail.
Step 3: Copy the Edit Settings
Now, right-click or Command + click the selected image thumbnail and choose "Copy Edit Settings." Alternatively, you can use the keyboard shortcut Control + C (Win) or Command + C (Mac).
Step 4: Paste the Edit Settings
Right-click or Command + click another image thumbnail and choose "Paste Edit Settings." You can also use the keyboard shortcut Control + V (Win) or Command + V (Mac). The selected image and its thumbnail will now change to match the settings of the first image.
To select and edit multiple images at once, hold Control (Win) or Command (Mac) while clicking the images you want to paste the settings to, and then use Control + V (Win) or Command + V (Mac).
Copying and Pasting the Camera Raw Filter Between Layers
If you want to copy and paste the Camera Raw filter between layers, follow these steps:
Step 1: Convert the Image Layers to Smart Objects
Convert the active layer to a Smart Object by going to Layer > Smart Objects > Convert to Smart Object. Repeat this process for each layer or separate image you want to copy or paste to.
Step 2: Open Camera Raw
In the Layers Panel, select the layer you want to apply the Camera Raw filter to, and then go to Filter > Camera Raw Filter. The Camera Raw window will now open.
Step 3: Edit the Layer
Make any desired edits to the layer using the available adjustments in the Camera Raw window. Once you are satisfied, click OK.
Step 4: Drag the Smart Filter to the New Layer
Go to the Layers Panel, where you will see both the Smart Filters and Camera Raw Filter underneath the active layer. Hold Alt (Win) or Option (Mac) and click the Camera Raw Filter, then drag it to the layer you want to paste it to. This will copy and paste the filter to the new layer. Now, both layers will have the same filters.
Inserting a Battery Pack: DX4530 Camera Guide
You may want to see also
![]()
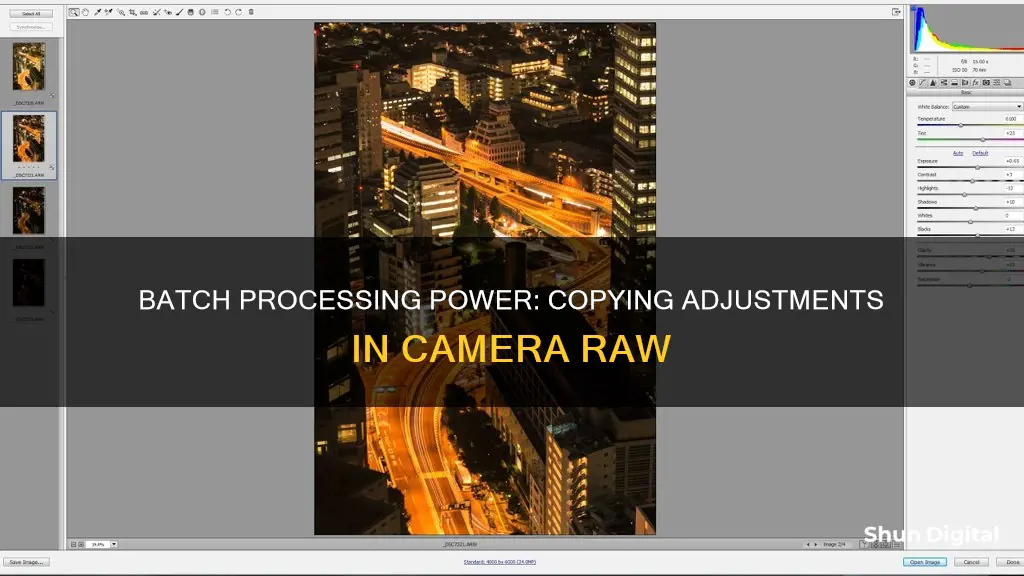
Using the Synchronize button
The Synchronize button is a useful feature in Camera Raw that allows you to apply the same adjustments to multiple images, saving you time and effort. Here's a step-by-step guide on how to use the Synchronize button effectively:
Step 1: Open Your Raw Images
Start by opening the raw images you want to edit in Photoshop. You can do this by using Adobe Bridge or the Open dialog. Select the raw files you want to work with and open them with Camera Raw. This will be the first step in your batch editing process.
Step 2: Make Your Desired Adjustments to One Image
Once you have your images open in Camera Raw, select one image that you want to use as the basis for your adjustments. Make all the desired changes to this image, such as exposure, contrast, or colour adjustments. This will serve as the template for your other images.
Step 3: Select Multiple Images
Now, in the Filmstrip area, select the images you want to apply the adjustments to. You can use the Select All button to quickly select all the images, or you can Shift-click to choose a specific range of images. This step allows you to apply the adjustments to as many or as few images as you need.
Step 4: Click the Synchronize Button
With your images selected, it's time to click the Synchronize button. This button is usually located in the upper left corner of the Camera Raw interface. Clicking it will bring up the synchronization options.
Step 5: Choose the Settings to Sync
After clicking the Synchronize button, you'll be presented with a list of settings you can choose to sync. These settings can include exposure, white balance, tone curves, and more. Select the adjustments you want to apply to your selected images. You can choose to sync all the settings or only specific ones, depending on your needs.
Step 6: Confirm and Apply the Changes
Once you've made your selections, click OK to apply the changes to your raw files. Camera Raw will then copy and paste the chosen adjustments to all the selected images. This will save you from having to manually adjust each image individually, making your batch editing process much faster and more efficient.
Charger Lost? Here's How to Power Your Camera
You may want to see also
![]()
Using the Previous Conversion option
To batch copy adjustments in Camera Raw, you can use the "Previous Conversion" option. This option allows you to apply the same adjustments made to one image to another image or set of images. Here's how you can do it:
First, open the raw images you want to edit in Photoshop. Edit one image according to your desired adjustments and settings. Once you are satisfied with the edits, click "Done".
Next, select the images you want to apply the adjustments to. You can do this by holding "Ctrl" (Windows) or "Command" (Mac) and clicking on the thumbnails of the images.
Then, right-click on one of the selected images and choose "Develop Settings" > "Previous Conversion". Alternatively, you can click on the three stripes or the "hamburger" icon in the top right corner of the "Basic" tab and choose "Previous Conversion". This will apply the adjustments from the previous image to the selected images.
If you are working directly in Camera Raw without using Photoshop, the process is slightly different. After editing one image, click "Done". Then, open the next image you want to apply the adjustments to. Click on the three stripes or the "hamburger" icon in the top right corner and choose "Previous Conversion".
Using the "Previous Conversion" option is a quick and easy way to batch copy adjustments in Camera Raw without having to copy and paste settings for each individual image.
Action Camera Batteries: How Long Do They Really Last?
You may want to see also
![]()
Using keyboard shortcuts
Keyboard shortcuts can help you work faster and more efficiently when batch-copying adjustments in Camera Raw. Here are some of the most useful ones:
- Copying adjustments: After editing a photo in Camera Raw, right-click on the image and choose "Copy Edit Settings" or use the "Ctrl + C" (Windows) or "Cmd + C" (Mac) keyboard shortcut.
- Past ing adjustments: To paste the copied settings to another image, right-click and choose "Paste Edit Settings" or use "Ctrl + V" (Windows) or "Cmd + V" (Mac).
- Selecting multiple images: To select multiple images at once to paste adjustments, use "Ctrl" (Windows) or "Cmd" (Mac) while clicking the images.
- Syncing adjustments: With multiple images selected, you can sync adjustments by choosing "Sync Settings" from the filmstrip's drop-down menu or using "Ctrl + Shift + S" (Windows) or "Cmd + Shift + S" (Mac).
- Opening images: To open an image in Camera Raw, use "Ctrl + O" (Windows) or "Cmd + O" (Mac).
- Applying auto adjustments: To apply auto adjustments to an image, use "Ctrl + U" (Windows) or "Cmd + U" (Mac).
- Undo: To undo an adjustment, use "Ctrl + Z" (Windows) or "Cmd + Z" (Mac).
- Redo: To redo an adjustment, use "Ctrl + Shift + Z" (Windows) or "Cmd + Shift + Z" (Mac).
- Zooming: To zoom in and out, use "Ctrl + (+) or (-)" (Windows) or "Cmd + (+) or (-)" (Mac). To zoom to fit the image on the screen, use "Ctrl + 0" (Windows) or "Cmd + 0" (Mac).
These are just a few examples of the many keyboard shortcuts available in Camera Raw. Using these shortcuts can significantly speed up your workflow when batch-copying adjustments.
Best Camera Battery Chargers: De-A45 Edition
You may want to see also
Frequently asked questions
First, edit the photo inside Camera Raw. Once edited, right-click on the image and choose "Copy Edit Settings". Now select your next image, right-click, and choose "Paste Edit Settings" to paste your copied settings.
Convert the active layer to a Smart Object by heading to Layer > Smart Objects > Convert to Smart Object. Repeat this process for each of the layers or separate images you’d like to copy or paste onto. Then, in the Layers Panel, select the layer you’d like to apply the Camera Raw filter to and head to Filter > Camera Raw Filter.
In Adobe Bridge, select a file and choose Edit > Develop Settings > Copy Camera Raw Settings. Select one or more files and choose Edit > Develop Settings > Paste Camera Raw Settings.