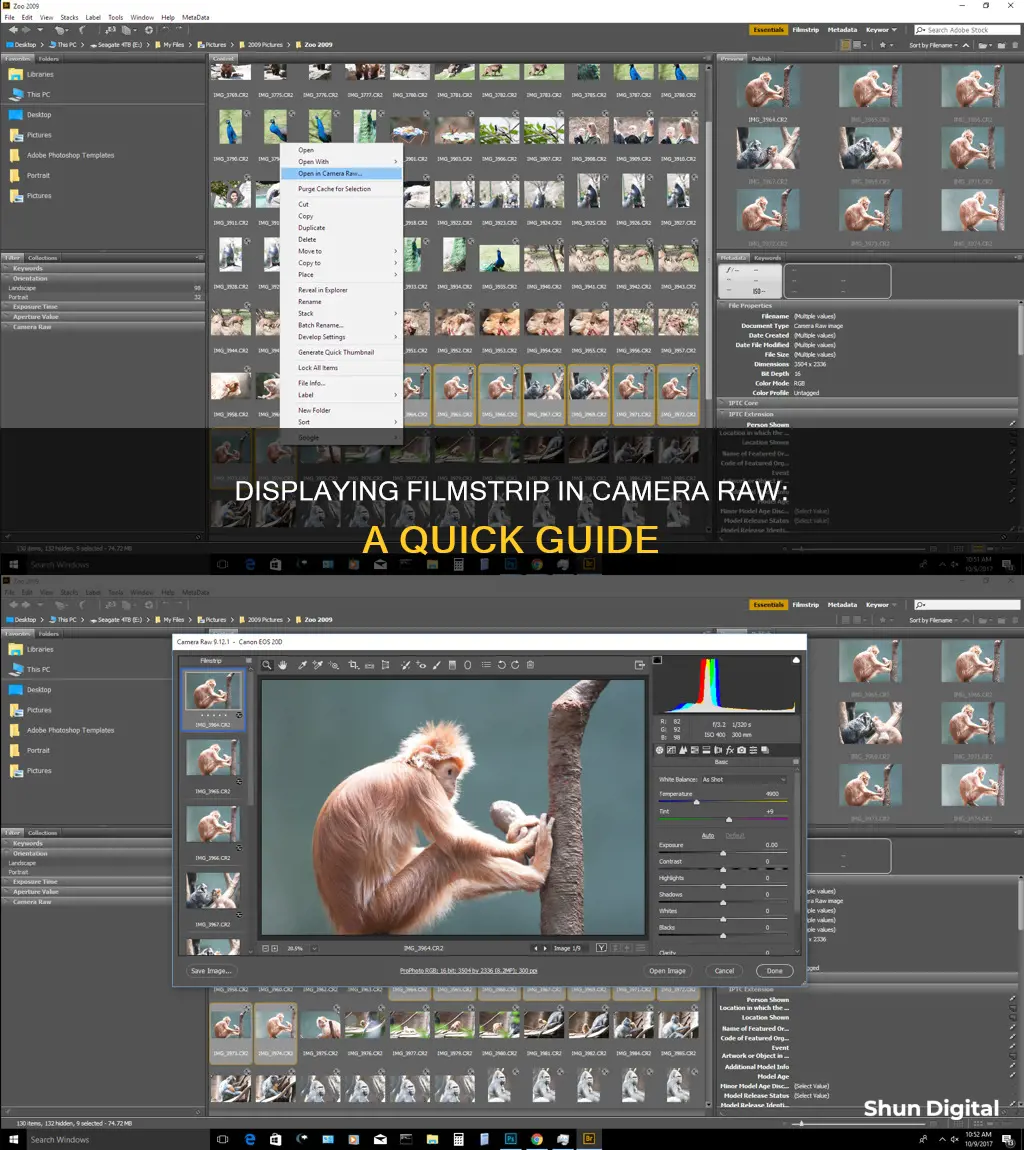
The filmstrip in Camera Raw is a useful feature when you are working with multiple images as it allows you to scroll through them quickly and apply batch adjustments. However, when working on a single image, the filmstrip can be an unnecessary nuisance, taking up valuable screen space. While the filmstrip is meant to appear automatically when multiple images are selected, some users have reported issues with it not appearing or appearing when it is not wanted. There are several methods to show or hide the filmstrip, depending on your software and personal preference.
| Characteristics | Values |
|---|---|
| When to use the filmstrip | When working with multiple images |
| How to open the filmstrip | Open multiple images in Camera Raw or Adobe Bridge |
| How to hide the filmstrip | Click and drag the divider between the filmstrip and preview window to the left |
| Double-click on the divider to hide the filmstrip |
What You'll Learn

Opening multiple images in Camera Raw
Using Adobe Bridge:
If you have Adobe Bridge installed, you can easily open multiple images in Camera Raw. Simply select the images you want to edit in Bridge, right-click, and choose "Open in Camera Raw". This will open all the selected images in Camera Raw, with the filmstrip appearing on the left-hand side. You can then apply adjustments to these images as a group by highlighting multiple thumbnails in the filmstrip.
Using Photoshop:
You can also open multiple images in Camera Raw directly from Photoshop. Go to File > Open in Photoshop and select multiple RAW files that you want to edit. Make sure you have the correct preferences set in Photoshop to open JPEG or TIFF files directly into Camera Raw. Once you click Open, the selected files will appear in Camera Raw with the filmstrip on the left.
Troubleshooting:
If you're having issues with the filmstrip not appearing when opening multiple images, try the following:
- Reset your Photoshop preferences.
- Check your operating system and ensure it is up to date.
- Make sure you have selected multiple images to open.
- Try opening the images from a different location, such as a folder on your computer, instead of an OS file browser window.
- Check if the filmstrip panel is closed and open it.
- Collapse and expand the filmstrip by dragging the divider between the filmstrip and the preview window to the left or right.
- Change your workspace from Start to Exp. Photography.
- Check the "Use legacy 'New document' interface" option in Photoshop preferences.
By following these steps, you should be able to successfully open multiple images in Camera Raw and utilize the filmstrip for efficient photo editing.
Clear Out Camera Raw and Lightroom Cache Clutter
You may want to see also

Hiding the filmstrip in Camera Raw
To hide the filmstrip, you can follow these steps:
- Click on the frame or vertical bar between the filmstrip and the preview window.
- Drag it to the left until it disappears, or double-click on the bar to make it disappear instantly.
- You can also hover your cursor over the vertical bar to reveal a scale cursor, which allows you to increase or decrease the size of the filmstrip panel.
By hiding the filmstrip, you give your single image more room to breathe and work with. This simple trick can help you focus on the image at hand without the distraction of the filmstrip.
It is worth noting that the filmstrip may also be useful when working with multiple images, as it allows you to quickly scroll through and apply adjustments to a group of photos. However, if you are only working with one image, hiding the filmstrip can provide a cleaner and less cluttered interface.
Charging Your USB Spy Camera: A Quick Guide
You may want to see also

Using the filmstrip to scroll through photos
The filmstrip in Camera Raw is a useful feature when you want to scroll through multiple photos and make similar adjustments to a group of images.
To access the filmstrip, you need to open multiple raw images into Photoshop. You can do this by selecting multiple raw files in the file open dialog box. If you are using Bridge, you can open multiple images from there into ACR.
Once you have multiple images open, you will see the filmstrip on the left-hand side of Camera Raw. You can then scroll through the thumbnails of your images and make adjustments to them as a group.
If you only have one image open, the filmstrip will not appear, as there are no other images to scroll through.
In some cases, the filmstrip may not appear even when you have multiple images open. This could be due to damaged preferences or other technical issues. Resetting your Photoshop preferences or performing a full uninstall/reinstall of the software may help resolve this issue.
Additionally, if you are working on a single image and do not need the filmstrip, you can hide it by clicking on the frame between the filmstrip and the preview window. When you see the double-headed arrow, drag it to the left until the filmstrip disappears. Alternatively, you can double-click on that bar to hide the filmstrip without dragging.
Charging Your Camera: Can You Still Capture Shots?
You may want to see also

Opening images in Camera Raw from Adobe Bridge
Opening Raw Files into Camera Raw from Adobe Bridge:
- Launch Adobe Bridge and navigate to the folder containing your images.
- Double-click on the raw file's thumbnail in Bridge.
- This will open the image in Camera Raw, where you can begin editing.
- If you want to move the image from Camera Raw into Photoshop, click the "Open Image" button in the bottom right corner of the Camera Raw dialog box.
- When you're done editing, click the "Done" button to close Camera Raw and return to Adobe Bridge.
Opening JPEG and TIFF Files into Camera Raw from Adobe Bridge:
- In Adobe Bridge, click on the JPEG or TIFF file's thumbnail to select it.
- Go to the File menu and choose "Open in Camera Raw," or simply use the keyboard shortcut Ctrl+R (Win) / Command+R (Mac).
- Alternatively, you can right-click (Windows) or Control-click (Mac) on the thumbnail and choose "Open in Camera Raw" from the menu.
- Make your desired edits in Camera Raw.
- When you're finished, click the "Done" button to close the Camera Raw dialog box and return to Adobe Bridge.
Synchronizing Edits Across Multiple Images in Camera Raw:
The Filmstrip view in Camera Raw is a convenient way to work with multiple images simultaneously. When you open multiple images in Camera Raw from Adobe Bridge, the Filmstrip view opens by default. This view allows you to apply settings from the active image to all selected images, saving time on editing.
To apply synchronized edits:
- In the Filmstrip pane, click on the thumbnail of the image you want to be the active image.
- Click the "Synchronize" button at the top of the Filmstrip pane.
- Choose which settings you want to synchronize across the selected images.
Keep in mind that the Filmstrip view is not available when importing multiple images into After Effects.
Charging the Lumix LX5: A Step-by-Step Guide
You may want to see also

Applying batch adjustments in Camera Raw
Edit your first photo in the sequence, as this will be applied to the rest of the photos. Make sure to check the 'Before and After' by clicking on the icon on the lower left side of the screen. After you're satisfied with the edit, scroll to the last photo in the sequence and Shift-Click to select all the photos. Then, either right-click with your mouse or use the shortcut Option-S to bring up the synchronize dialog box. This will allow you to copy and paste all of your adjustments from the first photo. Hit 'OK', and the same settings will be applied to all the photos in the sequence.
You can also apply batch adjustments by first selecting the files you want to edit in Adobe Bridge. Then, right-click on any of the selected images and choose 'Open in Camera Raw' from the drop-down menu. When the images open in Camera Raw, press Ctrl + A (or Command + A on a Mac) to 'Select All'. Now, any adjustments made will be applied to all the selected images.
Another method is to use the Filmstrip view in Camera Raw, which opens by default when you open multiple images in Camera Raw from Adobe Bridge. In the Filmstrip pane, images can be 'deselected', 'selected' (but not active), or 'active' (selected). Adjustments are applied to all selected images. You can also synchronize settings to apply settings from the active image to all selected images. Click the 'Synchronize' button at the top of the Filmstrip pane and choose which settings to synchronize.
Finally, you can create an action to automate the processing of image files with Camera Raw. You can automate the editing process and the process of saving the files in formats such as PSD, DNG, JPEG, Large Document Format (PSB), TIFF, and PDF. In Photoshop, you can use the Batch command, the Image Processor, or the Create Droplet command to process one or more image files.
Charging Your Kodak Camera Battery: How Long Does It Take?
You may want to see also
Frequently asked questions
The filmstrip should appear automatically when you open multiple images in Camera Raw. If it doesn't, try resetting your Photoshop preferences. If you're still having issues, try uninstalling and reinstalling Photoshop.
If you're working on a single image, you can hide the filmstrip by clicking on the frame between the filmstrip and the preview window and dragging to the left until it disappears. You can also double-click on the frame to hide the filmstrip.
The filmstrip appears by default when Enhanced Details is activated from the filmstrip. This feature was added in ACR 11.2 and can be useful for users with larger screens.
To open multiple images in Camera Raw, select the images you want to edit in Adobe Bridge, then right-click on one of the selected images and choose "Open in Camera Raw". You can also open multiple images by selecting them in a folder or via File > Open in Photoshop.


