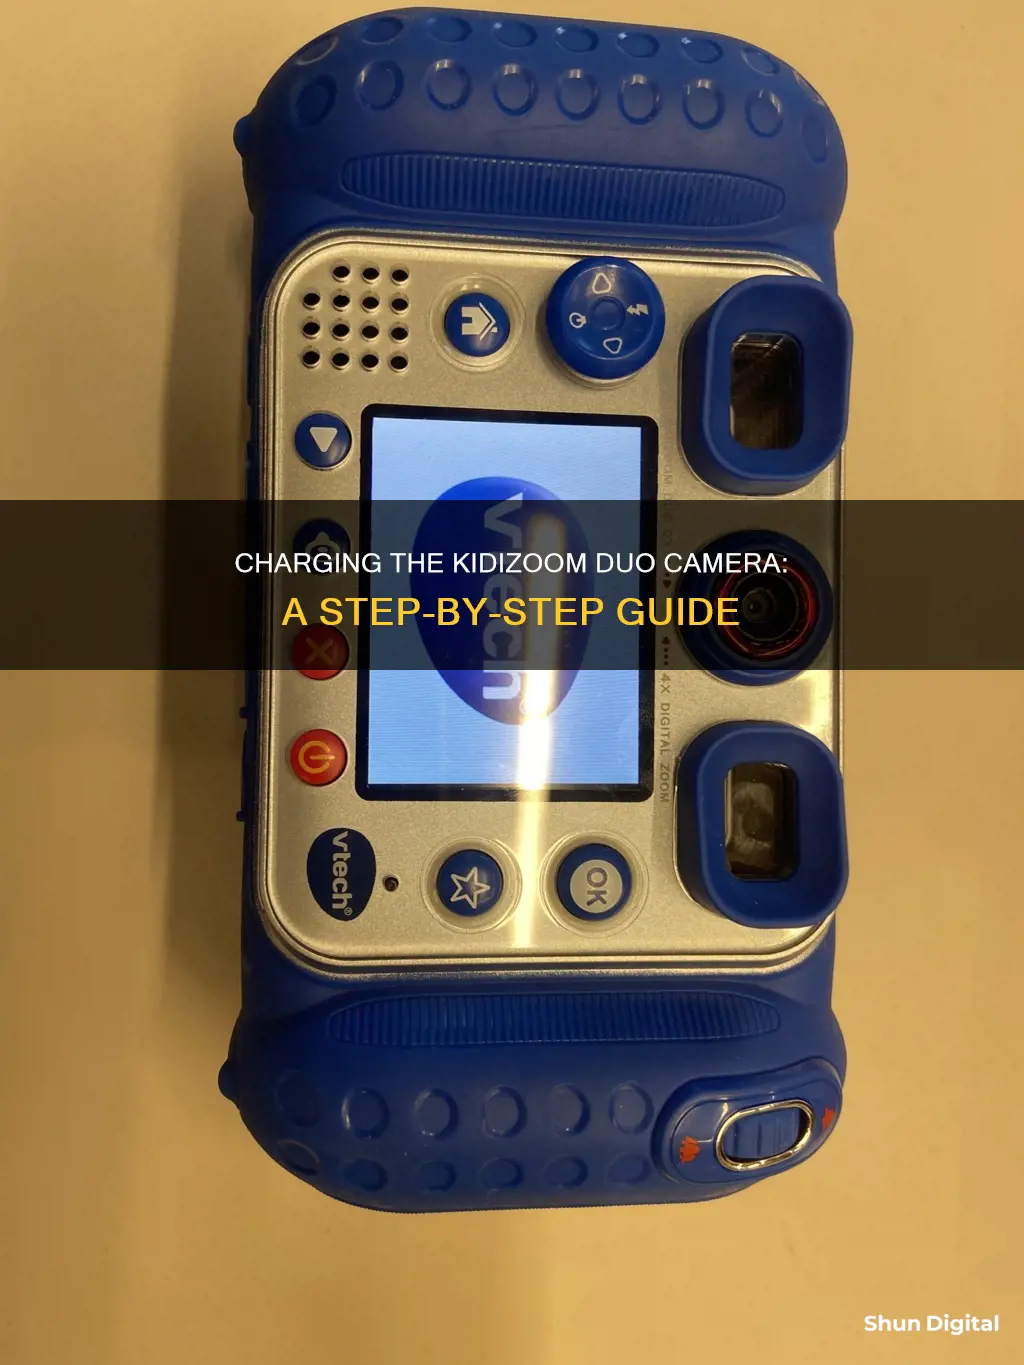
The Kidizoom Duo is a digital camera designed for children aged 3 to 9 years old. It features a 2.4 colour LCD screen, dual lenses for selfies, and various photo effects. The camera is powered by 4 AA batteries and cannot be charged via USB. The USB cable included with the camera is intended for file transfer only.
| Characteristics | Values |
|---|---|
| Charging method | The Kidizoom Duo is not rechargeable and uses 4 AA batteries. |
| Charging cable | The micro USB cable is used for file transferring and not for charging. |
What You'll Learn
![]()
The Kidizoom Duo is battery-operated and requires 4 AA batteries
When installing the batteries, ensure the camera is turned off. Locate the battery covers on the handles of the camera and open them by pressing each trigger inwards. Install 2 batteries into each side of the camera, following the polarity indications. Once the batteries are installed, replace the battery covers and ensure they are secure.
For optimal performance, it is recommended to use new alkaline batteries. Do not mix different types of batteries, and always insert batteries with the correct polarity. Additionally, it is important to remove exhausted batteries and those that will not be used for extended periods.
The Kidizoom Duo is a fun and durable digital camera with two lenses, allowing users to take photos or group pictures with various effects. It has a built-in motion sensor and photo optimisation for an enhanced photo-taking experience. The camera also includes five games, three of which are motion-controlled, adding to the overall fun and interactivity.
Charging Camera Batteries: A Global Guide
You may want to see also
![]()
The USB cable is for file transferring, not charging
The Kidizoom Duo camera is not charged via USB. The USB cable is for file transferring only. The camera operates with 4 AA batteries, which are included with the camera for demo purposes. For regular use, it is recommended to use new batteries.
The Kidizoom Duo is a digital camera designed for children aged 3 to 9 years old. It features a 2.4" color LCD screen, a rear-facing camera, and the ability to take photos and videos. The camera also includes creative photo effects, such as cartoon and collage effects, as well as five built-in games, three of which are motion-controlled.
The camera is durable and can withstand drops and tumbles. It has a microSD card slot for memory expansion, with a recommended capacity of 1 GB to 32 GB. The USB cable included with the camera is used to connect it to a computer for file transferring. This allows users to download photos and videos from the camera to the computer and vice versa.
It is important to note that the USB cable is not meant for charging the Kidizoom Duo camera. The camera is powered by AA batteries only. When transferring files, ensure that the camera is turned off before connecting it to the computer.
To connect the Kidizoom Duo camera to a computer:
- Turn off the camera.
- Locate the USB Port on the bottom of the camera and pull up the rubber cover.
- Insert the smaller end of the USB cable into the USB Port on the camera.
- Insert the larger end of the USB cable into a USB Port on your computer.
Once connected, two removable drives, "VTech 5200" and "VT SYSTEM," will appear on your computer. "VTech 5200" is for storing your data, while "VT SYSTEM" is for system data storage and cannot be accessed. If a memory card is inserted in the camera, the removable drive will only show the content on the memory card.
To back up voice files recorded by the camera:
- Locate and open the "VOICE" folder in the "VTech 5200" removable drive.
- Copy and paste the recorded voice files to a location on your computer for backup.
To transfer photo or video files to the camera:
- Select the photo or video files you want to transfer from your computer.
- Locate and open the "DOWNLOAD" folder on the "VTech 5200" removable drive.
- Copy and paste photo files into the "PHOTO" subfolder or video files into the "VIDEO" subfolder.
It is important to note that the Kidizoom Duo camera only supports specific file formats: photos in Standard Baseline JPEG and videos in AVI (Motion JPEG) format. Always ensure that you are using the correct file formats when transferring files to the camera.
Charging Your Kodak 12MP Camera: A Step-by-Step Guide
You may want to see also
![]()
You can use rechargeable batteries
Yes, you can use rechargeable batteries with the Kidizoom Duo camera. The camera requires 4 AA batteries to operate, and rechargeable batteries of this size and type can be used.
It is important to note that rechargeable batteries should only be charged under adult supervision. Additionally, the USB port on the camera is for file transferring and not for charging the batteries.
When installing the batteries, ensure the camera is turned off. Then, locate the battery covers on the handles of the camera and open them by pressing each trigger inwards. Insert 4 new AA batteries (2 on each side) as illustrated in the user manual. Finally, replace the battery covers, ensuring they click into position.
It is recommended to use new alkaline batteries for maximum performance. Do not mix different types of batteries, such as alkaline, standard (carbon-zinc), or rechargeable batteries. Also, do not mix new and used batteries. Always insert batteries with the correct polarity, and ensure that the battery contacts are clean and undamaged.
If you are using rechargeable batteries, be sure to follow the specific instructions provided by the battery manufacturer for proper handling and care.
Charging Camera Batteries: International Travel Guide
You may want to see also
![]()
The Kidizoom Duo is not rechargeable
The Kidizoom Duo is a fun, durable, and easy-to-use digital camera designed for children aged 3 to 9 years old. It features a 2-megapixel front camera and a VGA rear/selfie camera, with the front camera capable of 4x digital zoom. The camera has two rubberised hand grips on either side, each containing space for 2 AA batteries. The camera comes with batteries included, but it is recommended that you use new batteries for regular use.
The Kidizoom Duo has a variety of fun features and modes, including the ability to add different effects to photos and videos, a voice recorder, and built-in games. It also has parental control settings to limit play time on the games. The camera is well-built and robust, with a rubberised, bump-proof design that can withstand being dropped from child height.
While the Kidizoom Duo offers a lot of entertainment value for children, it is important to note that the image and video resolution is low, and the battery life may not be very long-lasting. Additionally, there is no option to wirelessly connect the camera to a device to transfer photos and videos; instead, you will need to use the USB cable or remove the memory card.
Xomodo Wireless Cameras: How Long Does the Charge Last?
You may want to see also
![]()
The Kidizoom Duo comes with a wrist strap
The wrist strap attachment process is simple and easy to follow. First, locate the thread loop on the end of the strap. Insert it into the groove behind the bar and then push the loop through the opening. Next, feed the end of the strap up and through the loop, pulling it tight to ensure a secure fit. Finally, make sure the loop is securely tightened around the bar.
The wrist strap is an essential part of the Kidizoom Duo package, which also includes the camera itself, a USB cable for file transferring, and a parent's guide. It is worth noting that the USB cable is not meant for charging the camera, as it operates on 4 AA batteries. The wrist strap enhances the overall user experience by providing stability and security while capturing memories with the Kidizoom Duo camera.
Charging the Blackmagic Camera: A Step-by-Step Guide
You may want to see also
Frequently asked questions
The Kidizoom Duo camera is not rechargeable and does not come with a charger. It operates on 4 AA batteries.
Yes, rechargeable batteries can be used with the Kidizoom Duo camera. However, rechargeable batteries should only be charged under adult supervision.
You can transfer photos and videos by connecting the camera to your computer using the included micro USB cable. The cable is for file transferring only and not for charging.
The Kidizoom Duo camera supports microSD and microSDHC memory cards with a capacity of up to 32GB.
To install a memory card, first turn off the camera. Then, locate the microSD card slot at the bottom of the camera and pull up the rubber cover. Insert the memory card as illustrated in the user manual.