Adobe Bridge is a file manager that allows users to view, manage, and edit their files efficiently. One of its key features is the ability to work with Camera Raw files, which are unprocessed image data from a camera's image sensor. By default, Bridge opens Raw files in Photoshop, but users can change the settings to directly edit Camera Raw settings in Bridge. This is advantageous as it improves speed and streamlines the workflow by eliminating the need to switch between applications. To enable this feature, users can go to the Preferences menu in Bridge and select Double-Click Edits Camera Raw Settings in Bridge under the General options. This will ensure that when users double-click on a Raw file, they can edit it directly in Bridge without having to open Photoshop.
| Characteristics | Values |
|---|---|
| How to enable Camera Raw editing in Bridge | Launch Adobe Photoshop or Photoshop Lightroom Classic, then relaunch Adobe Bridge |
| How to open Camera Raw in Bridge | Click on the "Open in Camera Raw" icon at the top of the Bridge interface, or go to "File" > "Open in Camera Raw" in the Menu Bar |
| How to change default setting to open Camera Raw in Bridge instead of Photoshop | Go to "Edit" > "Preferences" (Windows) or "Adobe Bridge" > "Preferences" (macOS), then click on "General" and check "Double-Click Edits Camera Raw Settings in Bridge" |
What You'll Learn
![]()
How to enable Camera Raw editing in Bridge
To enable Camera Raw editing in Bridge, you need an active subscription to Adobe Photoshop or Photoshop Lightroom Classic. If you have an active subscription, follow these steps:
- Launch either Adobe Photoshop or Photoshop Lightroom Classic.
- Relaunch Adobe Bridge.
- Camera Raw editing should now be enabled in Adobe Bridge.
Alternatively, you can make a change in the Bridge Preferences. On a Windows PC, go to the Edit menu and select Preferences. On a Mac, go to the Adobe Bridge menu and select Preferences. In the Behaviour section, you will see an option that says "Double-Click Edits Camera Raw Settings in Bridge". By default, it is disabled. Click inside its checkbox to enable it.
Defringing in Camera Raw: A Step-by-Step Guide
You may want to see also
![]()
How to adjust image white balance in Bridge
Adjusting the white balance of an image in Adobe Bridge can be done by opening the image in Camera Raw and then making adjustments in the Basic panel. Here is a step-by-step guide on how to do this:
Step 1: Open the Image in Adobe Bridge
Open Adobe Bridge and select the image you want to edit. Right-click on the image and select "Open in Camera Raw". This will allow you to make adjustments to the image, including the white balance.
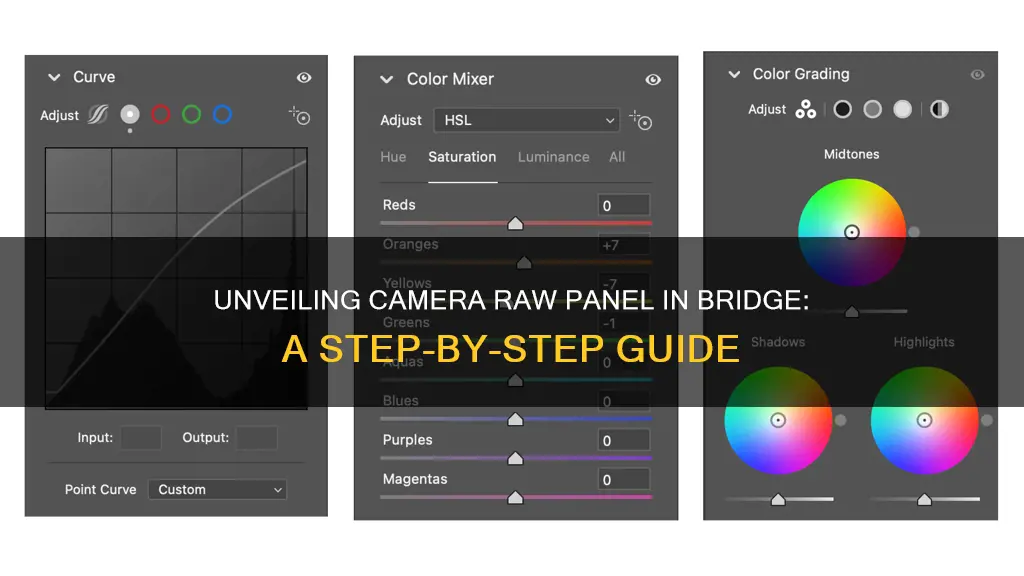
Step 2: Access the Basic Panel in Camera Raw
Once the image is open in Camera Raw, you will see several image enhancement tools to the right of your photo. Locate the Basic panel, which is where you will find the White Balance controls.
Step 3: Understand the White Balance Controls
The White Balance drop-down menu in the Basic panel has three main controls for correcting a colour cast: "As Shot", "Auto", and "Custom". "As Shot" uses the white balance settings from when the photo was taken, "Auto" allows Camera Raw to automatically adjust the white balance, and "Custom" lets you manually adjust the white balance.
Step 4: Adjust the White Balance
If you choose the "Custom" option, you can use the Temperature slider to adjust the colour temperature of the image. Moving the slider to the left will make the image cooler (more blue), while moving it to the right will make the image warmer (more yellow or orange). You can also use the colour dropper tool to select a neutral colour in the image, and Camera Raw will adjust the white balance accordingly.
Step 5: Fine-Tune the Colour Balance
In addition to the White Balance controls, you can also fine-tune the colour balance by adjusting the Temperature and Tint properties in the Basic panel. These controls allow you to make precise adjustments to the colour temperature and remove any remaining colour casts.
By following these steps, you can easily adjust the white balance of your images in Adobe Bridge using the Camera Raw panel. This will help you improve the realism and mood of your photos by ensuring that the colours are accurately represented.
Spy Camera Battery Life: How Long Does It Last?
You may want to see also
![]()
How to straighten images in Bridge
Firstly, open the image in Adobe Bridge. You can do this by selecting 'Get Started' from the Welcome Screen and then clicking 'Open Document', or by going to 'File > Open'.
Next, select the Straighten Tool from the Toolbar. This can be found in the top left of the Camera Raw dialog box, to the right of the Crop Tool. You can also select the Straighten Tool by pressing 'A' on your keyboard.
Now, look for something in your image that should be straight, either horizontally or vertically. Click on one end of it, hold down your mouse button, and drag to the other end. You can use the Zoom Tool (Ctrl+Spacebar on Windows or Command+Spacebar on Mac) to get a closer view of the area you want to straighten.
Release your mouse button when you're done. Camera Raw will automatically switch to the Crop Tool and draw a crop box around the image. The crop box will be rotated to the same angle you dragged with the Straighten Tool. If you zoomed in on your image, you can zoom out to see the entire crop box by pressing Ctrl+0 on Windows or Command+0 on Mac.
Finally, press Enter on Windows or Return on Mac to straighten the image.
If you want to adjust the crop box, select the Crop Tool by pressing 'C' on your keyboard. You can then click and drag any of the handles around the box to resize it. When you're done, press Enter (Windows) or Return (Mac) to crop and straighten the image.
Complete Recharge: DMC-ZS60 Camera Battery Charging Guide
You may want to see also
![]()
How to copy Camera Raw settings from one file to another in Bridge
Adobe Bridge allows you to copy and paste Camera Raw settings from one image file to another. This can be done by following these steps:
- Open Adobe Bridge.
- Launch a photo into Camera Raw from the application.
- Edit the photo and close out of Camera Raw by clicking the "Done" button.
- Right-click on the thumbnail of the edited photo and select "Develop Settings" > "Copy Settings".
- Right-click on the thumbnail of the photo you want to apply the settings to and select "Develop Settings" > "Paste Settings".
- The thumbnail should update with the edits that were made to the original image in Camera Raw.
You can also copy and paste Camera Raw settings using keyboard shortcuts. On a Mac, this can be done by selecting "Cmd-Opt-C" to copy and "Cmd-Opt-V" to paste. On Windows, use "Ctrl-Alt-C" to copy and "Ctrl-Alt-V" to paste.
Additionally, you can apply Camera Raw settings to multiple photos via Bridge by following these steps:
- In Bridge, Ctrl-click/Cmd-click multiple photo thumbnails or Shift, then Shift-click a consecutive series of thumbnails.
- Choose a preset from the "Edit" > "Develop Settings" submenu, or right-click a selected thumbnail and choose a preset from the "Develop Settings" submenu on the context menu.
- Choose additional presets if needed.
Alternatively, you can copy and paste settings from one photo to another:
- Click the thumbnail for a photo that has the desired settings.
- Choose "Edit" > "Develop Settings" > "Copy Camera Raw Settings" (Ctrl-Alt-C/ Cmd-Option-C), or right-click the selected thumbnail and choose "Develop Settings" > "Copy Settings" from the context menu.
- Click another thumbnail or Ctrl-click/Cmd-click multiple thumbnails, then choose "Edit" > "Develop Settings" > "Paste Camera Raw Settings" (Ctrl-Alt-V/ Cmd-Option-V), or right-click the selected thumbnail and choose "Develop Settings" > "Paste Settings" from the context menu.
- In the "Paste Camera Raw Settings" dialog box, uncheck any settings you don't want to paste, or choose a tab name from the "Subset" menu and then remove or add any check marks.
- Click "OK".
Samy's Camera and Texas Sales Tax: What's the Deal?
You may want to see also
![]()
How to batch process multiple Raw images in Bridge
Adobe Bridge is a media browsing application that enables you to view, manage and organise your digital files, as well as edit your photos without the need to import and file them in various catalogs.
- Install Adobe Photoshop Bridge. It is a free install with the purchase of any Photoshop program.
- Open Bridge and select 'Open' from the file menu to select the folder containing all the images you want to process together.
- Right-click on the first photo and select 'Open in Camera Raw'. This will open the selected photo in Photoshop's Camera Raw filter, where you can make your desired changes.
- Once you are satisfied with the edits, click 'Done' in the bottom right corner of the Camera Raw window.
- To apply the same edits to the next image, right-click on the image, scroll down to 'Develop Settings', and then select 'Previous Conversion'.
- Repeat this process for all the images in the folder by selecting all of them while holding the Ctrl key, right-clicking on any one of them, and then selecting 'Previous Conversion'.
- Once you have made global batch edits to your images, go through them one at a time in the same Camera Raw window and make any final local adjustments for each one.
- Finally, select all your images again and click the 'Save Image' button. A window will open where you can specify where you want the images saved and create a new folder for them.
Remember, batch processing is a great way to save time, but it may not always result in the best-looking images. For perfect results, editing images individually might be necessary.
Applying Camera Raw Presets: A Step-by-Step Guide
You may want to see also
Frequently asked questions
To enable Camera Raw editing in Bridge, you need an active subscription to either Adobe Photoshop or Photoshop Lightroom Classic. Launch one of these apps and then relaunch Adobe Bridge.
Select a file and either click the "Open in Camera Raw" icon at the top of the Bridge interface, or go to "File > Open in Camera Raw".
Running Camera Raw in Bridge can improve the speed of your computer and your workflow. Photoshop uses up computer resources while it's open, even if you're not actively using it. By running Camera Raw in Bridge, you can avoid having Photoshop open in the background.
In Bridge, go to the Adobe Bridge CC menu (Mac) or Edit menu (Windows) and choose Preferences. Click on "General" in the left-hand menu, then check "Double-Click Edits Camera Raw Settings in Bridge".
Select the file you want to copy settings from, then either Ctrl-click (Mac) or right-click (Windows) on the image and choose "Develop Settings > Copy Settings". Next, select the file you want to paste the settings to and either Ctrl-click (Mac) or right-click (Windows) on the image and choose "Develop Settings > Paste Settings".