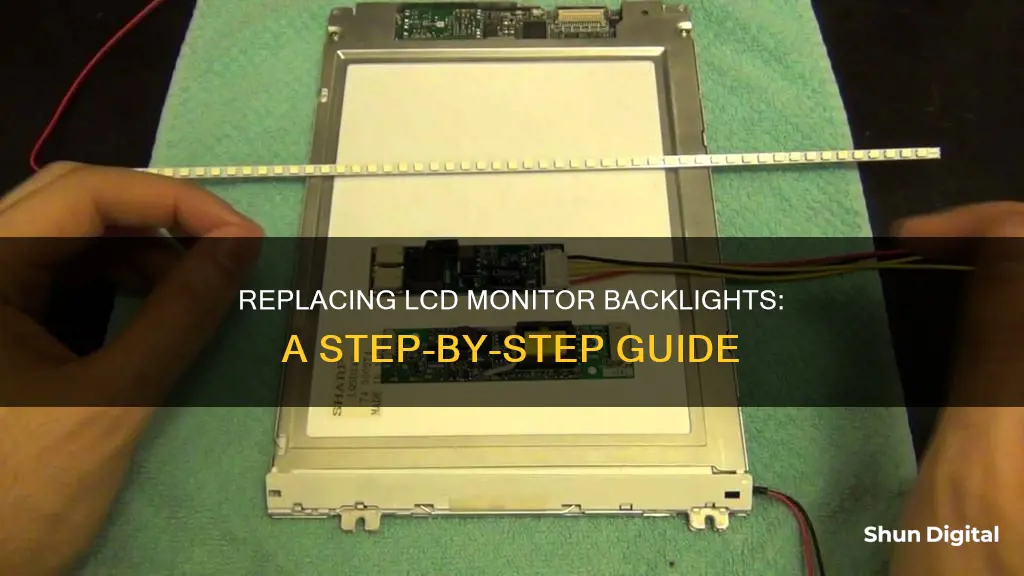
If your LCD monitor is no longer displaying images, the problem is most likely due to a burnt-out backlight bulb. The good news is that you can fix this issue by manually replacing the bulb. Before you begin, make sure to disconnect the power and release any built-up static electricity in your body by touching a metal object grounded to the floor. Then, simply remove the monitor's case, locate and remove the old backlight, and insert a new one. Finally, reassemble the monitor and test it out. With these simple steps, you can bring your LCD monitor back to life without incurring high replacement costs.
| Characteristics | Values |
|---|---|
| Difficulty | Not very hard, but requires careful organisation and patience |
| Cost | Usually $10-20 |
| Tools | Small Phillips Screwdrivers, Torx Screwdrivers, Electrical Tape, Soldering Iron, Dremel Tool, Blow Dryer |
| Process | 1. Disassemble LCD housing; 2. Take apart LCD; 3. Remove backlight; 4. Insert new backlight; 5. Test display; 6. Reassemble housing |
| Warnings | Be careful with exposed connections and cables, especially the inverter. The components inside are highly susceptible to electrical damage |
What You'll Learn
- Diagnosing the problem: Check for a faint light on the LCD screen to identify a backlight issue
- Disconnecting the power: Before disassembling the LCD housing, ensure the power is disconnected
- Disassembling the LCD: Remove screws and gently pry open the housing to access the internal components
- Removing the backlight: Locate the backlight tube and carefully cut into the plastic casing to access the tube
- Inserting the new backlight: Slide the new bulb into place and secure it with tape or soldering

Diagnosing the problem: Check for a faint light on the LCD screen to identify a backlight issue
To diagnose a backlight issue in an LCD monitor, you must first power on your computer and wait for an image to appear on the screen. If there is no image, there could be a problem with the backlight.
To check for a faint light on the LCD screen, look directly into the monitor from a distance of about one inch away. Cup your hands around your face to block out the light in the room and get a clearer view of the screen. If you can see a faint light, this indicates that the cold cathode backlight has gone out.
If there is no image at all, this could indicate a different problem, such as a power supply issue. However, if there is a faint light visible, the backlight bulb has likely burned out and needs to be replaced.
Before replacing the backlight, it is important to identify the model of your LCD monitor to find the correct replacement bulb. You can usually find this information in the manual that came with the monitor or on the manufacturer's website.
Once you have identified the model and purchased a replacement bulb, you can proceed with the steps to replace the backlight. This process will vary depending on the make and model of your LCD monitor, but it typically involves removing the monitor's casing, locating and removing the old backlight, and installing the new one.
Monitoring Data Usage: Wireless Router Tips
You may want to see also

Disconnecting the power: Before disassembling the LCD housing, ensure the power is disconnected
Disconnecting the power from an LCD monitor is generally safe, but it is always best to power off the monitor before doing so. This is because the damage caused to electronics when turning them on is due to the burst of electricity at startup, rather than the act of powering down.
To power off an LCD monitor, you can:
- Press the power button on the monitor.
- Power off the computer that the monitor is connected to.
- Unplug the monitor's power cable.
It is important to note that repeatedly unplugging the power cable can weaken the connection and potentially cause damage over time. Therefore, it is recommended to use the power button to turn off the monitor instead of unplugging the power cable.
Additionally, if you are working on an open monitor, always ensure that you release any built-up static electricity in your body before touching any internal components. This can be done by touching a metal object that is grounded to the floor.
Finding Volume Controls on Your ASUS Monitor
You may want to see also

Disassembling the LCD: Remove screws and gently pry open the housing to access the internal components
Before you begin disassembling your LCD, it is important to disconnect the power source. This is a crucial safety measure to prevent any electrical accidents. Once the power cable is disconnected, you can start the disassembly process.
The process of disassembling an LCD monitor involves carefully removing the screws and gently prying open the housing to access the internal components. Start by placing the monitor face down on a stable work surface, such as a desk or table. This positioning will give you access to the screws along the edges of the monitor's casing. Using the appropriate screwdriver, remove all the screws and set them aside in a safe place. It is important to keep the screws organised as you will need them later during the reassembly process.
After removing the screws, gently pry open the housing. This step requires caution and patience. Use a flat-head screwdriver to carefully separate the housing, little by little. Apply gentle force if needed, but be mindful not to use excessive force to avoid damaging the components. Take your time with this step to ensure a safe and successful disassembly.
As you gently pry open the housing, you will start to see the internal components of the LCD monitor. Be cautious as you work, as the components inside are sensitive and susceptible to electrical damage. It is recommended to release any built-up static electricity in your body before touching any internal parts. This can be done by touching a metal object grounded to the floor.
Once the housing is open, you will have access to the internal components of the LCD monitor. At this point, you can proceed to locate and remove the backlight assembly for replacement. Remember to stay organised during the disassembly process to facilitate a smooth reassembly later on. Keep the components in a logical order and take note of how they were originally positioned so that you can reassemble them correctly.
Finding the Perfect Duo Monitor: Size Considerations
You may want to see also

Removing the backlight: Locate the backlight tube and carefully cut into the plastic casing to access the tube
To remove the backlight from your LCD monitor, you must first locate the backlight tube. This will be a long, thin tube inside a clear plastic casing. Once you have located the tube, you will need to carefully cut into the plastic casing to access it.
It is important to note that the number of screws and the method of accessing the backlight tube will vary depending on the model of your LCD monitor. However, the screws are generally found around the borders of the back casing.
To begin, gently remove the back panel of the monitor by unscrewing all the screws from the back. If there is any metal sheeting underneath, remove this as well to expose the internal components.
Now, locate the backlight tube inside the clear plastic casing. In a well-ventilated area, use a dremel tool to carefully cut into the end of the plastic casing nearest the tube's lead connectors. Be extremely cautious during this step as the backlight tube contains mercury vapour, which can pose a health risk if exposed.
After cutting into the casing, use a blow dryer to heat the area where the tube's wires enter. Once the glue holding the wires in place is hot enough, carefully pull the wires and the tube free.
Monitoring Bandwidth Usage: Android Tips and Tricks
You may want to see also

Inserting the new backlight: Slide the new bulb into place and secure it with tape or soldering
Once you have removed the old backlight, it's time to insert the new one. Take your new bulb and slide it into the open spot on the monitor. Be very gentle and patient during this step. Ensure that you are organised and careful, keeping the elements of the LCD you removed in perfect order so that you can easily reassemble it.
If your bulb is in a plastic casing, use a piece of tape to cover the opening you made. Alternatively, if your bulb is soldered directly to the metal, use a soldering tool to secure it in place. Make sure all your connections are tight and secure. Finish reassembling the LCD housing and you're all set.
Before turning your monitor back on, ensure that you have reconnected it to your computer and that the stand is reattached. Then, power on your computer and wait for an image to appear on the screen to ensure that the backlight bulb has been installed correctly.
Monitoring PCI Bus Usage: Linux Command Line Essentials
You may want to see also
Frequently asked questions
Power on your computer and wait for an image to appear on the monitor. Look directly at the screen from a distance of about 1 inch away. Cup your hands around your face to block out the light in the room and get a clearer view of the LCD screen. Check to see if there is a faint light visible on the screen, which indicates that the backlight has gone out.
Check your monitor's manual or the manufacturer's website to find the model of the cold cathode bulb used as a backlight. Purchase a corresponding replacement bulb.
First, power off your computer and disconnect the monitor cable from the port on the back of the computer case. Disconnect the monitor stand from the monitor by pulling out the plastic latches or removing the screws holding it to the casing. Place the monitor face down on a table or desk and remove the screws along the edges of the casing. Lift off the back of the monitor case and set it aside. Check if the backlight is directly exposed on the lower end of the monitor or hidden behind another piece. Remove the screws holding the piece over the bulb and set it aside. Check if the bulb is kept in a plastic casing or soldered to the metal. Use a soldering tool to remove the solder or a rotary cutting tool to cut into the clear plastic casing around the bulb. Slide the new bulb into place and either solder it or use tape to cover the opening.
You will need a soldering tool or a rotary cutting tool, and electrical tape or a screwdriver.
Always release the built-up static electricity in your body before opening a monitor's case by touching a metal object grounded to the floor. Be VERY careful with the exposed connections and cables, especially the inverter. Opening up the LCD monitor will void the warranty provided by the manufacturer.


