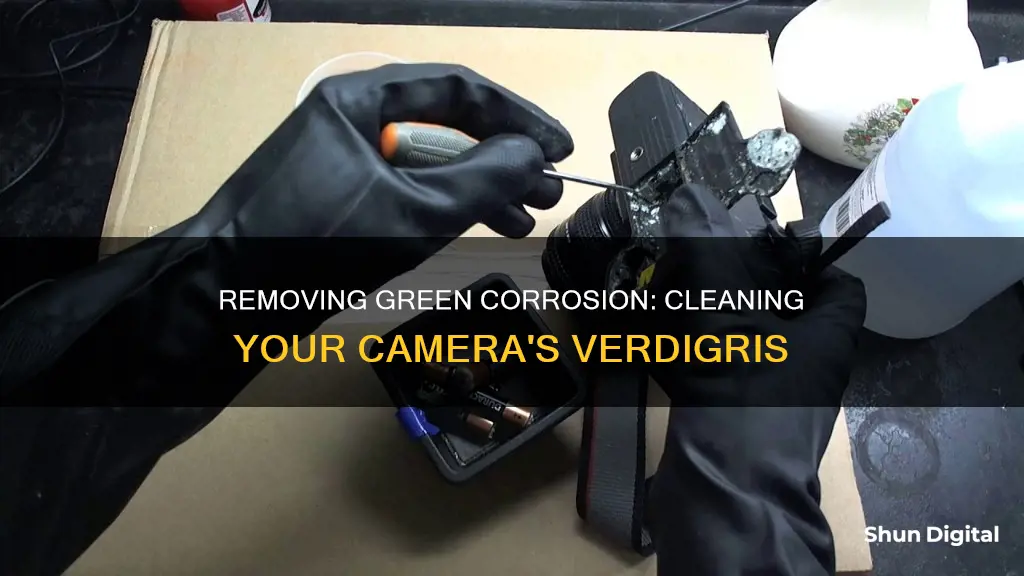
Green corrosion on a camera can be an unsightly problem that, if left untreated, can cause damage. The corrosion is caused by a chemical reaction between the metal and moisture in the air, resulting in oxidation. It is important to address this issue as soon as possible to prevent further damage to the camera. There are several methods that can be used to remove the green corrosion from a camera, ranging from household items to more specialized products.
What You'll Learn

Soak the corroded parts in white vinegar
Soaking corroded parts in white vinegar is an effective way to remove green corrosion from your camera. Here's a step-by-step guide to help you through the process:
Step 1: Prepare the Vinegar Solution
Get a container large enough to submerge the corroded parts of your camera. Fill it with distilled white vinegar, ensuring the vinegar completely covers the affected areas. For better results, you can also create a mixture by adding a cup of table salt to a gallon of vinegar. The salt increases the acidity, making it even more effective at removing corrosion.
Step 2: Soak the Corroded Parts
Fully submerge the corroded parts of your camera in the vinegar solution. If it's not possible to submerge the parts, you can also use a cloth saturated with vinegar and place it over the affected areas. Let the camera parts soak for at least 10 minutes. For more severe corrosion, you may need to soak the parts for up to 12 hours or even a few days. Keep in mind that different metals react differently to vinegar, so adjust the soaking time accordingly.
Step 3: Scrub Away the Corrosion
After soaking, remove the camera parts from the vinegar solution. Use a soft-bristled brush or an old toothbrush to gently scrub away any remaining corrosion. If necessary, you can use a brass-bristle brush for more stubborn areas. Be careful not to apply too much pressure to avoid damaging the camera parts.
Step 4: Rinse and Dry
Once you've removed as much corrosion as possible, rinse the camera parts with water to remove any residual vinegar and corrosion particles. Dry the parts thoroughly with a soft microfiber cloth.
Step 5: Repeat if Necessary
If there are still some stubborn spots of corrosion, don't worry. Simply repeat the process by soaking the parts in vinegar again and scrubbing them gently. You can also try using other household items like baking soda or lemon juice to remove any remaining corrosion.
Remember to be gentle throughout the process to avoid damaging your camera's parts. Additionally, always put your safety first by wearing protective gear, such as gloves and eye protection, when handling corrosive substances and cleaning agents.
Troubleshooting ProPresenter: Camera Not Detected
You may want to see also

Use isopropyl alcohol on a swab
To remove green corrosion from your camera, you can use isopropyl alcohol on a swab. This method is particularly useful for corrosion caused by perspiration, which often occurs near the eyebrow and the eyepiece.
Firstly, you will need to gather your supplies. Make sure you have isopropyl alcohol and some swabs. You can use a Q-tip, but be aware that generic alternatives may be made of polyester, which is more abrasive than cotton. You will also need a microfibre cloth.
Next, put a few drops of the isopropyl alcohol onto the swab. Be careful not to use too much, as you don't want fluid getting all over the place. You should also be aware that isopropyl alcohol may discolour plastics over time, so be careful when applying it to your camera.
Then, gently rub the affected area with the swab until the corrosion is removed. You may need to apply a bit of pressure for more stubborn areas.
Finally, use a microfibre cloth to wipe down the camera and remove any remaining fluid. Make sure to pat the camera dry rather than wiping it, and be sure to pay attention to any gaps on the lens barrel.
Concealing Cameras: Hiding Devices Within Your Television Set
You may want to see also

Use a rust remover
If you're looking to remove corrosion from your camera, you might want to consider using a rust remover. This can be an effective way to get rid of any unsightly and damaging green corrosion on your camera without causing further damage. Here's a step-by-step guide on how to do it:
Step 1: Gather Your Supplies
Before you start, make sure you have all the necessary supplies. In addition to a rust remover, you'll also need some soft cloths, cotton swabs, and protective gear like gloves and safety goggles. It's important to be cautious when working with chemicals and to avoid getting them on your skin or in your eyes.
Step 2: Prepare the Camera
If possible, remove any plastic parts or coverings from the camera that could be damaged by the rust remover. For example, you might want to take off the top cover or any other corroded parts that can be easily detached. This will allow you to focus the treatment on the affected areas.
Step 3: Apply the Rust Remover
Follow the instructions on your chosen rust remover for the best results. Typically, you'll want to soak a cloth or cotton swab in the rust remover and then apply it to the affected areas. Be generous with the amount you use, making sure to fully cover the corroded parts. You may need to leave the solution on the camera for a few minutes to allow it to work effectively.
Step 4: Rinse and Repeat
After allowing the rust remover to sit, rinse the camera with water to remove any residue. You may need to repeat the process of applying the rust remover and rinsing multiple times, especially if the corrosion is severe or stubborn. Make sure to dry the camera thoroughly after each rinse.
Step 5: Finishing Touches
Once you're satisfied that the corrosion has been removed, you can reassemble any parts that you took off earlier. Give the camera a final wipe-down with a soft cloth to ensure it's clean and dry. If there are any remaining signs of corrosion, you can try using a mild abrasive, such as a wooden toothpick or steel wool, to gently remove them. However, be cautious as this can also damage the finish of your camera.
Using a rust remover can be an effective way to remove green corrosion from your camera. Just make sure to work carefully and follow the instructions provided with your chosen product. With a bit of time and effort, your camera will be looking much better!
Woman Man Camera TV: Sarah Cooper's Guide to Chaos
You may want to see also

Clean with baking soda and water
To clean your camera's battery terminals with baking soda and water, start by mixing baking soda and water together in a small bowl until you get a paste-like consistency. The mixture should resemble toothpaste. Next, disconnect the battery and cover the positive terminal, ensuring that the terminal and battery post do not touch while you work.
Now, take a brush and dip it into your baking soda and water mixture. Carefully brush the corrosion away from you, working the paste into any large chunks of corrosion. Remember to brush away from the vent caps to avoid getting the mixture into the raised holes at the top of the battery.
Once you have brushed away the corrosion, use a damp cloth or brush to remove any remaining residue. Finally, dry the terminals and the top of the battery case with a clean towel.
Removing the Eye Piece: Accessing Your Camera's EVF
You may want to see also

Disassemble the camera for a thorough clean
If corrosion has built up inside your camera, it may be necessary to disassemble it for a thorough clean. However, this should be done with caution, as opening your camera may void its warranty. If you're unsure about cleaning the camera yourself, it's best to contact the manufacturer for guidance, hire a professional, or take it to a service centre.
If you decide to disassemble the camera, the first step is to turn it off and unplug it from the power source. You should also ensure you have the right tools for the job. This includes items such as a soft brush, canned air, a microfiber cloth, and lens cleaning solution.
Once you're ready to begin, use the soft brush to gently sweep away any dirt or debris on the outside of the camera. Then, use canned air to blow off any remaining dust or debris from the lens and surrounding areas. Be careful not to focus on one area for too long, as this can cause friction and impact picture quality over time.
Next, apply a few drops of lens cleaning solution onto the microfiber cloth and gently wipe the lens using a circular motion, working from the centre outwards. Be careful not to apply too much pressure, as this can scratch the lens. Finally, dry off any remaining moisture from the lens with a dry microfiber cloth.
If corrosion is present on the camera's terminals or battery contacts, you can use white vinegar to clean them. Soak a Q-tip in white vinegar and carefully apply it to the affected areas. It may take several applications and some firm rubbing to remove all the corrosion. Alternatively, you can use a wooden matchstick or toothpick to scrape off as much of the corrosion as possible before applying vinegar or another mild acid like citric acid or coca-cola.
The Absence of Spacecraft Cameras: Exploring the Unseen
You may want to see also
Frequently asked questions
Green corrosion is caused by a chemical reaction between the metal and moisture in the air, resulting in oxidation.
First, soak a Q-tip in isopropyl alcohol and gently scrub the affected area. If this doesn't work, try using a Q-tip dipped in white vinegar. If there are still some stubborn spots left, sprinkle some baking soda over them, then scrub again with a damp cloth or brush before rinsing with water.
Use multiple foam Q-tips soaked in a mixture of water and baking soda to clean the battery compartment. Then, use high-strength (91% or higher) isopropyl alcohol on a foam Q-tip to clean out the baking soda mixture.
Green corrosion is often caused by perspiration, so be sure to wipe down your camera regularly, especially around the eyepiece.


