If you're experiencing issues with your camera, it may be necessary to remove its associated plugin. This can be done in several ways, depending on the camera and the operating system in use. For example, to remove the OBS Virtual Camera plugin on a Mac, you can use the commands sudo rm -rf /Library/CoreMediaIO/Plug-Ins/DAL/obs-mac-virtualcam.plugin and sudo rm -rf /Library/Application Support/obs-studio/plugins/obs-mac-virtualcam in the Terminal. Alternatively, on Windows 10, you can run virtualcam-uninstall.bat as an administrator, or simply uninstall OBS-VirtualCam from the list of programs in the search bar on the taskbar.
| Characteristics | Values |
|---|---|
| How to remove OBS Virtual Camera on Windows | Run virtualcam-uninstall.bat as admin. It can be found in C:\Program Files\obs-studio\data\obs-plugins\win-dshow |
| How to remove OBS Virtual Camera on Mac | Hit "CMD+SHIFT+G", then enter /Library/CoreMediaIO/Plug-Ins/DAL/ Delete the file named obs-mac-virtualcam.plugin - you might be asked for your password to confirm the deletion. |
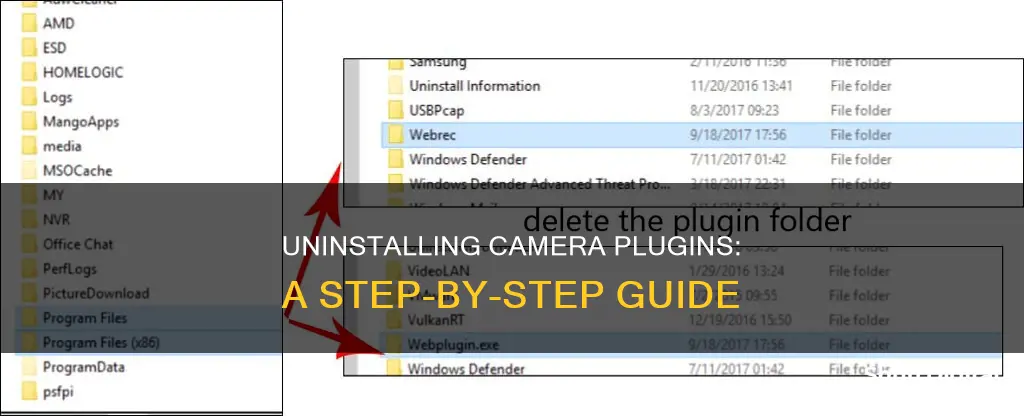
| How to remove Dahua security camera web plugin | Open the file explorer, go to This PC > Local Disk (C:) > Program File, locate the webrec directory (folder), open the folder and subfolder in this directory, run the uninstall file, and remove the webrec directory. |
What You'll Learn

Removing the Dahua security camera web plugin
If you're experiencing issues with your Dahua security camera, you may need to remove and reinstall its web plugin. This can be done by following a process similar to the initial installation.
Step-by-Step Guide to Removing the Dahua Web Plugin:
Step 1:
Open your computer's file explorer and navigate to "This PC > Local Disk (C:) > Program Files". Here, you will find the "webrec" folder, which contains the plugin information for your security camera system.
Step 2:
Enter the "webrec" folder and locate the torch-icon file folder. Open this folder, and then open the "3.0.0.3" file folder. This folder contains various files related to your plugins.
Step 3:
To initiate the uninstallation process, click on the "uninst" file and confirm the removal by clicking "Yes". This will remove all components of the plugin from your computer. Once the process is complete, click "OK".
Step 4:
At this point, the "webrec" folder should be empty. Go back to the "Program Files" folder and completely delete the empty "webrec" folder. It is important to delete this folder to ensure the installation process is truly complete.
Additional Notes:
Check both "Program Files" folders on your computer and delete any instances of the "webrec" folder. Once the plugin has been removed, you can reinstall it, and it will likely work correctly with your cameras.
Alternative Methods:
It is worth noting that newer cameras and firmware updates may no longer require the Dahua plugin. Some alternatives include using a browser like Google Chrome, which has an always-updated version of Adobe Flash Player, or trying different browsers to find one that works with your camera. Additionally, you can use the SmartPSS software or view the video stream using software like VLC or TinyCam.
Removing Camera Shortcut from Huawei Lock Screen
You may want to see also

Uninstalling OBS Virtual Camera on Mac
To uninstall OBS Virtual Camera on a Mac, you will need to delete the OBS plugin and the DAL plugin.
Firstly, open Finder and press "CMD+SHIFT+G". Then, enter the following file path:
/Library/CoreMediaIO/Plug-Ins/DAL/
You should see a folder named "obs-mac-virtualcam.plugin" or something similar. Delete this folder. You may be asked to enter your admin password to do this.
Next, you will need to delete the OBS plugin. To do this, enter the following file path into Finder:
/Library/Application Support/obs-studio/plugins/
Delete the folder named "obs-mac-virtualcam".
You can also try uninstalling OBS Virtual Camera by dragging it to the trash via Finder. This will prompt you to remove the associated system extension. Make sure you have no existing copies of OBS in the Trash when you do this.
Stream Your Eufy Camera on TV: Easy Guide
You may want to see also

Removing Camera Raw on Mac
Removing Camera Raw on a Mac can be done manually or automatically.
Manual Removal
Firstly, ensure that you have exited out of Adobe Camera Raw. You can do this by:
- Right-clicking on its icon on the Dock and choosing the 'Quit' option.
- Bringing the Adobe Camera Raw window to the desktop and choosing the 'Quit' option from the Apple menu.
- Launching the Activity Monitor from the Dock, Launchpad, or Spotlight, typing 'Adobe Camera Raw' in the search box, selecting the relevant process, clicking the 'X' button on the upper left corner, and clicking 'Quit' in the pop-up dialog. If this doesn't work, choose 'Force Quit'.
Once you have exited out of the app, you can then move the Adobe Camera Raw app icon from the Applications folder to the Trash. You can do this by dragging the icon to the Trash or by right-clicking on the icon and choosing 'Move to Trash'.
Automatic Removal
You can also use a third-party uninstaller tool such as Osx Uninstaller or MacRemover to uninstall Adobe Camera Raw. These tools will scan your system for all associated components of the app and delete them for you.
OBS Virtual Camera Removal
If you are trying to remove the OBS Virtual Camera on a Mac, you can do so by following these steps:
- Hit "CMD+SHIFT+G", then enter the following file path: /Library/CoreMediaIO/Plug-Ins/DAL/.
- Delete the file named 'obs-mac-virtualcam.plugin'. You may be asked for your password to confirm the deletion.
Apple Watch Series 3: GPS and Camera Features Explored
You may want to see also

Removing a camera from Chrome settings
If you want to remove a camera from your Chrome settings, you can follow these steps:
- Open Chrome: Click on the Chrome icon to launch the browser.
- Go to Settings: In the top right corner of the Chrome window, click on the three dots (or the three lines, depending on your version of Chrome) to open the menu. From there, select "Settings".
- Select "Privacy and Security": In the Settings menu, look for the "Privacy and Security" section and click on it.
- Choose "Site Settings": Under "Privacy and Security," you'll find Site Settings. Click on it to proceed.
- Select "Camera" under "Permissions": In the "Site Settings" section, scroll down to find Permissions. From the available options, choose Camera.
- Manage Camera Access: At this point, you will see a list of websites that have access to your camera. To remove a specific camera, you will need to revoke its access. Find the website associated with the camera you want to remove and click on it.
- Revoke Camera Access: After selecting the website, you will see the option to revoke camera access. Click on the Delete or Remove button to the right of the site to revoke its access to your camera.
- Confirm Removal: Depending on your device and operating system, you may need to confirm the removal of camera access. Follow any additional prompts to ensure the camera is successfully removed from your Chrome settings.
By following these steps, you should be able to remove the desired camera from your Chrome settings. Keep in mind that if you're using Chrome for work or school, your network administrator may have set specific camera and microphone settings that you cannot modify. In such cases, you may need to reach out to your administrator for further assistance.
Removing the iPod Touch Gen 6 Camera: A Guide
You may want to see also

Uninstalling OBS Virtual Camera on Windows
If you are encountering issues with the OBS Virtual Camera, such as it interfering with other applications or not functioning as intended, you may want to consider uninstalling it. Here is a step-by-step guide on how to uninstall the OBS Virtual Camera on a Windows device:
Step 1:
Open the Start menu by clicking the Windows logo in the bottom-left corner of your screen.
Step 2:
Locate and click on the "Settings" option, which may appear as a cog icon. This will open the Settings app.
Step 3:
Within the Settings app, navigate to the "Apps" section. This section may also be named "Apps & Features," depending on your Windows version.
Step 4:
In the Apps list, locate "OBS VirtualCam" or "OBS Studio." You may need to scroll down to find it.
Step 5:
Click on the OBS VirtualCam or OBS Studio entry, and then select the "Uninstall" button.
Step 6:
Follow the on-screen prompts to complete the uninstallation process.
If the OBS Virtual Camera is still causing issues after uninstalling it through the Settings app, you may need to take additional steps:
Step 1:
Open the File Explorer by pressing "Windows + E" on your keyboard or by clicking on the File Explorer icon in the taskbar.
Step 2:
Navigate to the following directory: "C:\Program Files\obs-studio\data\obs-plugins\win-dshow." You can copy and paste this path into the address bar at the top of the File Explorer window to jump directly to the correct folder.
Step 3:
Locate the file named "virtualcam-uninstall.bat" within the folder.
Step 4:
Right-click on the "virtualcam-uninstall.bat" file and select "Run as administrator." This will initiate the uninstallation process for the OBS Virtual Camera.
Step 5:
Follow any additional on-screen instructions, if necessary.
By following these steps, you should be able to successfully uninstall the OBS Virtual Camera on your Windows device.
Eliminating Camera Flashback on Windows 10: A Guide
You may want to see also


