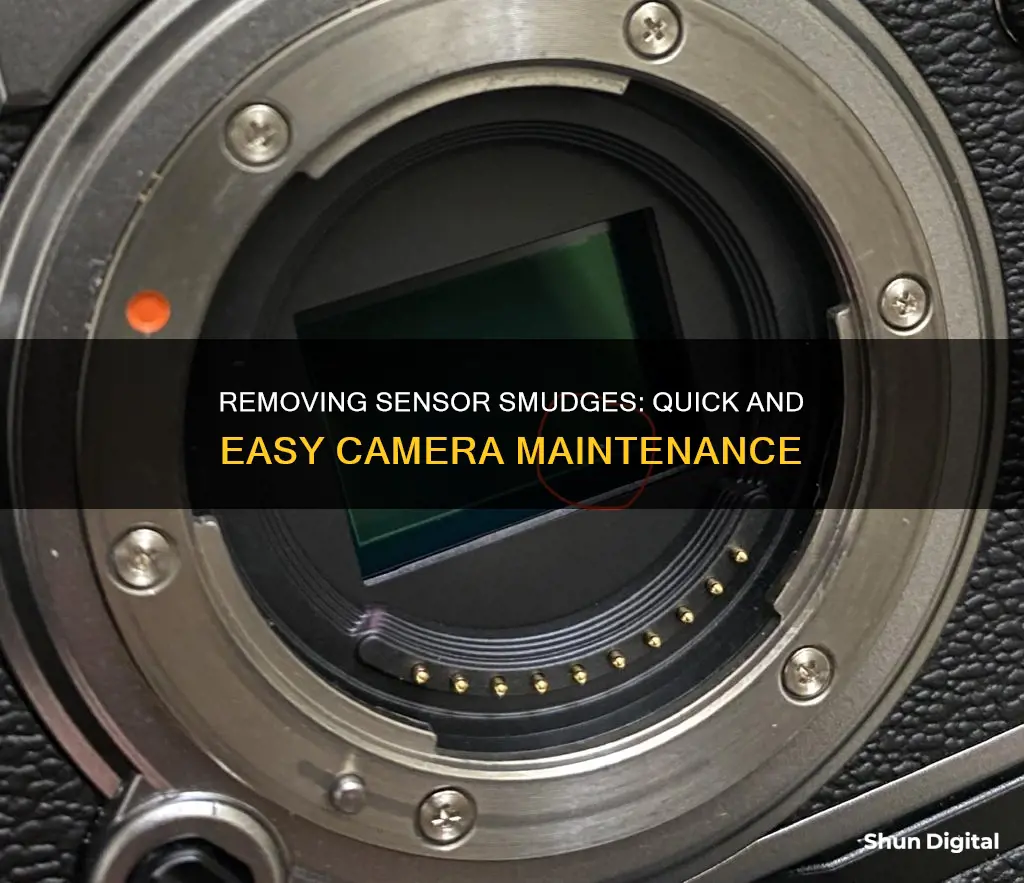
If you're a photographer, you've probably experienced the dread of seeing spots on your images. This is usually caused by dust or dirt on your camera's sensor. While newer camera models have a built-in sensor cleaning function, it's not always enough to get rid of the smudges. In this article, we will teach you how to remove smudges from your camera sensor using both dry and wet cleaning methods.
| Characteristics | Values |
|---|---|
| What is sensor dust? | Particles or elements that enter a camera and stick to its sensor when the user exposes the sensor by removing the body cap or switching lenses. |
| Why is sensor dust a problem? | If you’re a professional photographer, these quick fixes aren’t advisable since it would be too time-consuming to have to edit out sensor dust in every single picture. |
| Are self-cleaning sensors sufficient? | You may not need to clean your sensor as often, but it still needs to be cleaned manually every once in a while to ensure that it’s completely dust-free. |
| Is DIY sensor cleaning safe? | DIY sensor cleaning is completely safe as long as you do it the right way. |
| How to check if your sensor is dirty? | Shoot a sensor check image, then post-process to find the spots. |
| What to do before cleaning the sensor? | Make sure you have a fully charged battery, clean your camera’s exterior body, observe cleanliness in the area, and gather all the necessary tools. |
| Dry cleaning method for camera sensor: | Use a manual air blower to eliminate bigger dust particles, then use a sensor scope to check for uncleared spots. |
| Wet cleaning method for camera sensor: | Use sensor cleaning brushes, sensor cleaning solution, and swabs to clean the sensor. |
| Finishing steps in cleaning a camera sensor: | Shoot a piece of plain paper to see if you had any luck blowing off some of the smaller spots. |
| Tips to keep your camera sensor clean: | Always point the camera toward the ground when changing lenses so that dust particles won't land on your DSLR's sensor. |
What You'll Learn

Dry cleaning methods for camera sensors
The idea of cleaning your camera's sensor may be daunting, but it is a straightforward process. Here is a step-by-step guide on how to do it properly, effectively, and safely.
Every time you change a lens on your camera, you expose the inside to potential dust and dirt contaminants. This will inevitably show up in your images as blurry spots.
How to test for sensor dust
- Set your camera to a small aperture such as f/16 or f/22.
- Set your camera to the lowest ISO.
- Take a photograph against something bright white, such as a white wall, piece of paper, or cloudy sky. Gently move the camera slightly as you take the photo to help blur the photo and make the dust more visible.
- Inspect the back LCD screen at 100% or load the image onto your computer to check for dust.
Before you attempt to clean your sensor
- Try to use your camera's auto-clean mode if it has one.
- Ensure your camera's battery is fully charged.
Tools you will need
- Cleaning swabs that are lint-free and designed for your camera's specific sensor size.
- A cleaning solution designed for camera sensors.
- A bulb blower for manually puffing dust away with air.
- A flashlight or headlamp to see inside the camera and inspect the body.
- A sensor loupe—a magnifier with LED lights that allows you to clearly see the sensor and inspect for dust and dirt.
How to dry clean your sensor
- Find an area that is as free of dust and wind as possible.
- With a full battery and no lens on your camera, look for the menu option to manually clean your camera. This will lock the mirror back and reveal the sensor.
- Holding the camera upside down so the LCD screen is facing the ceiling, use the manual air blower to blow air into the camera onto the sensor. Be extremely careful NOT to touch the sensor with the tip of the blower.
- After a few blasts of air, turn off the camera and replace the lens.
- Take another test shot to see if this has removed the dust. If it remains, you will likely need to proceed to a 'wet' clean of the sensor.
Tips to keep your camera sensor clean
- When changing lenses, ensure it is done in a clean place with still air.
- Always point the camera towards the ground so that dust particles will not land on your DSLR's sensor.
- Avoid unnecessary lens changes.
- Ensure your lens cap is clean before covering up your lens optics.
- Keep your camera bag clean.
Viewing FLIR Camera Clips: A Step-by-Step Guide
You may want to see also

Wet cleaning methods for camera sensors
Step 1: Prepare the Cleaning Area and Gather Tools
- Find a clean, dust-free area to work in.
- Gather your cleaning tools: sensor cleaning swabs, cleaning solution designed for camera sensors, a bulb blower, a flashlight or headlamp, and a sensor loupe.
Step 2: Prepare the Camera
- Remove the lens from your camera.
- Place the camera on a surface with the LCD screen facing downwards.
- Select the manual cleaning option in your camera's menu to lock up the mirror (for DSLRs). Alternatively, remove the lens or body cap to expose the sensor (for mirrorless cameras).
Step 3: Prepare the Swab
- Take a sensor cleaning swab and use the air blower on it several times to remove any loose lint.
- Add two to three drops of cleaning solution to the tip of the swab. Be careful not to oversaturate the swab, as this can leave streaks on the sensor.
Step 4: Clean the Sensor
- With gentle pressure, place the swab on one side of the sensor.
- Gently drag the swab in one smooth motion from one edge of the sensor to the other.
- Turn the swab over and repeat the process, starting from the opposite side and dragging it back to where you started.
- Use a sensor loupe to inspect the sensor for any remaining dust or streaks. If necessary, repeat the process with a new, clean swab.
Step 5: Final Checks
- Turn off the camera and replace the lens.
- Take a test shot against a white wall, piece of paper, or the sky to check for any remaining dust spots.
Wet cleaning your camera sensor is a delicate process, but it can be done safely and effectively if you follow the correct procedures. Always exercise caution when handling your camera's sensor to avoid causing any damage.
Removing Bixby Vision from Your Camera: A Step-by-Step Guide
You may want to see also

How to check if your camera sensor is dirty
It's important to regularly check if your camera sensor is dirty, as dust can cause black spots in your photos and lead to hours of painstaking time spent in post-processing. Here is a step-by-step guide on how to do this:
Step 1: Set Up Your Camera
- Set your camera to Aperture Priority mode (A).
- Set the ISO to the lowest setting available on your camera (usually 100 or 200).
- Set the focus mode on the camera and lens to Manual Focus (MF).
- Set the aperture (f-stop) value to the highest number available.
Step 2: Take a Picture
- If you are outdoors, point your camera at a clear, blue patch of sky.
- If you are indoors, point your camera at a plain white piece of paper or a computer screen.
- Zoom in the lens so that the sky, paper, or screen takes up the whole frame.
- Make sure that your focus is way off (completely out of focus) so that only dust particles will be visible.
Step 3: Review Your Image
- View the image on the LCD screen of your camera.
- Zoom in on the image and scroll left to right and top to bottom to examine each section.
- Look for dark spots, which indicate dust on your camera sensor.
If you find dark spots on your image, it's time to clean your camera sensor. You can do this manually or by using your camera's self-cleaning mode. Just be sure to follow the proper steps and take precautions to avoid damaging your sensor.
Unlocking Yi Home Camera Generations: A User's Guide
You may want to see also

Things to do before cleaning your camera sensor
Before you begin the process of cleaning your camera sensor, there are several important steps to take to ensure the safety of your equipment and the effectiveness of the cleaning. Here is a list of things to do before you start cleaning:
- Check if your camera has an auto-clean mode: Many modern cameras have a built-in sensor cleaning function. Try using this feature first to see if it makes a difference in removing dust or dirt from your sensor. This can usually be found in the camera's menu under "sensor cleaning" or "auto-clean."
- Ensure your camera's battery is fully charged: This is crucial to prevent the camera from turning off midway through the cleaning process, which could damage the sensor. Most cameras won't let you initiate the sensor cleaning feature if the battery is too low, so make sure your battery is fully charged before starting.
- Clean your camera's exterior body: It is important to clean the outside of your camera before attempting to clean the sensor. This will help prevent dust particles from entering the camera and settling on the sensor during the cleaning process.
- Choose a clean and dust-free area: Select a clean and dust-free environment to perform the sensor cleaning. This will help minimize the amount of dust and dirt in the air that could potentially settle on your sensor during the cleaning process.
- Gather all the necessary tools: Before you begin, make sure you have all the required tools and materials for cleaning your camera sensor. This includes items such as a bulb blower, sensor cleaning swabs, cleaning solution designed for camera sensors, a flashlight or headlamp, and a sensor loupe (a magnifier with LED lights to inspect the sensor).
- Inspect your sensor for dust: Before proceeding with any cleaning methods, it is important to confirm the presence of dust or dirt on your sensor. You can do this by taking a photograph of a plain white surface or the sky and checking for blurry spots or dark/grey blobs. Additionally, you can use the "Visualize Spots" feature in Lightroom to help identify dust spots in your images.
- Be cautious: Always exercise extreme care when handling your camera sensor. Avoid touching the sensor with anything, as it is extremely fragile and susceptible to damage. Be gentle and deliberate in your movements to prevent accidental scratches or marks.
By following these steps, you will be well-prepared to clean your camera sensor effectively and safely. Remember to work slowly and carefully, and always prioritize the safety of your equipment.
Integrating Alcidae Cameras with Alexa: A Step-by-Step Guide
You may want to see also

Tools for cleaning your camera sensor
The first step in cleaning your camera sensor is to check whether it needs cleaning. To do this, set your camera to a small aperture such as f/16 or f/22, and the lowest ISO setting. Then, take a photograph against a bright white surface or the sky. If you see dark spots or blobs on the image, your sensor needs cleaning.
Dry cleaning method
The first step in cleaning your camera sensor is to use a manual air blower to eliminate larger dust particles. This can be done by holding the camera upside down and blowing air into the camera onto the sensor, being careful not to touch the sensor with the tip of the blower.
Tools for dry cleaning your camera sensor:
- Manual air blower
- Sensor scope
Wet cleaning method
If the air blower does not remove all the dust, the next step is to use a sensor-cleaning brush or swab. These brushes have bristles that hold an electrostatic charge and attract particles off the sensor.
Tools for wet cleaning your camera sensor:
- Sensor cleaning brush or swab
- Sensor cleaning solution
Hisense TV: Are There Hidden Cameras?
You may want to see also


