Setting up a new desktop monitor is a simple process that can greatly improve your computing experience. Whether you're a gamer, a professional, or just looking for some extra screen space, connecting an external monitor to your laptop or desktop computer is a straightforward task that usually only requires a few steps. In this article, we'll guide you through the process of hooking up your new desktop monitor, covering everything from cables and ports to display settings and troubleshooting.
| Characteristics | Values |
|---|---|
| Number of cables required | 2 |
| Types of cables required | 1 for power and 1 for data |
| Examples of cable and port combinations | DVI, HDMI, DP (DisplayPort), USB-C, VGA, composite, S-Video connections |
| Cable and port combinations for older monitors | VGA, composite, and S-Video connections |
| Cable and port combinations for newer monitors | USB-C, HDMI |
| Cable and port combinations for Apple devices | Thunderbolt |
| Display options | Duplicate, Extend, Second Screen Only |
What You'll Learn

Choosing the right cable
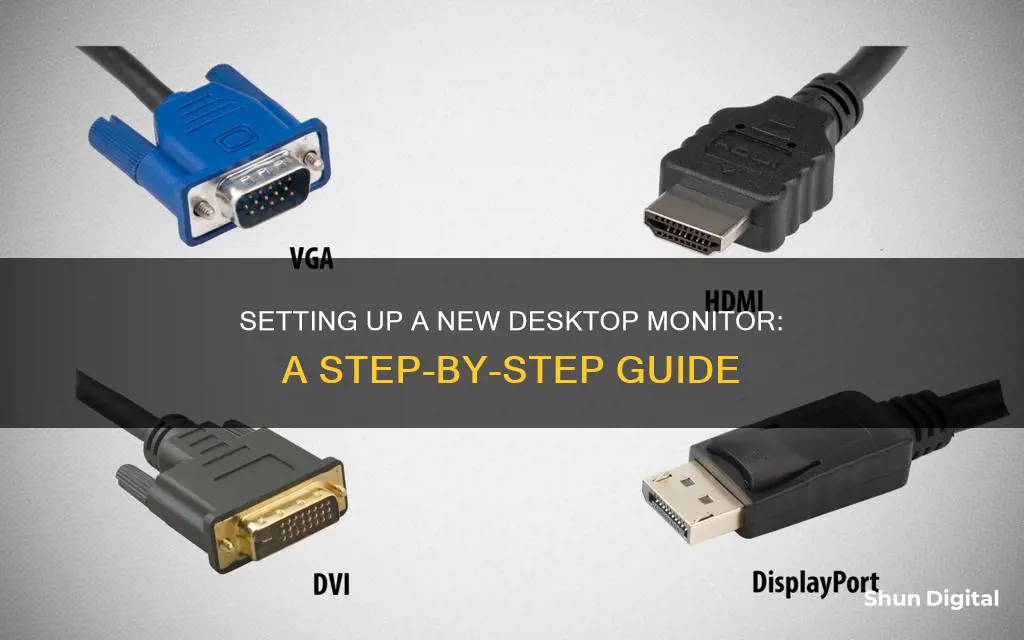
The most popular type of video connection today is HDMI, which stands for High-Definition Multimedia Interface. HDMI cables transmit both video and audio signals and are commonly found on modern monitors and laptops. If your laptop and monitor have different video connections, you can usually find an adapter to convert the signal.
Another option is a DisplayPort cable, which also transmits both video and audio. DisplayPort has a higher bandwidth than HDMI and is often used in gaming monitors. For even higher-quality displays, a DisplayPort may be preferable to take advantage of its faster refresh rates.
If you have an Apple device, you may need a Thunderbolt cable, which is also found on some MacBooks. Thunderbolt is a versatile port that can transmit power, video, data, and audio signals.
VGA, or Video Graphics Array, is an older type of connection that transmits analog video signals. It is usually blue with 15 holes. While VGA can provide high frame rates and resolutions, the image quality is not as sharp as newer connection types.
DVI, or Digital Visual Interface, is a newer type of connector that offers a sharper and better display than VGA. DVI carries both analog and digital signals, and it is easy to differentiate from VGA as DVI connectors are white while VGA connectors are blue. DVI supports standard, enhanced, and high-definition videos, as well as multiple-channel digital audio over a single cable.
When choosing a cable, it is important to consider the resolution and refresh rate you want to achieve. For example, a standard 18Gbps HDMI cable can handle 4K at 60Hz, while a gaming laptop may require a 48Gbps HDMI cable that can transmit 4K at up to 120Hz.
LCD Monitors: Do They Fade?
You may want to see also

Connecting the monitor
Firstly, you need to determine the type of cable you will need to connect your monitor to your computer. Most modern computers have different ports, including HDMI, USB Type-C, VGA, and DVI. Your monitor should come with a power cable and may include a data cable. If your monitor and computer have the same type of port, simply use the appropriate cable to connect the two. For example, if both your monitor and computer have an HDMI port, use an HDMI cable.
If your monitor and computer do not have matching ports, you have several options. You can purchase a different cable that is compatible with both your computer and monitor. You may need to use an adapter to convert the output, which is common when connecting newer monitors to older computers or vice versa. For instance, if your computer has an HDMI port but your monitor only has a VGA port, you would need an HDMI-to-VGA adapter. Alternatively, you can purchase a video converter that changes one connector type to another.
Once you have the correct cable or adapter, simply plug it into both your computer and monitor. Ensure that the power cord is connected to the monitor and an electrical outlet or power strip. Then, turn on both your computer and the monitor.
If your monitor has different connectors, you may need to switch the input type using the buttons under the bezel. Additionally, if your monitor includes software, you will need to install it.
After the physical connections are made, you may need to adjust your display settings. On Windows, press the Windows logo key + P to select a display option. This will open an options menu where you can choose to duplicate or extend your display. To duplicate is to show the same image on both displays, while to extend is to spread your desktop across both displays, allowing you to drag windows from one display to the other. On a Mac, go to System Preferences and click on Displays to adjust your display settings.
Expanding Your iMac: Using an External Monitor
You may want to see also

Display settings
Once you have connected your monitor to your laptop or desktop computer, you will need to adjust your display settings.
Windows
If you are using a Windows Operating System, press WIN+P to open an options menu on the right-hand side of your screen. Here, you can choose from the following display options:
- "Duplicate these displays" — shows the same image on both displays
- "Extend these displays" — increases your desktop across both displays
- "Show only on 1" or "Show only on 2" — shows the image only on the selected display
If you are using Windows 7, you can access these options by right-clicking on the desktop, selecting "Screen resolution", and then selecting from the drop-down menu under "Multiple Displays".
For Windows 8 and later, you can also access the display settings by right-clicking on the desktop and selecting "Display Settings". Here, you can adjust the resolution of your displays, although it is recommended to use the default resolution for optimal performance. You can also adjust the positioning of your screens by clicking and dragging the screen images until they match their correct positions.
MacOS
If you are using a Mac, go to the Display Settings pane in System Preferences. If your monitor is not automatically detected, click on "Detect Displays" and it will be detected. Here, you can choose whether you want your two screens to mirror each other or extend. If you choose to extend, you can drag and drop the monitor icons so that they match their real-life positions.
FirePro W9100: Monitor Connection and Compatibility
You may want to see also

Troubleshooting
If you are trying to set up an external monitor and it's not working, try the following:
- Ensure that your device is up to date.
- Make sure your cables are connected properly to the new monitor.
- Press the Windows logo key + P to make sure that the "Extend" option is selected.
- Disconnect all accessories from your PC. Connected docks, dongles, adapters, and other hardware can cause conflicts.
- Make sure the cable connecting your PC to your external monitor is secure.
- Try changing the cable connecting the external monitor. If the new one works, the previous cable was faulty.
- Try using the external monitor with a different system. This can help isolate whether the issue is with the monitor or the primary system.
- If your system has more than one video output port, try plugging your external monitor into one of the other video output ports. Typical ports are HDMI, VGA, DVI, and DisplayPort.
- If your system has more than one display adapter (also called a graphics card), you can try switching your system's default display adapter.
- If you are trying to use a display splitter to extend your display to more than one external monitor, you won't be able to. The splitter is duplicating the same signal instead of creating two independent signals.
- Try a Windows key sequence: press Windows logo key + Ctrl + Shift + B.
- Roll back your display driver.
- Reinstall your display driver.
If your second monitor is not displaying:
- Force Windows to detect your monitor: right-click the desktop and select Display Settings from the resulting pop-up menu. In the following window, click the "Detect" button located under the display diagram.
- Turn the screen off and on: Some connection types don't like hot-swapping while a different monitor is powered on.
- Verify cable connections: A loose cable can cause "no signal" errors. If they seem secure, unplug and plug them in again.
- Remove other peripheral devices: Disconnect any connected cameras or other unnecessary peripherals.
- Verify the correct input: Monitors with multiple input options need you to manually select which cable and port you're using, like HDMI 1, HDMI 2, DisplayPort 1.4, USB-C, etc. Use the buttons on your monitor to cycle through the channels and select the correct input from your PC.
- Change the data cable: If you're using an older cable standard like VGA or DVI-D, try a newer alternative like HDMI or DisplayPort.
- Change the graphics port: If you're using a dedicated graphics card with multiple output ports, try switching to another port.
- Update your drivers: Windows supports multiple monitors by default, but your current setup may not be configured correctly.
If your monitors have wrong or differing resolutions:
- Right-click your desktop and select the Display Settings option on the resulting pop-up menu.
- Click on the secondary display shown in the diagram.
- With your secondary screen highlighted, scroll down to Scale and Layout and click the drop-down menu located under Display Resolution.
- Select a screen resolution that works best for you. Windows designates one of these resolutions as "recommended" based on the display's hardware.
- Make sure your monitor and graphics card can run at your chosen resolution.
- Try updating your graphics drivers.
If your monitors have the wrong aspect ratio:
- Review your resolution settings: Ensure that your resolution settings match each monitor you are using. Use recommended or screen-fitting options where possible.
- Switch cables: If possible, try a different cable standard, like switching from DisplayPort to HDMI or vice-versa. Make sure the cables you are using support your current resolution — older cables may not support UHD/4K resolutions, which could cause this aspect ratio issue.
- Check if you are using a TV as a second monitor. If so, go into your TV settings and look for options to turn off the Overscan or Underscan setting. This may also be called a Relax mode. You may also want to make sure there are no Aspect Ratio modes accidentally enabled. Consult your TV manual for more information.
- Check your display orientation: In Windows, go to the Display section and look for Display Orientation. Try switching the orientation to something like Portrait, then switch it back to Landscape and see if this helps.
Monitoring Pagefile and Memory Usage for Smooth Gameplay
You may want to see also

Using multiple monitors
To set up multiple monitors, you'll need to ensure that your computer supports multiple displays. Modern computers typically have various ports, such as HDMI, USB Type-C, VGA, and DVI, which can be used to connect additional monitors. If your computer has multiple video output ports, you can connect multiple monitors directly.
If your computer only has a single video output, don't worry! You can use devices like USB docking stations or display adapters to add more monitors. Additionally, if your laptop and monitor don't share the same video connection, adapters are usually available to convert the connection to the required format. Common adapters include HDMI to DisplayPort, DisplayPort to VGA, and USB-C to HDMI.
Once you have the correct cables or adapters, follow these steps:
- Connect the cables to the appropriate ports on your computer and monitors.
- Power on the monitors and ensure they are properly connected to a power source.
- Press the Windows logo key + P to select a display option.
- Choose the "Extend" option to spread your desktop across all displays, allowing you to drag windows between them.
- Fine-tune the positions of the screens in the display settings to match their physical arrangement.
- Adjust the resolution of your displays if needed, although it is recommended to use the suggested resolution for the best experience.
By following these steps, you can easily set up and use multiple monitors to enhance your computing experience.
Battery Size for Elfi Doggy Monitor: All You Need to Know
You may want to see also
Frequently asked questions
First, check that the monitor has the right cables. Most monitors require at least two cables: one for power and one for data. The power cable connects to an electrical outlet, and the data cable transmits the picture signal from your computer to the display. The type of data cable will depend on the ports on your computer's video card, motherboard, and monitor support. Common data cables include HDMI, DisplayPort, VGA, and USB-C.
Once you've identified the right cables, match the cable with one of the video ports on the back of the monitor and computer. Plug the cable into each, and then connect the power cord to the back of the monitor and the other end to a power outlet or power strip.
Finally, turn on the monitor and computer. The monitor power button is often found on the middle or right side of the front or bottom edge of the monitor.
If your laptop and monitor don't share the same video connection, you can usually find an adapter that enables you to convert one of the above connections to the format you need. Common monitor connections include HDMI, VGA, and USB.
After connecting the monitor, you can choose to duplicate or extend your display. On Windows, go to Display Settings and press WIN+P to open up an options menu. Select the "Extend" option to use both displays as one large desktop, or the "Duplicate" option to show the same thing on both screens.
On a Mac, go to System Preferences and click on Displays. Hold down the Option key and click Detect Displays. You can also open the Privacy & Security menu and use the "Allow accessories to connect" option.


