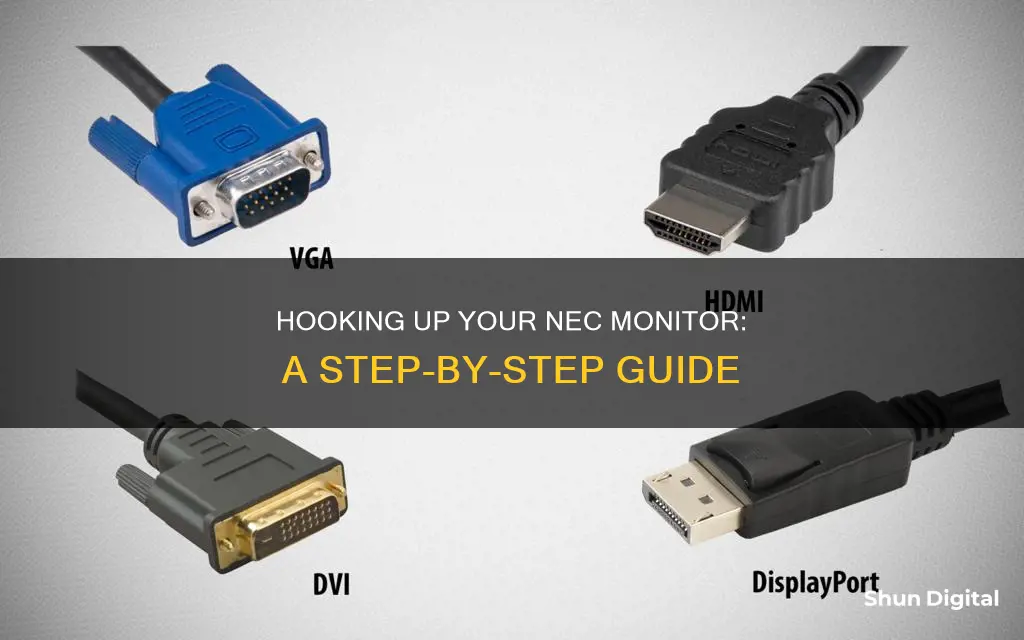
Setting up an NEC monitor depends on the type of monitor and the device you want to connect it to. For example, if you want to connect your NEC monitor to a computer, you'll need to ensure you have the right cables, such as a DVI, VGA, HDMI, or USB-C cable. You may also need to update your computer's display settings to recognise the monitor. If you're connecting your NEC monitor to a Mac, you can go to System Preferences -> Display and select the Arrangement tab to set up your displays. For arcade machines, you'll need to connect the power and video input to the monitor, which may require an isolation transformer to prevent damage to the monitor's power supply.
| Characteristics | Values |
|---|---|
| Display Size | 17", 19", 22", 23", 24", 27", 32", 43", 49" |
| Refresh Rate | 56Hz, 60Hz, 75Hz, 120Hz |
| Resolution | QSXGA Wide, FHD 1080i, FHD 1080p, 4K UHD 2160p |
| Response Time | 5ms, 5.5ms, 6ms, 8ms, 14ms |
| Connection | VGA, DVI, HDMI, USB-C |
What You'll Learn
- Using a DVI cable to connect a computer to an NEC monitor
- How to set up an NEC monitor as an external display for a Mac?
- Troubleshooting an NEC monitor that is not detected by a Windows 10 PC
- Using VGA for high-res connections to an arcade machine monitor
- Using red, green, blue, ground and sync for low-res connections to an arcade machine monitor

Using a DVI cable to connect a computer to an NEC monitor
To connect a computer to an NEC monitor using a DVI cable, you will first need to ensure that your computer supports the use of a DVI cable. Once you have confirmed this, follow the steps below:
Firstly, shut down your computer and turn off the NEC monitor. Next, disconnect any VGA, HDMI, or other video cables from both the monitor and the computer. Now, locate the DVI port on the back of the monitor. This may be labelled "DVI", or you can look for a port bearing multiple square pin-outs. Plug one end of the DVI cable into this port. Then, connect the other end of the DVI cable to the DVI port on the back of your computer. This port connects the cable to your computer's video card.
Now, power on both the computer and the monitor. You may need to press the "Reset/DV Mode" or "Source" button on the front of the monitor until "DVI" appears at the top of the screen. Note that DVI cables do not transmit audio signals, so you will need to attach an audio cable from the computer to your speakers to hear sound.
Finally, push any control button on the front of the monitor to open the on-screen display. You cannot change the signal input if the on-screen display is open, so if you press the "Reset/DV Mode" button while the display is open, you will be prompted to reset the monitor's settings to their factory default values.
Disposing of LCD Monitors: Local Solutions for E-Waste
You may want to see also

How to set up an NEC monitor as an external display for a Mac
To set up an NEC monitor as an external display for a Mac, you'll first need to determine what kind of cable you'll need to connect the two. Check the ports on both your monitor and your Mac to see if they're compatible. Most monitors have at least one HDMI port, and if you have a Mac that was released in 2019 or later, it will have Thunderbolt 3 ports, meaning you can use a USB-C cable. If you have an older Mac, you may need a different cable, such as a Mini DisplayPort connector.
Once you have the correct cable, plug your monitor into a power source and connect it to your Mac. Then, turn on your Mac and log in. Your Mac's screen should now be mirrored on the external display. If you want to use the external monitor as your main display, connect an external mouse and keyboard to your Mac, and ensure the computer is plugged into a power source. Then, close the MacBook's lid, and the monitor should display what's on your computer.
If you want to use the external monitor as a second monitor, you'll need to adjust your settings. Open System Preferences and click "Displays". In the Displays menu, click on the Arrangement tab. Uncheck the "Mirror Displays" box, and you'll be able to use your Mac's screen and the external monitor as two separate displays.
LCD Monitor Imports: Classifying for Success
You may want to see also

Troubleshooting an NEC monitor that is not detected by a Windows 10 PC
If your Windows 10 PC is not detecting your NEC monitor, there are several troubleshooting steps you can take to try and fix the issue.
First, make sure your device is up to date by selecting Start > Settings > Update & Security > Windows Update, then select Check for updates.
Next, try some basic hardware troubleshooting steps:
- Confirm the monitor is connected to a power source and turned on.
- Turn the computer off and on to refresh the connection.
- Open the monitor's built-in controls and choose the correct input port.
- Check the signal cable connection between the display and the graphics card.
- Disconnect the signal cable from both ends, wait a minute, and reconnect it.
- Try a different signal cable to see if the problem is with the cable.
- Check the manufacturer's requirements to ensure you have the correct cable, as DisplayPort and HDMI come in different versions.
- Change ports if the monitor and graphics card have multiple ports.
- Try connecting the monitor to another computer to see if the problem is with the monitor or your PC.
- Try connecting another known working monitor to your PC to see if the issue is with the graphics card.
- Disconnect all peripherals (e.g., printers, cameras, USB devices) to check if any other devices are conflicting with the display.
- If you have a Surface device with a dock station, try connecting the monitor directly to the computer to see if the problem is with the dock.
- Update the external monitor firmware to fix any bugs or compatibility issues (this is less common).
If the basic troubleshooting steps above don't work, the problem could be software-related. Here are some additional steps you can try:
- In the Settings app, force the system to detect the second monitor. Under the "Multiple displays" section, click the Detect button to connect to the external monitor.
- Try a Windows key sequence: press Windows logo key + Ctrl + Shift + B.
- Roll back your display driver: if you're experiencing issues after an update, returning to a previous version of your display driver may solve the issue.
- Reinstall your display driver: if none of the above steps work, reinstall your display driver.
Setting Up Your ASUS Portable Monitor: A Step-by-Step Guide
You may want to see also

Using VGA for high-res connections to an arcade machine monitor
VGA to arcade monitor connections can be achieved through several methods, each with its own advantages and considerations. One approach is to use a VGA-to-arcade monitor cable, ensuring that the sync is correctly wired on the arcade monitor side. This method may require trial and error with different wiring configurations to achieve a stable display.
Another option is to use an analog IO board that supports direct VGA output to the arcade monitor, eliminating the need for adapter cables. This simplifies the setup and provides a plug-and-play experience. Additionally, an HDMI-to-VGA adapter can be used in conjunction with a VGA amplifier to boost the signal and improve the display quality. However, it is important to ensure that the amplifier is compatible with the specific arcade monitor being used.
When establishing a VGA connection to an arcade monitor, it is crucial to consider the voltage requirements. Arcade monitors often require different voltages than standard VGA connections, so adjustments or amplifiers may be necessary to achieve the correct RGB and sync voltages.
Furthermore, arcade monitors typically use RGB and composite sync, running at the same frequency as a normal television. When connecting a computer to an arcade monitor, it is important to ensure that the video board supports TV output and can output the correct frequency through the VGA connector. Some video boards, such as the STB Velocity 128 and certain Diamond video boards, are known to be compatible with this setup.
It is also worth noting that arcade monitors have specific power supply considerations. They require a proper load on the power supply, and incorrect usage can lead to damage. Additionally, the orientation and magnetic shielding of the monitor should be taken into account, as tilting or relocating the monitor can result in display distortion.
ASUS MB168B Monitor and ASRock Motherboard: A Perfect Match?
You may want to see also

Using red, green, blue, ground and sync for low-res connections to an arcade machine monitor
To connect a computer to an arcade monitor, you will need to use a VGA cable for high-resolution games or red, green, blue, ground, and sync for low-res or medium-res games.
If you are using red, green, blue, ground, and sync, you will need to wire the arcade's red, green, blue, hsync, vsync, and ground to the PC's video card. You can purchase the necessary parts, including a 15-pin sub-d connector, IDE computer data cable, and a solder, from a store like Radio Shack. Solder the wires to the 15-pin sub-d connector, which will have numbers by each pin (1 to 15). The pins that the arcade is concerned with are 1, 2, 3, 5, 13, and 14.
Once you have wired this up, you should be good to go. You may initially get a scrambled picture, but you can adjust the vertical and horizontal knobs until you get a clear image. If you experience the screen drifting from side to side, check that the hsync and vsync are on the correct positive or negative settings.
You may also want to purchase a PC-to-video converter, which provides additional features such as height and width adjustment, zoom, and position control. This is not necessary but can be helpful if you are switching between a VGA monitor and an arcade monitor.
Please note that these instructions are provided as general guidance, and specific steps may vary depending on the exact model of your NEC monitor and arcade machine. Always refer to the official manuals or seek professional assistance if you are unsure about any part of the process.
Theatre Mode: ASUS Monitor's Unique Feature Explained
You may want to see also
Frequently asked questions
Your Mac should recognize the external display automatically. If not, click on "Displays" in System Preferences, and set up the external monitor from there.
Shut down your computer and turn off the monitor. Disconnect any VGA, HDMI, or other video cables from the monitor and the computer. Locate the DVI port on the back of the monitor and plug in one end of the DVI cable. Connect the other end of the cable to the DVI port on the back of your computer. Power on the computer and the monitor. Press the "Reset/DV Mode" or "Source" button on the front of the monitor until "DVI" appears at the top of the screen.
You will need a DVI (Digital Visual Interface) cable. DVI cables don't transmit audio signals, so you will also need an audio cable from the computer to your speakers to hear sound.


