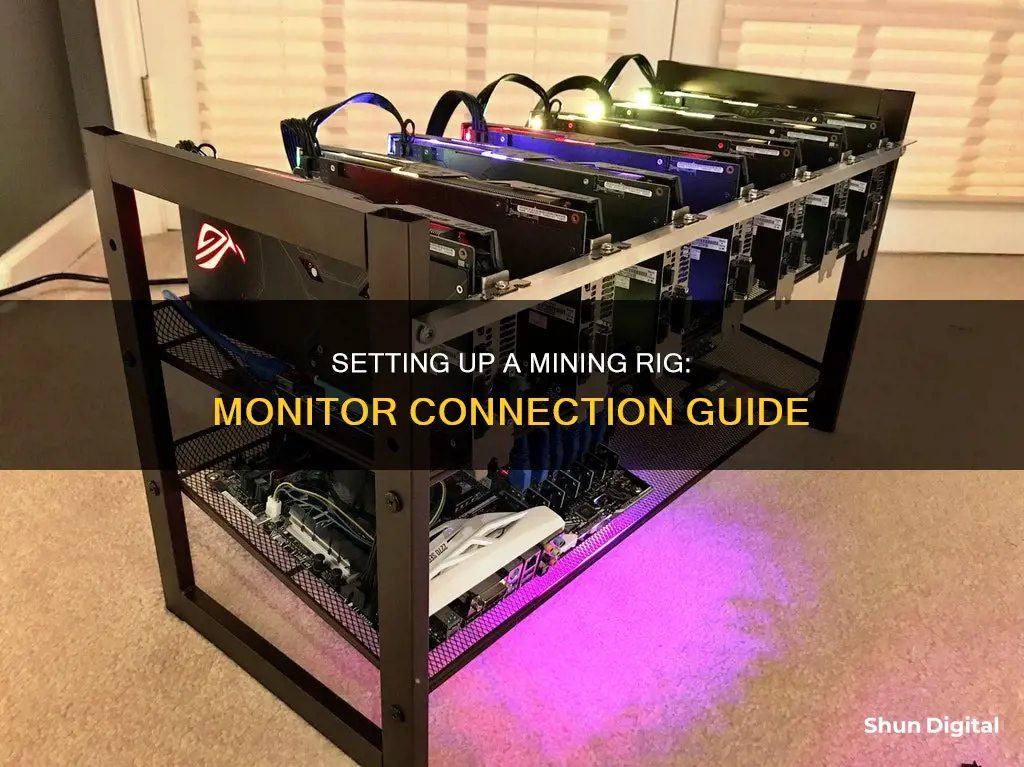
Setting up a mining rig can be a daunting task, but with the right tools and guidance, it can be a straightforward process. A mining rig is a hardware setup that enables the addition of new coins to the circulating supply of any cryptocurrency. It is a crucial process that allows cryptocurrencies to function as a decentralised P2P network. To get started, you will need the right hardware, software, and access to a mining pool. This includes GPUs, a motherboard, CPU, RAM, PSU, risers, SSD, and an Ethernet cable or Wi-Fi adapter for an internet connection.
Once you have all the components, you can begin assembling the rig. This involves attaching the motherboard, processor, RAM, power supply unit, USB risers, and GPUs, ensuring all cables are correctly connected. Finally, you will need to configure the BIOS settings and install the operating system and relevant drivers.
To monitor your mining rig, you can use remote access software such as TeamViewer or Chrome Remote, or mobile apps such as the NiceHash phone app. These tools allow you to monitor temperatures, receive notifications, and remotely control your rig.
What You'll Learn

Connecting to your rig via SSH
Once you have your rig powered up and connected to your internet router, head to your desktop computer and open up a command prompt. From here, you can try a few things to obtain your rig's IP address:
- Type "ping miner" (without the quotes). If you get an IP address, make a note of it and skip the rest.
- Type "arp -a" to list all the IP addresses on your local network. Your mining rig will likely have a "dynamic" type address, so ignore the static ones.
- Log into your internet router's administration area to find the IP address. You're looking for "miner" in the list of connected devices.
If the above methods don't work, you'll need to temporarily plug a monitor, keyboard, and mouse into your rig to find its IP address. Once you have the address, download and open Putty, inputting your mining rig's IP address into the "Host Name (or IP address)" field. Ensure the port is 22 and the connection type is "SSH", then click "Open".
If successful, you should see a login prompt. Use the following credentials:
Login as: miner
Password: miner
Now you should be authenticated and can start using your rig!
Asus vs LG: Who Makes Better Monitors?
You may want to see also

Using a smart plug to turn the power on and off
Smart plugs can be used to remotely power cycle your rig in the event that it crashes or goes offline. This can be done by attaching the smart plug to your motherboard's 'main' power supply.
There are quite a few smart plugs to choose from. The TP-Link HS110 Smart Plug is a good option as TP-Link’s consumer networking products are generally top-notch, the management app seems full-featured and mature, and the built-in energy monitoring is a nice extra. The HS110 can handle up to 1800 watts, considerably more than most smart plugs, and should be fine for a 12+ GPU rig.
Other options include the iHome Wi-Fi smart plug, which is compatible with HomeKit, and the Broadlink SP2, which is cheap, in English, and has a power monitor with a calculator.
One user reported that they use a smart plug with a box fan to cool their rig when GPU temperatures get too high.
DisplayPort Multi-Monitor Setup: Easy Guide to Success
You may want to see also

Using a remote desktop software
Remote desktop software is a great way to monitor and manage your mining rig from a distance. It allows you to access your rig as if you were sitting in front of it, providing control over various functions and features. Here are some detailed instructions and considerations for using a remote desktop software:
Choosing a Remote Desktop Software
Firstly, you'll need to choose a suitable remote desktop software that meets your needs. There are several options available, each with its own advantages and features. Here are some popular choices:
- Google Chrome Remote Desktop: This option is highly recommended by users and integrates seamlessly with your Google account. It offers stable and free remote access to your devices.
- TeamViewer: TeamViewer is a well-known and reputable remote desktop software. It provides direct control of your PC through its app, making it convenient for remote access. However, some users have reported being blocked due to being flagged as a business account.
- AnyDesk: AnyDesk is another free software that offers excellent performance and hassle-free remote access.
- Windows Remote Desktop Connection: For Windows users, the built-in Remote Desktop Connection feature is a smooth and secure option for remote access.
- Minerstat: Minerstat is a comprehensive platform that offers a wide range of tools and features for managing and monitoring your mining rig. It provides integrated overclocking tools, profit switch features, heatmap visualization, and diagnostic tools.
Setting Up Remote Access
Once you've chosen your preferred remote desktop software, you'll need to set up remote access to your mining rig. This process may vary depending on the software you select, but here are some general steps:
- Install the Software: Download and install the remote desktop software on both your local device (e.g., computer or mobile phone) and the mining rig.
- Configure Settings: Follow the software's instructions to configure the necessary settings, such as creating an account, setting up access permissions, and establishing connections.
- Test the Connection: Test the remote connection to ensure it works as expected. You may need to configure port forwarding on your router for external access.
Remote Monitoring and Management
With your remote desktop software set up, you can now monitor and manage your mining rig from a distance. Here are some functions you may be able to perform, depending on the software you choose:
- Monitor GPU Temperature: Keep an eye on the temperature of your GPUs to prevent overheating. Some software allows you to set alerts or automate shutdowns if temperatures get too high.
- Start and Stop Rigs: Remotely start or stop your mining rigs as needed, ensuring efficient operation and saving energy.
- Restart Crashed Rigs: If your rig crashes, you can remotely restart it without having to be physically present.
- View Performance Metrics: Access real-time data and performance metrics such as hashrate, connectivity, GPU fanspeed, and more.
- Receive Notifications: Set up notifications to stay informed about critical events, such as rig crashes, high temperatures, or slow mining progress.
- Resolve Issues Remotely: Diagnose and resolve issues with your mining rig remotely using diagnostic tools and health checks.
Security Considerations
When using remote desktop software to access your mining rig, it's important to consider security:
- Secure Connections: Ensure that your connections are secure, especially when accessing sensitive information. Use secure protocols and consider using a VPN for added security.
- Authentication and Access Control: Implement strong authentication mechanisms, such as two-factor authentication, to protect your rig from unauthorized access. Control access by creating user accounts with specific permissions.
- Data Protection: Protect sensitive data by encrypting connections and storing data securely. Be cautious when accessing sensitive information over insecure connections.
By following these instructions and considerations, you can effectively use remote desktop software to monitor and manage your mining rig from anywhere, giving you greater flexibility and control over your mining operations.
The Standard 24-Inch Monitor: How Big Is It Really?
You may want to see also

Setting up a watchdog USB to reset the system upon crash/blue screen
Setting up a watchdog USB to reset the system upon a crash or blue screen can be done in several ways. Here is a step-by-step guide:
Firstly, it is important to understand what a watchdog error is and what causes it. A watchdog error occurs when a system's watchdog timer detects that the system is not responding or functioning correctly. This can be due to various factors, including overheating, hardware failure, driver issues, software conflicts, power supply issues, BIOS settings, malware infection, or overclocking.
To set up a watchdog USB to reset the system upon a crash or blue screen, you can try the following methods:
- Reinstall GPU drivers: Press Windows + X, select Device Manager, right-click on your driver, select Uninstall Device, confirm, and then restart your computer.
- Check for overheating: Install third-party software like SpeedFan to monitor and regulate the speed of cooling fans. Optimize the cooling intensity to reduce heating.
- Reset BIOS settings: Press Windows key + I to open Settings, select Update & Security, click Recovery, click Restart Now, select Troubleshoot, click Advanced Options, choose UEFI Firmware Settings, and then Restart. Reset the configuration and save the changes.
- Update your solid-state drives (SSDs): Press Windows + X, open Device Manager, look for "Disk Drives," expand to show all storage devices, right-click the first device, select "Update Driver," and click "Search Automatically for Drivers." Repeat this for all storage devices.
- Scan your system files: Type "cmd" in the Windows search box, right-click on the Command Prompt app, choose "Run as Administrator," type "sfc /scannow," and press Enter. If corrupted files are found and repaired, restart your computer.
In addition to these methods, you can also try removing all external devices, checking the IDE ATA/ATAPI Controller, or performing a system restore if all else fails.
It is important to note that you may not need to perform all of these steps. Try each method one at a time and check if the issue has been resolved before moving on to the next step.
By following these steps, you can effectively set up a watchdog USB to reset your mining rig upon a crash or blue screen, ensuring the smooth operation of your system.
Unlocking Your ASUS Monitor: A Step-by-Step Guide
You may want to see also

Using a GPU PCI-E riser express cable
- Make sure your PSU can accept the power draw of the GPU(s) you plan to add.
- Unbox your riser(s) and GPU(s).
- Plug in the USB cable and power.
- Pull back the plastic "lock" on the slot and remove any covering on the card connector.
- Insert the GPU into the motherboard, ensuring you line up the notch.
- Depending on your GPU, you may need to attach power connectors from the PSU. Use the cables provided with your GPU to do this.
- Power up your rig and find your graphics card drivers online.
- Install the drivers and you should be good to go!
When choosing GPU PCI-E riser express cables, consider the following:
- Quality: Look for risers with solid capacitors, voltage transformers, and inductance to ensure stable and reliable power supply.
- Compatibility: Ensure the riser is compatible with your motherboard and GPU. Check the PCI-E slot type (e.g., X1, X4, X8, X16) and the power connectors (e.g., 6-pin, 8-pin).
- Ease of setup: Choose risers that are easy to set up and come with clear instructions.
- Reviews: Check reviews from other users to gauge the reliability and performance of the risers.
- Price: Compare prices between different brands and sellers to find the best value.
Some popular brands of GPU PCI-E riser express cables include FebSmart, Ubit, N.ORANIE, Onvian, Osprey, BEYIMEI, and LinksTek. When purchasing, make sure to get the correct number of risers for your setup and consider buying extra for future expansion or as spares.
Setting Up Audio on Your ASUS XG35VQ Monitor
You may want to see also
Frequently asked questions
First, ensure that you have the right hardware, software, and a mining pool. Then, follow these steps:
- Attach the motherboard outside the mining frame.
- Attach the processor to the motherboard.
- Install the RAM.
- Fix the motherboard to the frame.
- Attach the power supply unit.
- Attach the USB risers.
- Attach the GPUs.
- Connect the graphics card to the monitor.
- Connect the mouse and keyboard, and turn on the rig.
Ensure that the cables are correctly connected and that the monitor is connected to the main PCI-E slot. If you're still having issues, try using an HDMI cable or resetting the CMOS.
You can use the NiceHash phone app to monitor and control your rigs, as well as monitor temperatures and profitability.
You can use a smart plug to turn the power off and on again. You can also use Task Scheduler to send an email every time the PC boots up, or TeamViewer to remote login to the system.


