Reversing cameras are a great way to improve safety and prevent accidents when driving in reverse. They provide a live video feed of the space behind your vehicle, helping you to see obstacles that may not be visible in your mirrors. This is especially useful when fitting into tight spaces or parallel parking. While there are various options available, the key considerations when installing a reversing camera are the camera and screen mounting locations, as well as the power supply for the camera.
What You'll Learn
![]()
Where to position the camera
The ideal position for a reversing camera is in the centre of the vehicle, low down, to provide the driver with a clear view of the area behind the car. The rear bumper is a good option, but for some vehicles, a position above the rear doors can also work.
There are several options for mounting the camera. One approach is to use a tiny camera that fits behind the number plate, which is discreet and will not obstruct the driver's view. Alternatively, you can choose a camera that replaces the boot handle or reversing light, resulting in a seamless look. If you opt for a boot handle camera, you will need to replace the standard handle with one that has a built-in camera. This option is ideal if you want a discreet camera that is barely visible.
Another option is a pedestal camera, which is mounted above the number plate. While this type of camera is more noticeable, it provides a clear view and can be a good choice if you want to ensure the camera is visible to people outside the vehicle.
When choosing a camera position, it is essential to consider the vehicle's size and shape and select a location that will provide the driver with the best possible field of view. Additionally, some cameras come with built-in lights, which can be beneficial if your reversing lights are not bright enough.
Pennsylvania Camera Tickets: Pay or Fight?
You may want to see also
![]()
How to power the camera
The reversing camera will be powered by a connection to your car's fuse box. The power supply for the camera will come from a separate box that is wired to the camera, or a cable that feeds directly to the camera itself. The best way to power the camera is by connecting it to the 12V power supply to the reversing light. This way, when you engage reverse, the reversing light bulb comes on and the camera gets power at the same time.
If your camera has replaced a rear light unit, you may need to reconnect it to the power supply for that specific light. For example, if the reversing camera replaced a number plate light, it will need to have power when the dipped or main lights are on.
If you already have a built-in Sat-Nav or car entertainment screen, you may have a spare input that you can connect the camera to. Even if you don't, you may be able to use an additional wiring harness to allow multiple inputs. If you do not have an existing screen, you'll need to get an LCD display screen that can be attached to your dashboard. The add-on screen will require power, which can be taken from any 12V power supply (radio connectors can be used).
The camera's red wire will need constant power, and the black wire will need to be earthed. You can find these above the pedals under the steering wheel, or near the fuse block. With the keys out of the ignition, grab a test light and start probing until it lights up. Then, strip, solder and tape in your power wire. For the earth wire, there will be a suitable earthing bolt somewhere nearby.
Transferring Photos: Full Resolution or Compressed?
You may want to see also
![]()
Camera mounting options
The camera itself will need to be mounted at the rear of the vehicle, and there are a few options to consider. Firstly, you can choose a tiny camera that fits discreetly behind your number plate, keeping it largely out of sight. Alternatively, you could opt for a camera that seamlessly replaces your existing boot handle or reversing light, making it almost invisible. If you don't mind the camera being visible, a pedestal camera is another option, which sits above your number plate.
For a more integrated look, you can choose a boot handle or number plate camera that is designed specifically for your vehicle make and model. This will give the impression of a factory-fitted rear camera.
When selecting a mounting location, it is ideal to position the camera as low down as possible, in the centre of the vehicle, typically on the middle of the rear bumper. This provides a better field of view. Alternatively, above the rear doors can also be a suitable position.
If you want to avoid drilling holes in your car, exterior-mounted rear-view cameras are a good option. These cameras can be attached with screws, high-strength adhesive pads, or other removable methods.
Number plate-mounted cameras are a popular choice as they are relatively inconspicuous, with only a small camera visible, and the wires hidden by the number plate. Boot handle cameras are even more discreet, as they are fully integrated and often require replacing your standard boot handle with one that has a built-in camera.
Leica's Golden Cameras: A Limited Edition Run
You may want to see also
![]()
Screen mounting options
There are several options for mounting the screen of your reversing camera. You can choose to have an external monitor, or an internal monitor.
External monitor
An external monitor is a small video screen that is mounted onto your windscreen, similar to a GPS. External monitors are easy to see and can be replaced if necessary. However, they do take up more space than internal monitors.
Internal monitor
An internal monitor is a fully functioning rear-view mirror that houses a small screen inside the glass. Some internal monitors clip onto your current rear-view mirror, while others replace it entirely. Internal monitors that clip on are easy to install, but they may be less secure and stable than those that replace the mirror. Internal monitors that replace the mirror entirely offer a more seamless, built-in look, but they may be more difficult to install.
When choosing where to mount your screen, consider the following:
- The driver should be able to see the screen easily without having to look away from the road.
- The screen should not obstruct the driver's view of the road.
- The screen should be securely attached so that it does not fall off while driving.
- Consider the aesthetics of the screen and how it will look in your car.
In addition, there are different types of screens available, such as:
- Dash/window mount systems: These screens can be mounted on the dash, roof or windscreen, offering flexibility in terms of positioning. They tend to be bulkier and may take up space on the dash.
- Rear-view mirror systems: These systems replace the existing rear-view mirror and offer a factory-fitted appearance. They keep the dashboard clutter-free and position the screen near the mirror, which is where the driver is used to looking when reversing.
- In-dash systems: These systems integrate with the existing vehicle screen, offering a seamless, built-in look and removing messy cables. However, not all vehicles have an existing screen or the required space to install one.
- Multi-function systems: These systems offer additional features such as GPS navigation, DVD players and Bluetooth hands-free. They can reduce clutter in the vehicle by combining multiple functions into one unit.
When choosing a screen mounting option, consider the size of the screen, the ease of installation, the aesthetics, and the functionality that best suits your needs.
Understanding Camera Playback Mode: A Beginner's Guide
You may want to see also
![]()
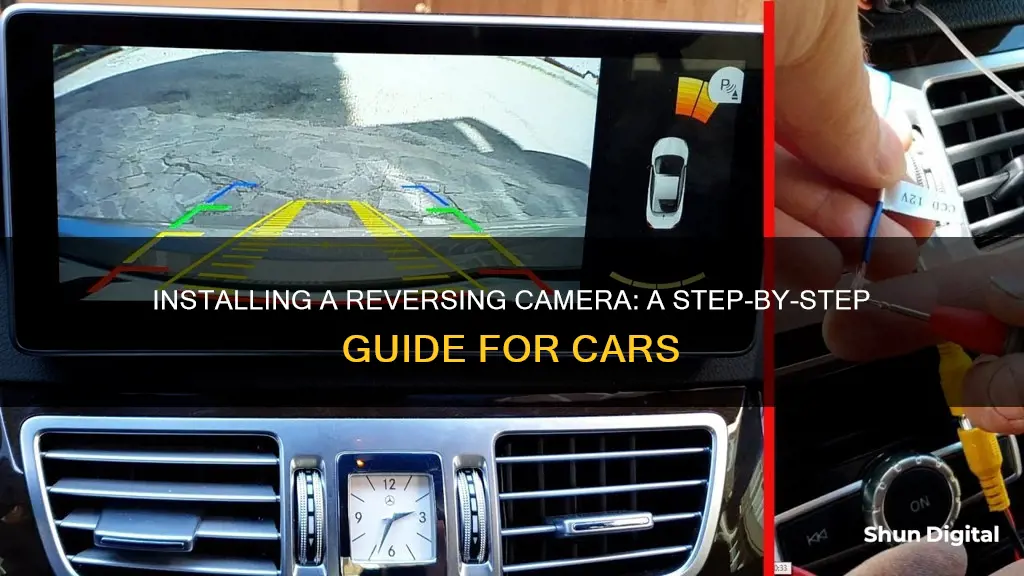
How to connect the camera to the screen
There are several types of reversing camera systems available, from DIY wireless kits to professionally installed systems. Most cameras work in the same way, receiving power from the reversing light circuit in the vehicle. Once powered on, the camera generates a video signal, which is transmitted to the Video-In socket of the connected display device. The display device could be a dash-mount or rear-view mirror screen, or an in-dash system that uses the car's existing screen.
Wireless Reversing Camera Kits
These kits come with a camera and a screen, and a wireless transmitter. The transmitter sends a signal to the screen, and the camera is wired into the reversing lights for power. Wireless kits are easy to set up but may suffer from signal interference.
Rear View Mirror Systems
This type of system replaces the existing rear-view mirror with one that has an integrated LCD screen. The screen is powered by a cable connected to the cigarette lighter or, for a more professional installation, a cable that is concealed within the vehicle.
In-Dash Systems
In-dash systems use the vehicle's existing in-dash screen as a monitor, resulting in a factory-fitted look and no messy cables. They have a vehicle-specific interface and are designed to plug directly into the existing screen.
Dash/Window Mount Systems
These systems have screens that can be mounted directly inside a car, usually on the dash, and are available in a range of sizes and types. They can also be attached to the roof or windshield, or permanently mounted in commercial vehicles where there is no rear-view mirror.
Wiring the Reversing Camera
The exact wiring method will depend on the type of system and the vehicle it is being fitted to. For an Android Headunit, for example, the system uses the PINK 'REV' wire on the universal fitting. The camera signal is on a yellow RCA plug and a long black coax cable. The power for both the signal and the camera can be picked up at the reversing light cluster (Circuit A) or, if more convenient, near the front of the car at the cabin fuse box (Circuit B).
For other vehicles, the camera's power and video cable is routed from the back of the car, where the camera is mounted, to the front of the car, where the monitor is located, usually near the fuse box. The video cable is connected to the camera cord's video connector, and the power cable is connected to the camera cord's power connector. The monitor's power and video cable is then connected to the camera cable.
Georgia's Camera Ticket Policy: What You Need to Know
You may want to see also