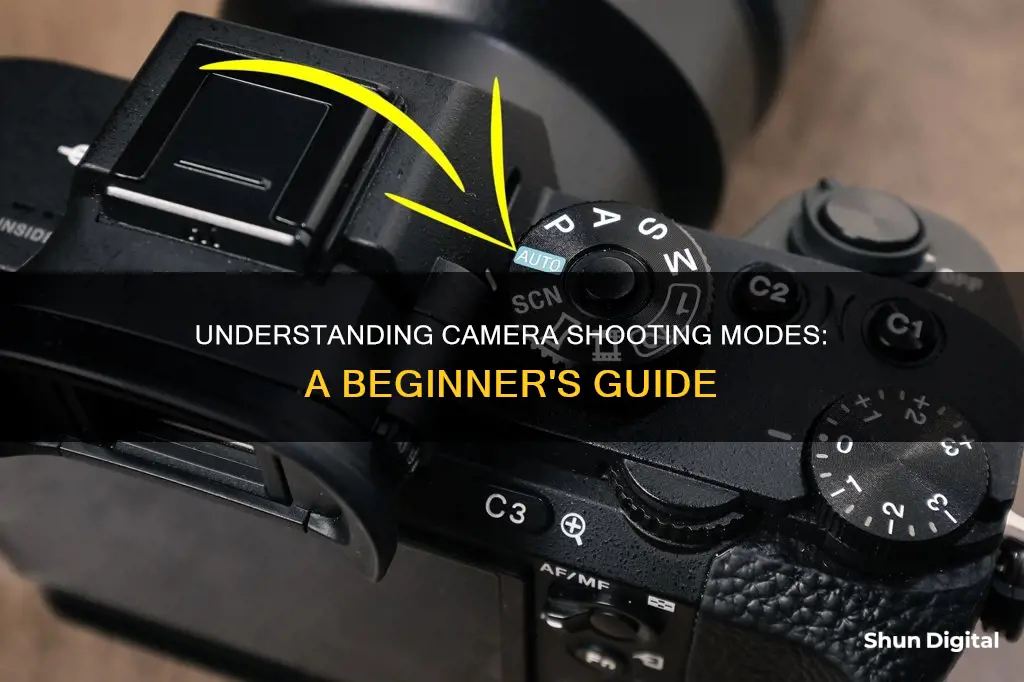
Shooting modes on a camera are controls that adjust the main exposure settings, which include aperture, shutter speed, and ISO. These modes can be changed using different camera mode icons found on the dial or camera wheel, usually located on the top of the camera body. The main modes are also known as Camera Modes PASM or shooting modes P.A.S.M. and include a mix of auto-modes, semi-automatic modes (a.k.a camera priority modes), and fully manual modes.
Characteristics of Shooting Modes on a Camera
| Characteristics | Values |
|---|---|
| Purpose | Control parameters of an exposure, specifically shutter speed, aperture and ISO |
| Control | Fully automate the camera exposure or allow the photographer to manually control some or all parameters of the exposure |
| Dial | PSAM or PASM |
| Basic Modes | Programmed Automatic, Shutter-Priority, Aperture-Priority, and Manual |
| Abbreviations | P, A, S, and M |
| Other Modes | Full Auto Mode, Landscape Mode, Sports Mode, Close-Up Mode, Portrait Mode, Night Portrait Mode |

Manual mode
However, it is important to note that there are occasions when using Manual mode can be easier than automatic. For example, when photographing the same thing under the same conditions repeatedly, or when the lighting is unchanging or changing radically.
Shipping a Camera With Battery: The Safe Way
You may want to see also

Shutter-priority mode
In Shutter-priority mode, photographers set the shutter speed of their camera, and the camera then selects the appropriate aperture to create a well-exposed image. Shutter speed refers to how long the shutter is open, which determines how much light reaches the camera sensor. A faster shutter speed allows for less light to reach the sensor, while a slower shutter speed results in more light exposure. This mode is especially helpful when capturing motion, as it allows photographers to freeze or blur moving subjects depending on their shutter speed choice. For example, a fast shutter speed can freeze the motion of a speeding car, while a slower shutter speed can blur the motion of water for a dreamy effect.
One of the benefits of Shutter-priority mode is that it simplifies the technical aspects of photography by allowing the photographer to focus on shutter speed while the camera handles the aperture. This mode is an excellent stepping stone for photographers who want more control than the fully automatic mode offers but are not yet ready for complete manual control. Shutter-priority mode is also advantageous when the shutter speed is the most critical factor in capturing a scene. For instance, in sports photography, a fast shutter speed is necessary to effectively freeze the action, while a slower shutter speed can be used to create artistic motion blur.
While Shutter-priority mode is a powerful tool, it may not always be the best choice. For example, if the depth of field is a priority, photographers might prefer Aperture Priority or Manual mode, as these modes allow direct control over the aperture setting. Similarly, in situations with constant lighting but a risk of over or underexposure, Manual mode might be a better option to maintain consistent exposure.
Charging Your GoPro Ultra HD Camera: A Step-by-Step Guide
You may want to see also

Aperture-priority mode
Aperture priority mode is particularly useful when you want to control the focus of objects in the frame. For example, in landscape photography, you may want objects in the foreground, middle distance, and background to all be in focus, which can be achieved by selecting a high f-number (e.g. f/16 or f/22) to obtain a large depth of field. Conversely, in portrait photography, you may want to blur the background and bring the subject into sharp focus. This can be achieved by choosing a low f-number (e.g. f/1.4 or f/2.8) to create a shallow depth of field.
Aperture priority mode also allows you to indirectly affect shutter speed for a desired effect. For instance, in landscape photography, selecting a small aperture will cause the camera to choose a slow shutter speed, resulting in a beautiful blurring effect for objects like waterfalls. On the other hand, a larger aperture will shorten the shutter speed, reducing hand jitter when shooting without a tripod.
Aperture priority mode is a valuable tool for both beginners and professionals. It provides a balance between manual control and automatic adjustments, allowing photographers to focus on their artistic vision while the camera optimises the exposure. However, it's important to note that this mode might not be suitable in certain situations, such as when you require full manual control over all settings or when you need consistent settings for a series of images.
Mastering the Art of Scaling Down in Camera Raw
You may want to see also

Program mode
In Program mode, the camera will automatically set the shutter speed and aperture based on the available light to ensure correct exposure. However, photographers can override these settings by adjusting the ISO, which amplifies brightness and decreases image quality. A low ISO, such as 100, is less sensitive to light but offers better image quality, while a high ISO, like 6400, allows shooting in low light conditions. Program mode also allows users to control the flash, exposure compensation, white balance, metering, focus modes, and autofocus behaviour.
One of the benefits of Program mode is that it allows photographers to learn about the different aspects of their DSLR camera without having to worry about getting the perfect exposure. It is a stepping stone to learning how to use more advanced modes and take full control of the camera.
To use Program mode, simply turn the camera's mode dial to "P". Then, test the exposure by taking a test shot and adjust it using exposure compensation if needed. Set the ISO based on the lighting conditions, with lower values for bright environments and higher values for darker scenes or fast-moving subjects. Compose the photo, focus, and make any desired adjustments to the auto settings using the control dial. Finally, capture the shot.
Charging Olympus Camera Batteries: Where and How?
You may want to see also

Auto mode
Additionally, auto mode can be beneficial when lighting conditions are challenging, such as when there are lots of shadows, different coloured lights, or strong light sources. The camera can often make well-informed decisions about the settings to use in these situations, resulting in balanced photographs.
However, one of the limitations of auto mode is that it prevents you from carefully selecting the settings needed to achieve specific artistic results. As a result, some photographers, particularly more advanced ones, criticise auto mode. They argue that it takes away creative control and results in "middle-of-the-road photos".
Despite this, auto mode can be a valuable tool in certain situations, and it does have its place in photography, especially for beginners. It can free you up to focus on the scene, moment, and composition, rather than getting bogged down in technical details.
Understanding Raw Camera Support: Unlocking Photography's Full Potential
You may want to see also
Frequently asked questions
Shooting modes on a camera are predetermined settings that help you take a photograph. They are usually found on the top dial of the camera and can be abbreviated as "M, S, A, P, AUTO".
The four main types of shooting modes are Program Mode, Shutter Priority Mode, Aperture Priority Mode, and Manual Mode.
The right shooting mode depends on the scene you want to capture and your level of expertise. For beginners, it is recommended to start with Program Mode or any of the priority modes (Aperture Priority or Shutter Priority). For more advanced photographers, Manual Mode is usually the best option.


