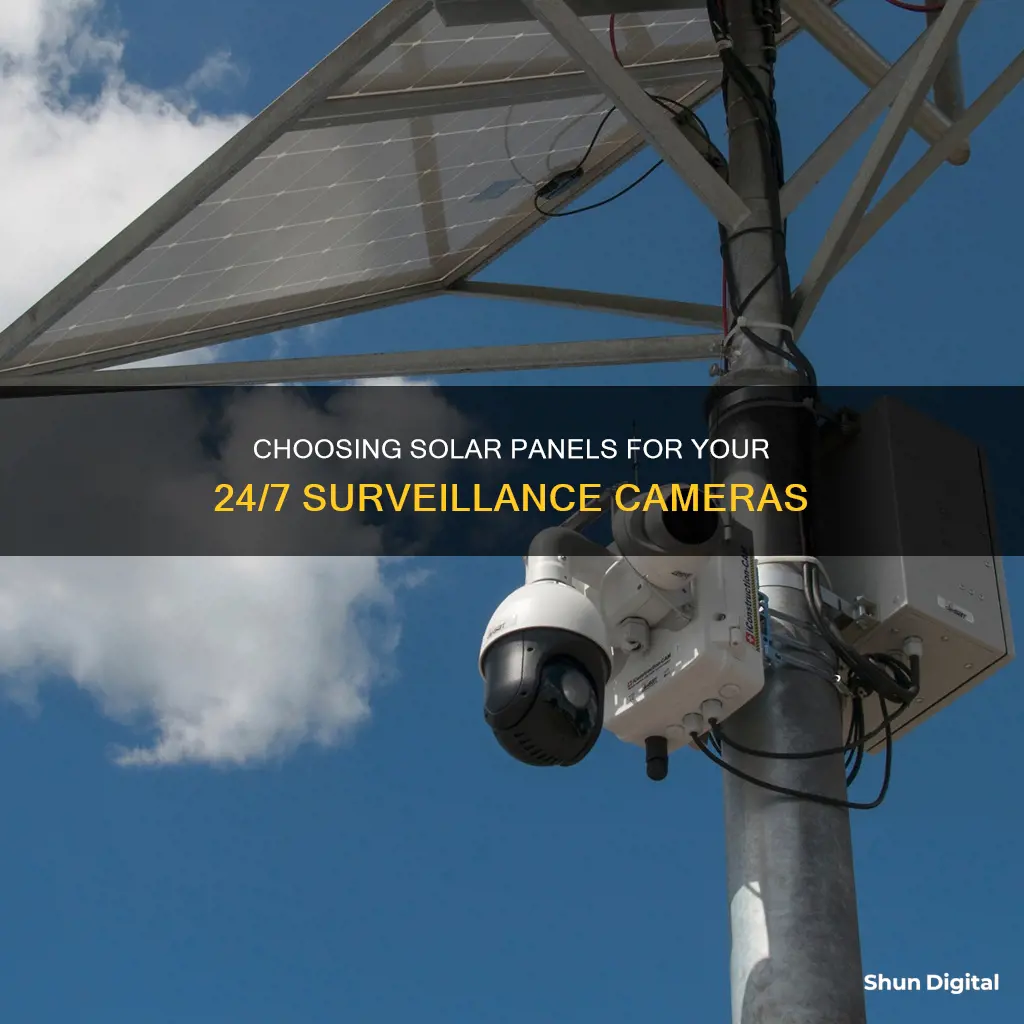
Solar-powered security cameras are ideal for enhancing home security, especially in outdoor settings, as they eliminate the need for plug sockets and recharge hassles. When selecting a solar panel for 24-hour camera surveillance, several key factors come into play. Firstly, determine the power requirements of your camera by noting its power rating in watts and voltage rating, which is typically 12V or 24V. This information is crucial for choosing the right solar panel and battery. Consider the benefits of a DIY solar-powered security camera system, which offers independence from the power grid, eliminates the need for long wires, and can be installed in remote locations.
The type of battery is another important consideration. Deep Cycle Lead Acid batteries are more affordable and have a lifespan of 2 to 5 years, while Li-Ion batteries are pricier but offer faster charging, longer lifespans, and superior weight-to-storage ratios. Additionally, calculate the watt-hours required for continuous 24-hour camera operation and select a suitably sized battery.
When choosing a solar panel, identify the average peak sun hours in your area and select a panel with equal or greater voltage output than your battery. Ensure the solar panel is positioned to capture maximum sunlight by facing it towards the equator and adjusting the tilt angle.
A solar charge controller is also necessary to regulate voltage and prevent overcharging the battery. Select a charge controller with a current rating higher than the solar panel's short circuit current and a voltage rating matching your battery.
Lastly, choose the right solar cable by considering factors such as cable length, cross-section area, and material to minimise power loss during transmission.
By carefully considering these factors, you can effectively select a solar panel to power your 24-hour camera surveillance system.
| Characteristics | Values |
|---|---|
| Installation | Two alternatives: buy a readymade solar-powered security camera system or add a solar power system to an existing security camera. |
| Benefits | Independence from the power grid, no long wires, can be installed in remote sites or challenging environments, and minimises environmental impact. |
| Materials Required | Security camera, solar panel, battery, solar charge controller, crimp connectors, battery enclosure, and DC jack. |
| Power Requirement | Identify the power rating in Watts and voltage rating (12V or 24V) from the specifications. |
| Battery | Two good choices: Deep Cycle Lead Acid (less expensive, 2-5 years lifespan) or Li-Ion (can be charged fast, lightweight, longer lifespan but more expensive). |
| Solar Panel | Use a solar panel with equal or greater voltage output than the battery. Consider the average peak sun hours in your area. |
| Charge Controller | Ensures the battery is not overcharged or over-discharged. Select based on the maximum output current of the solar panel and battery voltage. |
| Solar Cable | Use copper cables with appropriate length and cross-section area to minimise resistance and power loss. |
| Data Storage | Local storage (SD card or microSD card) or cloud storage. |
What You'll Learn
![]()
Calculate power requirements of the camera
Calculating the power requirements of a surveillance camera system is essential to ensure the correct solar panel setup. The power consumption of a camera system depends on several factors, including the type of camera, its features, and its connection to the power source.
Firstly, it's important to note that the power consumption of security cameras varies. CCTV cameras typically range from 2 to 15 watts, with an average of 5 watts. IP cameras may have a slightly higher power draw, with the Reolink RLC-810A PoE IP 4K HD security camera consuming less than 12 watts.
When calculating power requirements, it's essential to consider the additional components of the surveillance system, such as the DVR/NVR (Digital Video Recorder/Network Video Recorder). These devices typically consume more power than individual cameras, with models ranging from 10 to 60 watts. For example, a hard drive inside an NVR may use approximately 6 watts of power.
The features of the cameras also impact power consumption. Cameras with IR illumination night vision and pan-tilt functionality can increase power consumption by approximately 2 to 4 watts. Additionally, PoE (Power over Ethernet) cameras may require a PoE switch or injector, which will further add to the overall power consumption of the system.
To calculate the total power requirements of the camera system, you need to identify the power consumption of each component and then sum them up. This includes the power draw of the cameras, DVR/NVR, and any additional features or accessories.
For example, let's consider a setup with four CCTV cameras, each rated at 5 watts, and a 20-watt DVR. The total power consumption of this system would be 40 watts (4 x 5 watts for cameras + 20 watts for DVR).
If you plan to have the system operational 24/7, you would multiply the total wattage by the number of hours in a day, month, or year to calculate daily, monthly, or annual power consumption.
In this example, the daily power consumption would be 0.16 kWh (40 watts x 24 hours), the monthly power consumption would be 4.8 kWh (40 watts x 720 hours), and the annual power consumption would be 58.4 kWh (40 watts x 8,760 hours).
It's important to note that these calculations assume continuous operation. If the cameras have motion detection or other power-saving features, the actual power consumption may be lower.
Additionally, the power requirements may vary based on environmental factors, such as temperature, and the efficiency of the components used.
By accurately calculating the power requirements of the camera system, you can ensure that your solar panel setup can provide sufficient power to keep the surveillance system operational at all times.
Transitioning from Camera Raw to Lightroom: A Guide
You may want to see also
![]()
Choose a battery type
The battery is the heart of your solar-powered security camera system, providing consistent power day and night, regardless of the weather.
There are two good choices of battery types for solar-powered security cameras: Deep Cycle Lead Acid or Li-Ion.
Deep Cycle Lead Acid batteries are the more affordable option, with a lifespan of 2 to 5 years and good performance for solar energy storage. They are also easier to charge than Lithium-ion batteries. However, they are heavier and larger than Li-Ion batteries.
Li-Ion batteries are more expensive, with prices up to 20 times that of Deep Cycle batteries. They can be charged quickly, are lightweight, and have a long lifespan of 5 to 9 years. They also discharge more evenly and have greater storage capacity relative to their volume.
When choosing a battery type, consider your budget, the weight and size of the battery, and the ease of charging. If you are looking for a cost-effective solution and are not concerned about weight and size, a Deep Cycle Lead Acid battery is a good option. On the other hand, if you want faster charging, lighter weight, and longer lifespan, a Li-Ion battery may be worth the higher cost.
Additionally, remember to protect your battery in a weatherproof container, such as a NEMA Box, to safeguard it from environmental conditions.
Focus Camera's Grey Market Sales: What You Need to Know
You may want to see also
![]()
Identify solar camera and cellular gateway
When selecting a solar camera and cellular gateway, there are a few key considerations to keep in mind.
Firstly, identify the power requirements of your surveillance equipment. This includes determining the nominal wattage and voltage rating of your cameras, wireless routers, radios, lighting, and any other components that will be powered by the solar panel.
Next, choose the right battery type for your system. The two most common types are Deep Cycle AGM Sealed Lead Acid (SLA) batteries and Lithium Iron Phosphate (LiFePo4) batteries. SLA batteries are more cost-effective and widely used, while LiFePo4 batteries last longer and are more compact but are significantly more expensive.
Another important factor to consider is the solar panel's size and rating. Calculate the power requirements of your cameras and equipment to determine the solar panel's necessary wattage and voltage output. Additionally, consider the peak sun hours your location receives to ensure the solar panel can adequately charge the battery.
Finally, select a suitable cellular gateway that transmits LTE internet data and allows for flexible wireless setup. This will enable remote access to your solar camera system from any device with internet connectivity.
By carefully considering these factors, you can effectively identify and select a solar camera and cellular gateway that meets your specific requirements for 24-hour camera surveillance.
Charging a Dead DVC Camera Without a Charger
You may want to see also
![]()
Size the battery array
Sizing your battery array correctly is crucial to ensure your solar-powered security camera system functions optimally without outages or battery damage. Here are some detailed guidelines on how to size the battery array for a 24-hour camera surveillance system:
Determine Power Requirements:
First, identify the power requirements of your camera system. Calculate the total power consumption by adding up the wattage of all cameras and any other equipment that will be powered by the solar panel system. This information can be found in the equipment's specification or data sheet.
Choose Battery Type:
Select the type of battery you will use based on your specific application and budget. The most common type is a Deep Cycle AGM Sealed Lead Acid Battery (SLA), which is cost-effective and widely used for off-grid locations. Lithium Iron Phosphate (LiFePo4) batteries are another option; they last longer and are smaller but are significantly more expensive.
Calculate Daily Energy Usage:
Estimate your daily energy usage in kilowatt-hours. This information can usually be found on your electric bill. For example, if your equipment uses 1,000 watts per day, your daily usage is 10 kilowatt-hours.
Consider Seasonal and Weather Variations:
Take into account the seasonal variations in sunlight and weather conditions. Estimate the number of cloudy days in your area, as your battery array will need to be sized accordingly. Additionally, consider the lowest temperature your battery array will experience, as this can impact battery performance and capacity.
Size Your Battery Array:
Using the information gathered above, you can now size your battery array. The exact calculation will depend on your daily power usage and the battery type chosen.
For example, let's say your camera system consumes 6 watts of power and operates on 12 VDC. It will draw 0.5 amps (500 mA). If you want to power this with a 50-amp-hour battery, you would calculate as follows:
- Divide the amp-hours by 2 to ensure you're operating within the top 50% of the battery's cycle: 50 amp-hours / 2 = 25 amp-hours available to use.
- Calculate the combined amperage of your equipment: 0.5 amps + (additional equipment amperage).
- Divide the available amp-hours by the total amperage of the equipment to find how many hours the battery will last: 25 amp-hours / total amperage = hours of battery life.
In this example, a 50-amp-hour battery will power your 6-watt camera equipment for a certain number of hours before becoming over-discharged. Ensure that you have appropriately sized solar panels to recharge the battery daily.
It is always recommended to size up rather than down to avoid frequent outages and ensure your security camera system functions reliably 24 hours a day.
Camera Tickets in Culver City: Still Active or Not?
You may want to see also
![]()
Size the solar array
Sizing a solar array is a crucial step in setting up a solar-powered surveillance system, as insufficient solar capacity can lead to frequent outages and permanent battery damage. Here are some detailed guidelines on how to size the solar array for a 24-hour camera surveillance system:
Determine the Installation Solar Zone
Weather conditions vary across different regions and seasons, affecting the energy generation of solar panels. It is essential to consider the solar zone of the installation location. Surveillance equipment powered by solar arrays sized for "average" sun conditions may not be sufficient. Longer winter nights can strain the system by over-discharging batteries and interrupting charge cycles. Therefore, it is crucial to take the installation region into account to avoid system outages and costly battery replacements. Refer to solar zone maps, such as the one provided by Vorp Energy, to determine the solar zone of your specific location.
Determine Power Requirements of Surveillance Equipment
The next step is to calculate the total power consumption of the surveillance equipment. Solar panels that are undersized for the equipment will lead to frequent outages. The power consumption of devices can vary between brands, styles, and models. Therefore, it is essential to refer to the data sheet or specification sheet provided by the manufacturer to identify the maximum power consumption. This information is typically specified in watts. Additionally, take note of the operating voltage of the equipment, as it will determine the necessary converters and injectors. Once you have determined the installation solar zone and total power consumption, you can use tools like the Solar System Planner to estimate the required solar array size.
Select the Solar Panel
Once you have addressed the above considerations, you can proceed to select the appropriate solar panel for your 24-hour camera surveillance system. The first step is to identify the average peak sun hours your area receives. You can use resources like the Global Solar Atlas to find the average daily sun hours or "peak sun hours" for your location.
Next, calculate the required solar panel rating. This calculation involves dividing the battery watt-hours by the peak sun hours. The battery watt-hours are determined by multiplying the battery capacity in amp-hours by the battery voltage. It is recommended to add a margin of roughly 30% to account for various system losses.
For example, if you have a 12V battery system with a 24Ah battery, requiring 288Wh to fully charge, and your location receives 5.1 peak sun hours, the calculation would be as follows:
- Solar Panel Rating = Battery Watt-Hours / Peak Sun Hours = 288Wh / 5.1 peak sun hours = 56.47W
- Accounting for losses: 56.47W x 1.3 = 73.4W
So, in this case, you would need a solar panel with a rating of at least 73.4W.
Configure the Solar Panels
After selecting the appropriate solar panels, you will need to decide on the configuration, which can be series, parallel, or a combination of both. This decision will depend on factors such as the required battery storage and inverter sizing. If you prioritize year-round reliability, it is generally advisable to use the lowest DC voltage and power rating to minimize potential breakdowns and maintain a smooth-running system.
Additional Considerations
It is important to ensure that all photovoltaic panels are from the same manufacturer and are of the same type. Mixing and matching different panels can create problems and reduce the overall efficiency of the array.
Additionally, while solar panels can be angled to maximize sunlight exposure, installing a solar tracker that follows the sun's rotation can be expensive.
By following these steps and considerations, you can effectively size the solar array for your 24-hour camera surveillance system, ensuring sufficient power generation and reliable performance.
Surveillance Cameras in Australia: What's the Law?
You may want to see also
Frequently asked questions
Solar-powered security cameras offer increased security and reliability. They provide independence from the power grid, eliminate the need for long wires, can be installed in remote or challenging locations, and reduce environmental impact.
The key components are a solar panel, a solar charge controller, a deep cycle battery, and proper cables for the power load.
To determine the size, you need to calculate the power requirements of your camera and identify the average peak sun hours in your area. The solar panel should have a voltage output equal to or greater than your battery voltage. For a 12V battery, use a 12V solar panel. You may also want to factor in a margin of around 30% to account for system losses.