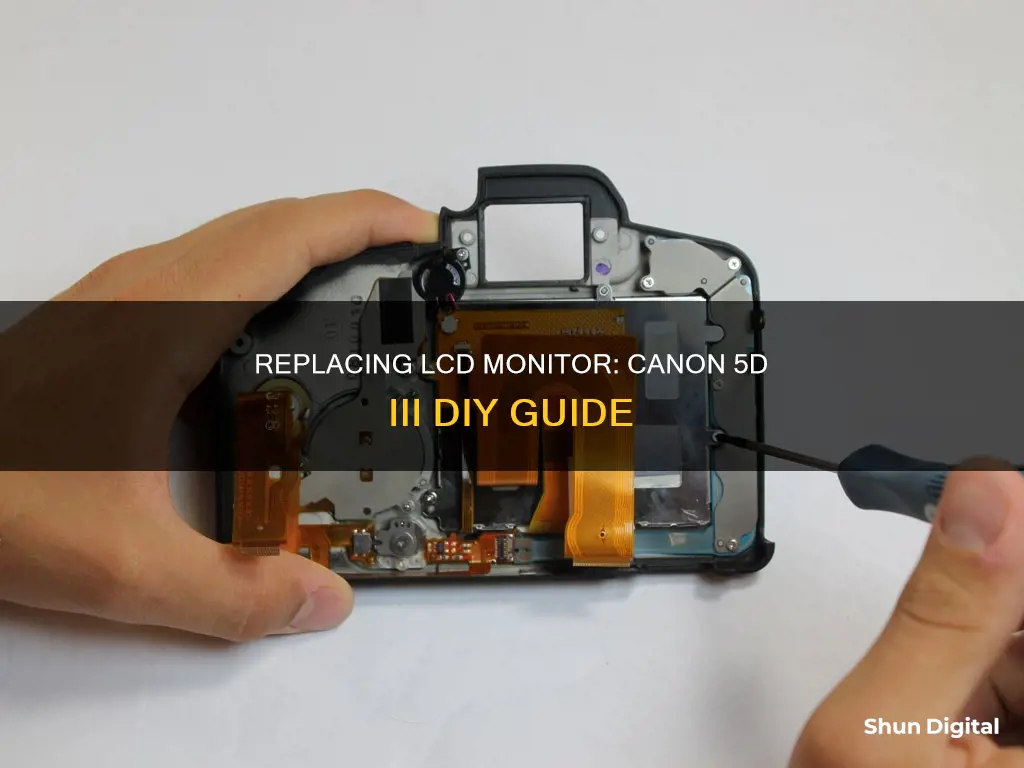
If the LCD monitor on your Canon 5D Mark III camera is broken, you can replace it yourself by ordering a new LCD screen online and following a step-by-step guide. This process involves removing the old LCD screen and its casing, and then installing the new screen. You will need a range of screwdrivers to do this, and it is recommended that you follow the instructions carefully to avoid damaging your camera.
What You'll Learn

Removing the LCD screen
To remove the LCD screen from your Canon 5D Mark III, you will need a Phillips #000 and a Phillips #0 screwdriver. You may also need a hairdryer or heat gun, a suction cup, and a new adhesive tape.
First, lift the rubber flap covering the input/output jacks and remove the single 3.4 mm screw with your Phillips #000 screwdriver. Next, peel back the rubber cover above the in/out ports to reveal two more screw heads. Remove these with your Phillips #0 screwdriver.
Now, lift the in/out port plastic covering from the bottom where the backup battery used to be. Remove each 6.3 mm screw on either side of the viewfinder, as well as the three 4.8 mm screws on the bottom of the back plate, using your Phillips #0 screwdriver.
Peel back the rubber covering next to the menu dial to access another screw. Remove this 3.4 mm screw with your Phillips #0 screwdriver.
At this point, you can turn the device upside down to let the back panel fall off. Be sure to catch it so that the data ribbons do not tear or tug.
Now, remove each data ribbon cable from the motherboard by applying pressure down and gently sliding your thumb upwards on the slot where the cable meets the motherboard. This will raise a small clip that locks the cable in place.
With the back panel free from the device, remove each of the 3.4 mm screws holding in the LCD screen using your Phillips #0 screwdriver.
Finally, grip the wire attaching the speaker to the data ribbon cable and pull it out. The LCD screen is now free from the back panel.
To finish the replacement, follow these instructions in reverse.
Monitoring Python Memory Usage: Techniques and Best Practices
You may want to see also

Purchasing a new screen
When purchasing a new screen for your Canon 5D Mark III, there are a few things to keep in mind. Firstly, it is important to distinguish between the LCD screen and the LCD protector. The LCD screen is the display that shows the images and information, while the LCD protector is a piece of plastic or glass that sits on top of the LCD screen to protect it from scratches and damage.
If your LCD screen is cracked or damaged, you will need to replace it with a compatible screen for the Canon 5D Mark III. You can find these screens sold by third-party retailers, such as on Amazon or eBay. When purchasing a new LCD screen, make sure to check the compatibility with your camera model and look for a screen with similar specifications, such as resolution and size. It is also recommended to seek professional installation for the new screen to ensure it is installed correctly.
On the other hand, if only your LCD protector is scratched or damaged, you may only need to replace this protective layer. The LCD protector is much cheaper to replace than the entire screen and can be found for the Canon 5D series on websites like USCAMERA and Lehman. The part number for the Canon 5D Mark II LCD protector is CB3-4948-000 000, and the tape to secure it is CB3-4949-000 000.
When purchasing a new LCD protector, ensure that it is specifically designed for your Canon 5D model. The protector should fit flush with the body of the camera, providing protection from knocks and impacts. It is also important to follow the correct installation procedures, which may involve using a hairdryer or heat gun to remove the old protector and applying new adhesive tape to secure the new one.
Monitoring Internet Usage: AT&T's Parental Controls Guide
You may want to see also

Attaching the new screen
To attach the new screen to your Canon 5D III, you will need to purchase a replacement LCD screen compatible with your camera model. You can find these screens online through retailers such as Amazon or specialist camera stores.
Once you have your new screen, follow these steps:
Step 1: Ensure you have the correct replacement screen for your Canon 5D III. The screen should be an exact model match to ensure proper fitting and compatibility.
Step 2: Clean the camera body where the new screen will be attached. Remove any dust or debris with a soft, dry cloth.
Step 3: Carefully align the new screen with the camera body, making sure that the connection ports and screws match up with the camera's housing.
Step 4: Secure the new screen to the camera body using the appropriate screws. Tighten them gently and evenly with a suitable screwdriver to avoid damaging the screen or camera body.
Step 5: If your camera model uses adhesive tape to secure the screen, apply the tape carefully along the edges of the screen. Ensure the tape is firmly in place and follows the same path as any previous adhesive.
Step 6: Reattach any rubber flaps or coverings that were removed during the disassembly process. Ensure these are correctly positioned to maintain the camera's weather sealing.
Step 7: Turn on your camera and test the new screen. Ensure the display is functioning correctly, and all buttons and touch controls are responsive.
By following these steps, you can securely attach the new LCD screen to your Canon 5D III, restoring its display functionality.
ASUS VX238H Monitor: Know Its Length and More
You may want to see also

Removing the old adhesive
To remove the old adhesive from your Canon 5D Mark III camera, you will need to carefully lift the back plate to access the adhesive covering. This black covering starts underneath the camera and wraps around to the top. It is important to gently pry this adhesive up without cutting or ripping it.
Once the adhesive is loose, drape it over the top of the camera. You can then begin to remove the internal connectors. Be very careful during this step, as the internal connectors are delicate and can be easily damaged. Label the ribbon connectors and be sure to note which side attaches to the main board and which side attaches to the secondary board on the right. These connectors are different, so it is important to know which is which.
Next, remove each connector carefully. Use a small flat-head screwdriver to gently pry them up, and then use tweezers or needle-nose pliers to lift them out. Be careful not to pull on the wires, only the white connector ends.
After all the connectors have been removed, you can move on to removing the adhesive from the LCD screen itself. Use a hairdryer or heat gun to heat up the adhesive for removal. This should not take longer than 30 seconds. Apply a suction cup to the plastic lens, and then pull the lens away from the camera to remove the old lens. If it does not come off easily, try reheating it and applying more force.
Once the old lens is removed, clean off any remaining adhesive and check for fragments of plastic and dust on the LCD. Your camera is now ready for a new adhesive tape and lens.
Taking Screenshots on Your ASUS Monitor: A Step-by-Step Guide
You may want to see also

Applying new adhesive
When applying new adhesive to your Canon 5D III's LCD monitor, it is important to follow a precise procedure to ensure a secure and effective bond. Here is a detailed guide on how to do this:
Firstly, ensure you have the correct adhesive tape for your Canon 5D III. The replacement tape to secure the cover for this model is part number cb3-2864.
Once you have the correct tape, start by removing the protective film from the adhesive tape and exposing the sticky surface. Be careful not to touch the adhesive too much, as natural oils from your fingers can affect its strength.
Now, carefully line up the adhesive tape with the edges of the LCD screen and the camera body. Apply gentle pressure to fix the tape in place, working your way around the edges to ensure a complete and secure bond.
After the tape is firmly in place, remove the backing of the adhesive. Check again that the tape is properly aligned and seated flush with the camera body.
Finally, attach the new LCD screen to the camera body, applying firm but gentle pressure to create a strong bond between the adhesive and the new screen. Ensure everything is lined up correctly and seated properly.
Your Canon 5D III should now have a securely attached LCD screen, and you can enjoy your camera as if it were new!
Choosing the Right Monitor Size for Your MAME Cabinet
You may want to see also


