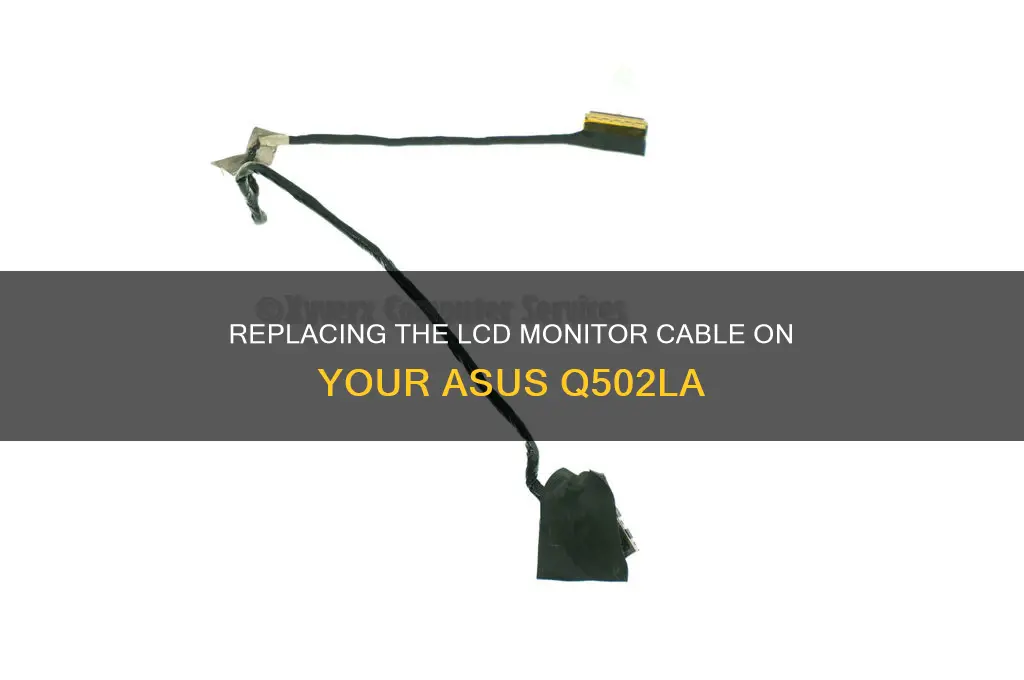
The Asus Q502LA is a laptop that features a 15.6 widescreen LCD monitor. If you're looking to replace the LCD monitor cable, you'll need to purchase a replacement cable that is compatible with your model. You can find these cables online from various retailers. Once you have the replacement cable, you can follow online guides and videos to walk you through the process of replacing the cable. It is important to note that you should ensure the new screen has the same size, resolution, and connector type as your old one. Additionally, you should refer to official manufacturer guides and videos for similar models to ensure you are taking the correct steps to avoid damage to your device.
What You'll Learn

Removing the bottom cover
To remove the bottom cover of your Asus Q502LA, you will need a spudger and a Phillips-head screwdriver.
First, remove the ten long Phillips screws from the bottom cover. These screws are longer than the others, so make sure you are unscrewing the correct ones. Once the screws are removed, use the spudger to gently pry the bottom cover off. Start from one of the corners and slowly work your way around the edges until the cover comes off. Be careful not to apply too much force, as you could damage the cover or the clips that hold it in place.
It is important to note that before you attempt any repairs or disassembly of your laptop, you should ensure that the battery is unplugged. This is a critical step to avoid any potential damage to the device or injury to yourself.
Additionally, when removing the bottom cover, be cautious of the internal components, such as the hard drive and cables. If you need to remove the hard drive, you can do so by unscrewing the four screws securing the hard drive caddy and then pulling on the tab to remove it from the laptop.
Remember always to handle your laptop and its components with care to avoid any accidental damage during the disassembly process.
Asus VS247H-P Monitor: Built-in Speakers or Not?
You may want to see also

Disconnecting the LCD cable
To disconnect the LCD cable of your Asus Q502LA, you will first need to remove the bottom cover of your laptop. This can be done by removing the ten long Philips screws from the bottom cover and using a spudger to pry it off.
Once the bottom cover is removed, you will need to locate the LCD cable. It is usually connected to the motherboard and can be identified by the black tag on top of the connector. To disconnect the LCD cable, lightly pull up on the black tag. Be careful not to pull too hard, as you do not want to damage the connector.
In some cases, the LCD cable may be held in place by a hinge cover or other components. If this is the case, you will need to remove these components before you can access the LCD cable. Make sure to keep track of the screws and components you remove so that you can reassemble your laptop correctly.
Additionally, it is important to unplug the battery before disconnecting any cables to avoid short circuits or damage to your laptop's internal components. Always handle the cables with care and avoid bending or twisting them excessively.
If you are unsure about the specific steps or if your laptop has different components, it is recommended to refer to a professional or seek model-specific guidance for further clarification.
Monitoring Data Usage on Xbox One: What You Need to Know
You may want to see also

Unscrewing the hinges
Firstly, make sure you have the right tools for the job. You'll need a spudger or a similar prying tool, as well as a screwdriver with the appropriate head for your laptop's screws. Now, let's begin:
Removing the Back Cover:
- Turn your laptop off and flip it over so the bottom cover is facing up.
- Remove the ten long Philips screws from the back cover. These screws are usually quite long, so take care not to strip the threads when removing them.
- Use your spudger to gently pry the bottom cover off. Start from one corner and slowly work your way around the edges until the cover comes loose.
Unplugging Internal Components:
- With the back cover removed, you'll now have access to the internal components. Before proceeding, it's important to disconnect the battery first to avoid any potential damage.
- Unplug the WiFi and LCD cables. These cables are usually located near the hinges and screen.
- Now, we're getting to the main part. Locate the hinges and identify the screws holding them in place.
- Using your screwdriver, carefully unscrew each screw from the hinges. Take your time and be gentle to avoid stripping the screws or damaging the surrounding components.
- Once all the screws are removed, gently lift the hinges to a 90-degree angle. This will allow you to slide the screen free from the rest of the laptop body.
It's important to note that you may need to lift the body of the laptop slightly to match the angle of the hinges for them to come completely free.
At this point, you have successfully unscrewed and removed the hinges. Remember to handle the hinges with care as they are crucial for the proper functioning of your laptop's screen.
To reassemble your device, simply follow these steps in reverse order, making sure to reconnect all cables securely and tightening the screws firmly, but not too tightly, to avoid damage.
Cloud Usage Monitor: Understanding Cloud Consumption
You may want to see also

Removing the plastic hinge cover
To remove the plastic hinge cover of your Asus Q501LA laptop, you will first need to remove the bottom cover of the laptop. This involves unscrewing the ten rather long Philips screws from the bottom cover and using a spudger to pry it off.
Next, unplug the Wi-Fi and LCD cables, making sure to unplug the battery first for safety. Then, unscrew the hinges. At this point, you can lift the hinges to a 90-degree angle and slide the screen free from the rest of the laptop. You may need to lift the body of the laptop to match the angle of the hinges to get the screen out.
Now, grab the hinge cover and slide it to one side. It should only slide in one direction, and you will need to pull it to remove it. It should come off cleanly, revealing the screws that hold the screen in place.
To reassemble your device, follow these instructions in reverse order, ensuring the first and last thing you do is unplug and plug back in the battery.
Monitoring Undo Tablespace Usage in Oracle: A Comprehensive Guide
You may want to see also

Replacing the LCD cable
To replace the LCD cable of an Asus Q502LA laptop, you will first need to remove the bottom cover by taking out the ten long Philips screws and using a spudger to pry it off.
Next, remove the plastic hinge cover by unscrewing the hinges and lifting them 90 degrees. You may need to lift the body of the laptop to match the angle of the hinges. Once the hinges are lifted, slide the hinge cover to the side and pull it off.
Now you can access the LCD screen. To remove the screen, use a guitar pick or a similar tool to carefully pry around the edges of the screen to pop it away from the plastic housing. Be careful not to damage the cables or hinges. At the bottom of the screen, remove the plastic covering that hides the cables and hinges, and unscrew the screws holding the screen in place.
Once the screws are removed, disconnect the LCD cable from the motherboard. The cable should just unplug; grab the black tag on top and lightly pull up. When plugging the new cable back in, simply push it down.
Finally, reverse the steps to reassemble the laptop, making sure the battery is the first and last thing you plug in.
Monitoring Hydro Usage: Smart Metering and Water Efficiency
You may want to see also
Frequently asked questions
If your display is distorted, or you're seeing strange colours, it could be time to replace your LCD monitor cable.
You will need a spudger, a guitar pick or similar tool, and a screwdriver.
First, power down your laptop and flip it over. Then, remove the ten long Philips screws from the bottom cover using your screwdriver. Next, use your spudger to gently pry the bottom cover off.
Once you have located the cable, gently pull it out of its connector. To reconnect the new cable, line up the connector carefully and push it firmly into place.


