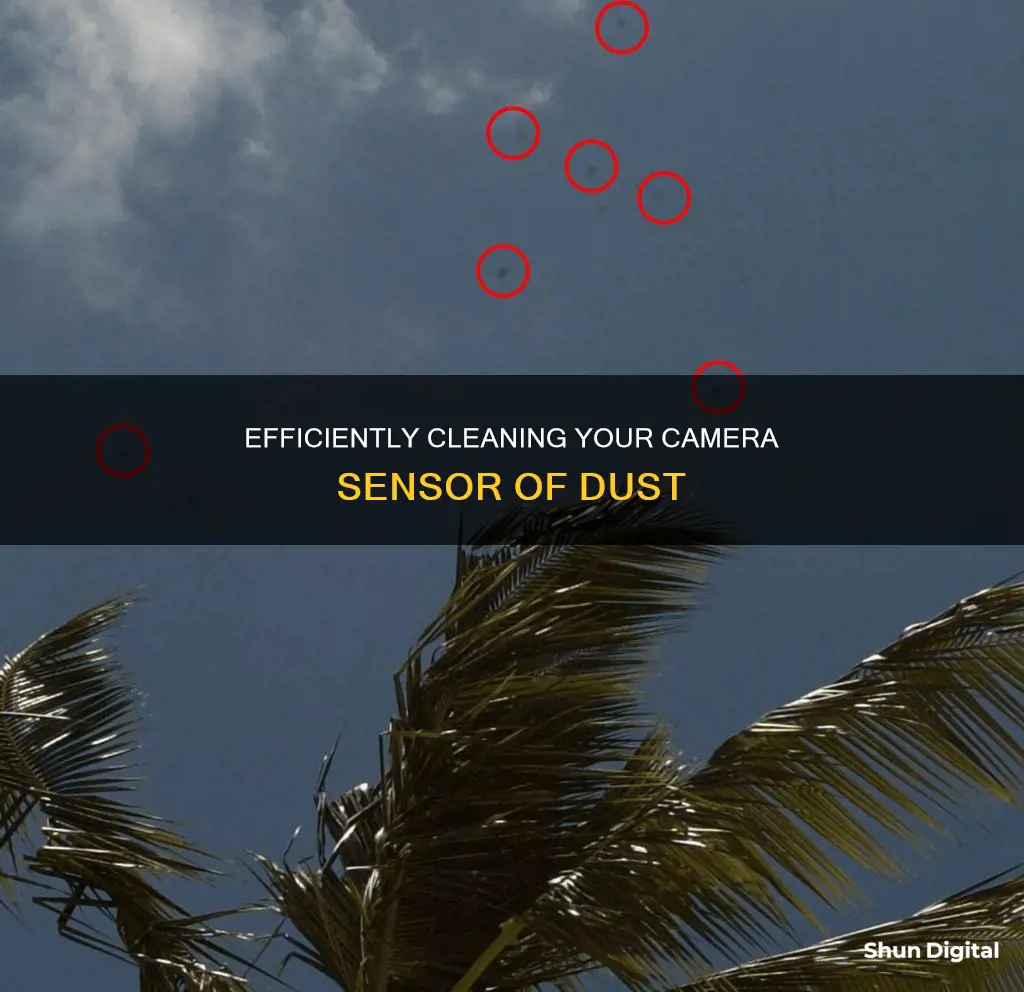
Dust on your camera sensor is a common problem for photographers, especially those who use interchangeable lens cameras. The dust can be removed using either a dry or wet cleaning method.
Dry cleaning method
Use a manual air blower to eliminate bigger dust particles, and a sensor scope to check for any remaining spots. You can also use a sensor brush to remove dust from your camera sensor.
Wet cleaning method
Use a sensor cleaning brush, which holds an electrostatic charge and attracts particles off the sensor, and a sensor cleaning solution to wipe your sensor clean.
| Characteristics | Values |
|---|---|
| --- | --- |
| Camera sensor dust | Dust or dirt on the camera sensor |
| Cause | Constantly using the camera and switching lenses during photo shoots |
| Signs | Mysterious spots in your photos |
| Prevention | Avoid unnecessary changing of lenses; always point the camera towards the ground when changing lenses; keep the lens cap clean; keep the camera bag clean |
| Dry cleaning tools | Manual air blower; sensor scope |
| Wet cleaning tools | Sensor cleaning brush; sensor cleaning products (e.g. Arctic Butterfly brush, Sensor Clean solution) |
| Other tools | Sensor swabs; sensor loupe; bulb blower; camera cleaning kit |
| Pre-cleaning steps | Check if the sensor is dirty; make sure you have a fully charged battery; clean the camera's exterior body; observe cleanliness in the area; gather all the necessary tools |
| Post-cleaning steps | Check the results by taking another shot at the same stopped-down aperture |
What You'll Learn

Check if your camera sensor is dirty
Checking if your camera sensor is dirty is an important part of regular camera maintenance. Dust on a camera sensor can range from mildly annoying to downright problematic, and it's almost impossible to prevent completely.
The first sign that your camera sensor is dirty is if you notice spots on your images. If you see dark spots in the same location across multiple images, you are likely dealing with dust on your camera sensor.
To test if your camera sensor is dirty, you can try the following:
Set your camera to Aperture Priority Mode
Set your camera to Aperture Priority Mode (A). Set your metering mode to Matrix/Evaluative Metering.
Set your ISO to the lowest number
Set your camera ISO to the lowest number, such as ISO 100 or 200. This will help to make any dust spots more visible.
Set your lens to Manual Focus
Turn off autofocus and set your lens to Manual Focus (MF). This will ensure that only dust particles are in focus when you take your test shot.
Set your aperture to the largest number available
Set your aperture (f-stop) to the highest number available. A smaller aperture will make any dust spots more visible.
Take a test shot
If you are outside, point your camera at a clear, blue patch of sky. If you are inside, point your camera at a plain white piece of paper or a computer screen. Make sure your target fills the whole frame and is completely out of focus. Take a picture.
Review your image
Review the image on your camera's LCD screen. Zoom in and scroll over the image to check for any dark spots. You can also transfer the image to a computer for better viewing. If you see any dark spots, your sensor is dirty and will need to be cleaned.
It's important to note that dust on the mirror or viewfinder of your camera will not affect your images. Only dust on the sensor will show up in your photos. Additionally, if you typically shoot at wide apertures, dust particles may not show up, even against bright backgrounds.
New Chevy Trailers: Can Cameras See Through Them?
You may want to see also

Use the auto-clean function
Using the auto-clean function is a simple and safe way to clean your camera's sensor. Here is a step-by-step guide on how to do it:
First, check your camera's manual to locate the auto-clean function. It is often found in the setup menu of higher-end cameras. This function will usually be labelled as "sensor cleaning" or "cleaning mode". Once located, refer to your camera's manual for specific instructions on how to activate this function.
Before using the auto-clean function, ensure that your camera's battery is fully charged. This is important because if the battery runs out during the cleaning process, it could damage the sensor. Additionally, make sure that your camera is turned off before proceeding.
Now, you can activate the auto-clean function. This will typically involve selecting the function from the menu and allowing the camera to perform the cleaning. During this process, the camera will attempt to shake loose any dust or debris on the sensor.
After the auto-clean function has finished running, check to see if the sensor is clean. This can be done by taking a test shot of a plain surface, such as a white wall or a clear sky, and inspecting the image for any remaining dust spots.
If the auto-clean function has successfully removed the dust, you're done! However, if there is still dust on the sensor, you may need to repeat the process or try a different cleaning method. Some cameras will automatically perform the auto-clean function when they are turned on or off, so you may want to try this as well.
Using the auto-clean function is a convenient and safe way to clean your camera's sensor. By following the steps outlined above, you can effectively remove dust and debris without risking damage to the sensor. Remember to always refer to your camera's manual for specific instructions and precautions.
Grocery Store Security: Live Camera Access Explained
You may want to see also

Use a sensor swab and eclipse fluid
Using a sensor swab and eclipse fluid is a safe and effective way to clean your camera sensor. Here's a step-by-step guide on how to do it:
Step 1: Prepare Your Workspace
Before you begin, ensure you have a clean and dust-free workspace. A kitchen or a brightly lit bathroom is ideal. Gather all the necessary tools, including your sensor swab and eclipse fluid. The size of the sensor swab should match the size of your camera's sensor.
Step 2: Access the Sensor
Turn on your camera and locate the menu option to manually clean the sensor. This will lock the mirror and reveal the sensor. If you have a mirrorless camera, simply remove the lens or body cap.
Step 3: Inspect the Sensor
Using a sensor loupe or a magnifying glass, visually inspect the sensor for any visible dust or smudges. This step is important to identify any problem areas and determine the level of cleaning required.
Step 4: Prepare the Sensor Swab
Following the instructions provided with your sensor swab, carefully prepare it for use. Ensure the swab is fresh and only use it once to avoid cross-contamination.
Step 5: Apply Eclipse Fluid to the Sensor Swab
Add 1-3 drops of eclipse fluid to the sensor swab. Be careful not to oversaturate the swab, as this can lead to streaking on the sensor. A light but sufficient moistening is ideal.
Step 6: Clean the Sensor
With the camera's sensor facing upwards, gently press the moistened swab against the sensor's surface. Perform a slow and steady single-directional swipe, using fluid motions without applying excessive pressure.
Step 7: Reinspect the Sensor
After cleaning, use a sensor loupe to scrutinize the sensor again. If you notice any streaks due to excess fluid, wait a few minutes and then attempt a gentler sweep with a new swab.
Step 8: Finalize the Process
Once you're satisfied with the sensor's cleanliness, carefully reattach the lens. Deliver a few light blasts from a rocket blower into the camera's interior to expel any remaining dust particles.
By following these steps, you can effectively and safely remove dust and dirt from your camera sensor, ensuring optimal image quality and the longevity of your equipment.
Playstation Camera: Always Watching or Just a Myth?
You may want to see also

Power up and mirror up
To power up and mirror up your camera, you need to use a special setting on the camera so that the delicate shutter and mirror mechanisms stay out of the way. This will allow you to reach the sensor and clean it.
If you're using a DSLR, you'll need to use a 'Lock mirror up for cleaning' option or something similar. This may be greyed out unless the batteries are fully charged. Choose this option and follow any on-screen instructions.
If you're using a mirrorless camera, there is no mirror to get out of the way, but the process is otherwise the same.
Mastering Camera IQ: A Guide to Understanding Your Camera's Settings
You may want to see also

Check results
To check if your camera sensor is clean, you can take a photo of a white or light-coloured wall or a clear sky. Set your camera to the lowest "normal range" ISO (100 for Canon and 200 for Nikon). Set the focus to manual and focus on infinity for a piece of paper and close-focus for the sky. Set the aperture to f/22 so you can see any spots. Take the shot and open it on a computer. Desaturate the image in Photoshop or a RAW converter. Increase the contrast by bringing the two end sliders of the histogram to meet the ends of the peak. This will help you see what's on the sensor.
If you see spots, it's time to clean the sensor.
Results After Cleaning
To check the results of your cleaning, repeat the above steps. You may need to repeat the cleaning process several times to get the desired results.
Mastering Camera TV: A Guide to Enhancing Your Viewing Experience
You may want to see also
Frequently asked questions
You can check if your camera sensor is dirty by taking a photo of a white or light-coloured wall at the smallest aperture on your lens. If you see black specks on the image, your camera sensor is dirty.
You can clean your camera sensor by using a sensor blower, sensor brush, sensor stamp, or sensor swab.
You can prevent your camera sensor from getting dirty by avoiding unnecessary lens changes, always pointing your camera towards the ground when changing lenses, and keeping your camera bag clean.


