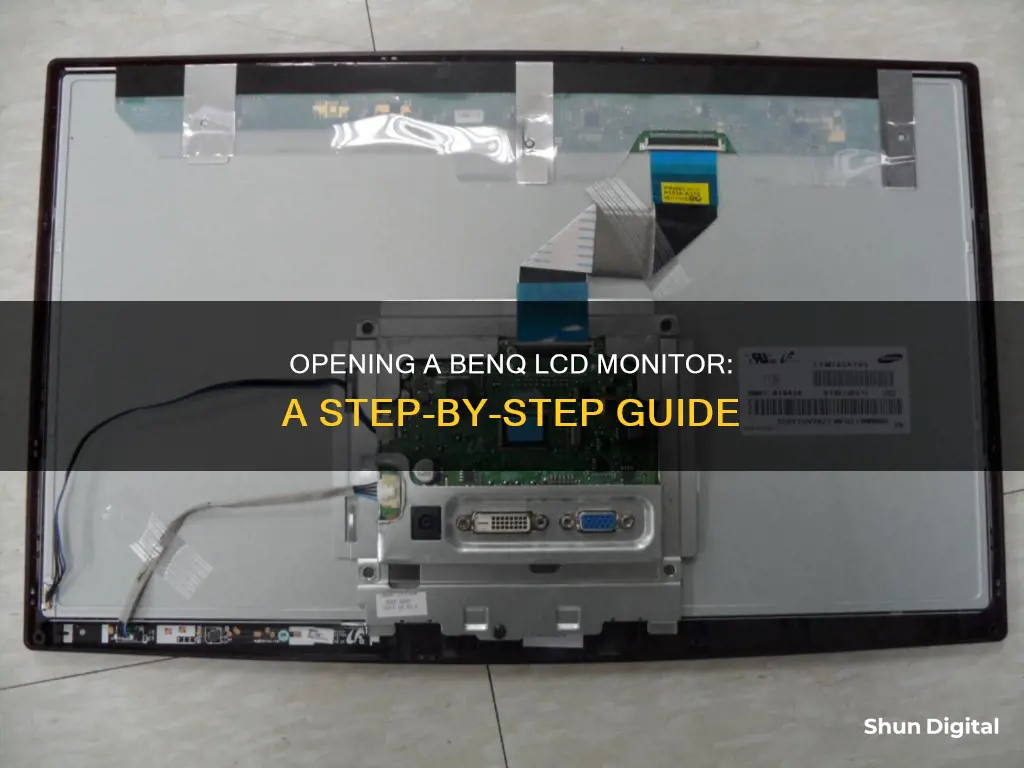
If your BenQ LCD monitor is malfunctioning, you may need to open it up to diagnose the problem. Before you begin, make sure to power off the monitor and unplug all cables, including the AC power adapter cord. It's also recommended to lay the monitor on a soft towel or a flat, sturdy surface to avoid damaging the screen. Now, you can start by removing the screws that secure the base of the monitor. From there, you can follow a series of steps to disassemble the monitor, including removing screws, disconnecting cables, and carefully prying apart components. Keep in mind that you may need specific tools, such as screwdrivers and pliers, for this process.
| Characteristics | Values |
|---|---|
| First Step | Power off the BenQ LCD monitor and unplug the AC power adapter cord |
| Second Step | Loosen the thumbscrews for the video cable and then disconnect it |
| Third Step | Spread a large, soft towel onto a flat, sturdy work surface and lay the monitor face down |
| Fourth Step | Remove the screws that secure the base to the monitor |
| Fifth Step | Remove the rubber grommets on the outer edges of the rear screen bezel |
| Sixth Step | Remove the retaining screws exposed when you removed the rubber grommets |
| Seventh Step | Flip the monitor over and separate the front and rear screen bezel pieces |
| Eighth Step | Disconnect the menu interface cable from the main circuit board |
| Ninth Step | Unplug the LCD backlight connector plug from the right side of the LCD inverter |
| Tenth Step | Disconnect the LCD inverter cable from the circuit board |
What You'll Learn

Turn off the monitor and unplug it
To open a BenQ LCD monitor, you must first turn off the monitor and unplug the AC power adapter cord. This is an essential step to ensure your safety and prevent any potential damage to the device.
Before beginning the disassembly process, it is crucial to power down the monitor completely. This means turning it off from the power button and then unplugging the power cord from the power source. By doing so, you eliminate any electrical current flowing to the device, making it safe to work on.
Unplugging the monitor is particularly important because LCD monitors contain sensitive electrical components that can retain a charge even after being turned off. Working on a device that is still plugged in can lead to electrical shocks, damage to the internal components, or even pose a fire hazard in some cases. Therefore, always make sure to disconnect the power source before proceeding.
Additionally, when unplugging the monitor, be mindful of the power cord and ensure that it is not damaged or frayed. If the power cord shows any signs of wear and tear, it is recommended to replace it before proceeding with the disassembly process. This is because a damaged power cord can be a safety hazard and may not provide a stable connection during the reassembly process.
Once the monitor is turned off and unplugged, you can proceed to the next steps of disassembling the monitor, such as removing the base, screws, and back cover. However, always refer to a reliable guide or manual for specific instructions on disassembling your particular model of BenQ LCD monitor.
Monitoring Propane Gas Usage: Efficient Ways to Track Consumption
You may want to see also

Lay it on a soft towel, screen down
Once you have powered off your BenQ LCD monitor, unplugged the AC power adapter cord, and loosened the thumbscrews for the video cable, it's time to lay the monitor on a soft towel, screen down. This step is crucial to protect the delicate LCD screen from scratches or damage during the disassembly process.
Choose a large, soft towel and spread it out on a flat, sturdy work surface such as a desk or table. Make sure the towel is free of any debris or sharp objects that could potentially damage the screen. Place the monitor face down on the towel, ensuring that the rear of the monitor is facing upward. This orientation will allow you to access the base of the monitor and begin the disassembly process.
With the monitor securely positioned on the towel, you can now proceed to remove the screws securing the base to the bottom of the monitor. Use a Phillips screwdriver to carefully remove these screws, and then set the base aside. This will give you access to the rear of the monitor and the screen bezel, which is the outer frame of the monitor.
At this point, you can start working on removing the rubber grommets located on the outer edges of the rear screen bezel. Most BenQ monitors have between six and eight grommets that need to be gently pried out using an awl or scribe. Be careful not to apply too much force, as you don't want to damage the grommets or the bezel.
After removing the grommets, use the Phillips screwdriver again to remove the retaining screws that were hidden underneath them. These screws help secure the bezel in place, so removing them will allow you to separate the front and rear bezel pieces in the next step.
Unlocking ASUS Monitor: Stuck at 60FPS, Why?
You may want to see also

Remove the base
To remove the base of your BenQ LCD monitor, first make sure that the monitor is turned off and unplugged from its power source. You should also disconnect any cables that are linking it to your computer.
Now, lay the monitor down on a table, with the LCD screen facing up to prevent any damage to the screen. Protect the monitor and screen by clearing a flat, open area on your desk and placing a soft item like a towel on the desk for padding. Be careful not to place the screen on top of any objects, as this could damage the glass.
To detach the monitor base from the stand arm, simultaneously push the locking clips upward and pull the stand downward and outward. Now, insert a pointed object, such as a screwdriver, into the hole above the monitor stand arm. Push the screwdriver against the release button inside the hole, then pull the monitor stand backward, away from the monitor.
Finally, remove the screws that secure the base to the bottom of the monitor using a Phillips screwdriver. Once these are removed, you can slide out and remove the base.
Monitoring Internet Usage: ASUS Router Settings Guide
You may want to see also

Remove the back cover
To remove the back cover of a BenQ LCD monitor, you will need a Phillips-head screwdriver.
First, ensure the monitor is turned off and unplugged. Place the monitor face down on a soft towel on a table or desk, so that the rear of the monitor is facing upwards.
Next, locate the screws holding the base of the monitor in place. There should be two or three screws, which you can remove with your screwdriver. Once the screws are removed, slide out the base.
Now, you need to remove the screws holding the back cover of the screen in place. There should be between six and eight screws in total, including the ones you have already removed that were holding the base in place.
Once all the screws are removed, you can start prying out the back cover. Use your screwdriver to gently lever the back cover away from the monitor, starting with the holes at the bottom, and working your way along the bottom edge and up the side edges.
Be careful not to force the cover, as you could break the small plastic tabs that help to secure the front and rear bezel pieces. Take your time and gently work your way around the edges of the monitor until the back cover comes away.
Monitoring Linux Memory Usage: Tracking a Process
You may want to see also

Disconnect the motherboard
To disconnect the motherboard of a BenQ LCD monitor, follow these steps:
Firstly, power off the monitor and unplug the AC power adapter cord. Place the monitor face down on a soft towel on a sturdy, flat surface, with the rear facing upwards. Remove the base of the monitor by pushing down on the plastic locking clip where the base meets the monitor, pulling the stand downwards and outwards. Unscrew the screws in the middle of the back of the monitor using a Phillips-head screwdriver. There should be six screws in total: two near the top and four closer to the bottom, near the base.
Now, insert the tip of your screwdriver into the seam between the front housing and the back of the monitor. Work your way gently around the sides until the back panel comes off. Remove the screws on the sides of the interior metal guard, which protects all the internal components, including the motherboard. Once the screws are removed, lift the metal guard and set it aside.
Finally, disconnect the green motherboard from the frame of the monitor by gently pulling it out until its metal connectors unplug from the frame. Your BenQ monitor is now successfully disassembled, with the motherboard disconnected.
Monitoring Bandwidth Usage: Firewall's Role and Importance
You may want to see also
Frequently asked questions
Place the monitor on a table with the LCD screen facing upwards.
You will need a Phillips-head screwdriver and a soft towel.
First, power off the monitor and unplug the AC power adapter cord. Then, lay the monitor face down on a towel. Remove the screws securing the base to the monitor and set the base aside.
Locate the rubber grommets on the outer edges of the rear screen bezel and gently pry them out with an awl or scribe. Remove the exposed retaining screws with a Phillips-head screwdriver. Carefully separate the front and rear bezel pieces with an awl or scribe.
Use a 5mm wrench or pliers to disconnect the VGA connector screws. Then, carefully disconnect the menu interface cable from the main circuit board, the LCD backlight connector plug, the LCD inverter cable, the primary video display cable, and the power cables.


