Surveillance cameras are a great way to keep an eye on your home or office when you're not around. The first step to installing them is to decide where to put them. Common spots include entry doors, off-street windows, porches, driveways, and common rooms. You should also consider the camera angle and ensure there are no obstructions.
The next step is to decide whether to use wired or wireless cameras. Wireless cameras are easier to install and don't require drilling, but their image quality may be impacted by the size of the area they cover. Wired cameras are better for larger properties but require more steps to install.
Once you've decided on the type of camera and where to place them, you can start the installation process. For wireless cameras, find a solid surface for the mount, drill pilot holes, and screw the camera mount securely into the wall. For wired cameras, you'll need to attach the camera mounts and run the cables to the DVR box.
| Characteristics | Values |
|---|---|
| Installation process | Wireless cameras are generally easier to install than wired cameras. |
| Installation time | Wireless cameras can be installed in 15-20 minutes, whereas wired cameras may take longer. |
| Equipment | Wireless cameras require a power source, such as batteries, while wired cameras need to be connected to a power outlet. |
| Mounting | Both wireless and wired cameras can be mounted on walls or solid surfaces using screws or adhesive pads. |
| Placement | Cameras should be placed in areas with a clear field of view, avoiding direct light and blind spots. |
| Height | Cameras should be installed at a height of 9-10 feet to prevent tampering but still allow for adequate surveillance. |
| Angle | The camera angle should be adjusted to cover the desired area, such as entry points, common spaces, or specific rooms. |
| Storage | Wireless cameras use cloud storage, while wired cameras may use DVR, NVR, or local storage devices. |
| Settings | Camera settings such as motion sensitivity, brightness, and night vision can be customised through a mobile app or software. |
What You'll Learn
![]()
Choosing a wired or wireless camera
When choosing between wired and wireless cameras, there are several factors to consider, including ease of installation, reliability, flexibility, and cost.
Wired security cameras transmit audio and video signals through a wire to a central hub, which can be a digital video recorder (DVR) or a networked video recorder (NVR) system. They receive constant power through a hardwired cable, ensuring a stable and reliable connection. However, the installation process is more complex and time-consuming, requiring drilling and running cables through walls, ceilings, or crawl spaces. Wired cameras are also less flexible, as they are tethered to specific locations and challenging to move or rearrange.
On the other hand, wireless security cameras offer ease of installation and flexibility. They connect to the home's Wi-Fi network and transmit footage wirelessly to a cloud server or local storage devices. Wireless cameras are typically battery-powered or plugged into power outlets, making them easy to place almost anywhere without extensive wiring. They are ideal for temporary deployments, events, or situations where power outlets are not available. However, wireless cameras rely on a stable internet connection and are more susceptible to network failures and digital snooping or hacking attempts.
Both wired and wireless cameras have their advantages and disadvantages. Wired cameras offer superior reliability and signal stability but require more time and effort for installation. Wireless cameras are easy to install, flexible, and scalable but depend on a reliable internet connection and may have limited signal range due to obstructions. The decision depends on your specific needs, budget, and whether you prioritize convenience and flexibility over a more permanent and reliable solution.
Traffic Camera Tickets: Enforceable in Florida?
You may want to see also
![]()
Selecting the right location
Identify Vulnerable Spots
Start by identifying the most vulnerable spots in your home or property. Consider the areas where intruders are most likely to enter, such as the primary front and back entryways, side doors, and garage doors. Over 30% of burglars use the front door, and more than 20% use the back door. Also, think about other areas you want to monitor, such as driveways, stairways, and hallways.
Camera Height
The height at which you install your cameras is important. If installed too low, they can be easily tampered with, and if installed too high, you may compromise video quality and reduce the effectiveness of motion detection sensors. The ideal height is typically around nine feet, which is high enough to keep people from accessing the camera without a ladder.
Field of View
Consider the field of view you want your cameras to have. If you want to monitor a large area like your front or back yard, choose a camera with a wide field of view. For instance, the Vivint Outdoor Camera Pro (Gen 2) has a 140° field of view.
Indoor Camera Placement
For indoor cameras, a good rule of thumb is to place them in a corner of the room opposite the entry point. This provides optimal coverage and ensures that anyone attempting to tamper with the camera will be recorded first. Like outdoor cameras, indoor cameras should also be installed at a height of around 10 feet or higher to prevent tampering and capture the most area.
Lighting Considerations
When positioning your cameras, consider lighting to avoid glare and ensure clear recordings. Place cameras below light fixtures so that the light fills the camera's field of view. Avoid pointing lights directly at the camera to prevent glare on the lens, and opt for indirect lighting instead.
Avoid Blind Spots
Avoid creating blind spots by carefully considering the placement of your cameras. For example, mounting a camera in the middle of a wall horizontally can result in blind spots on each side. If you need to cover a wider area, consider using multiple cameras or choosing cameras with a wider field of view.
Legal Considerations
Be mindful of legal considerations when selecting camera locations. Avoid pointing cameras at neighbouring properties or areas where people have a reasonable expectation of privacy, such as bathrooms, changing rooms, and bedrooms. Check your local laws and regulations regarding camera placement to ensure you comply with any restrictions.
The Evolution of Camera Bellows: Materials and Design
You may want to see also
![]()
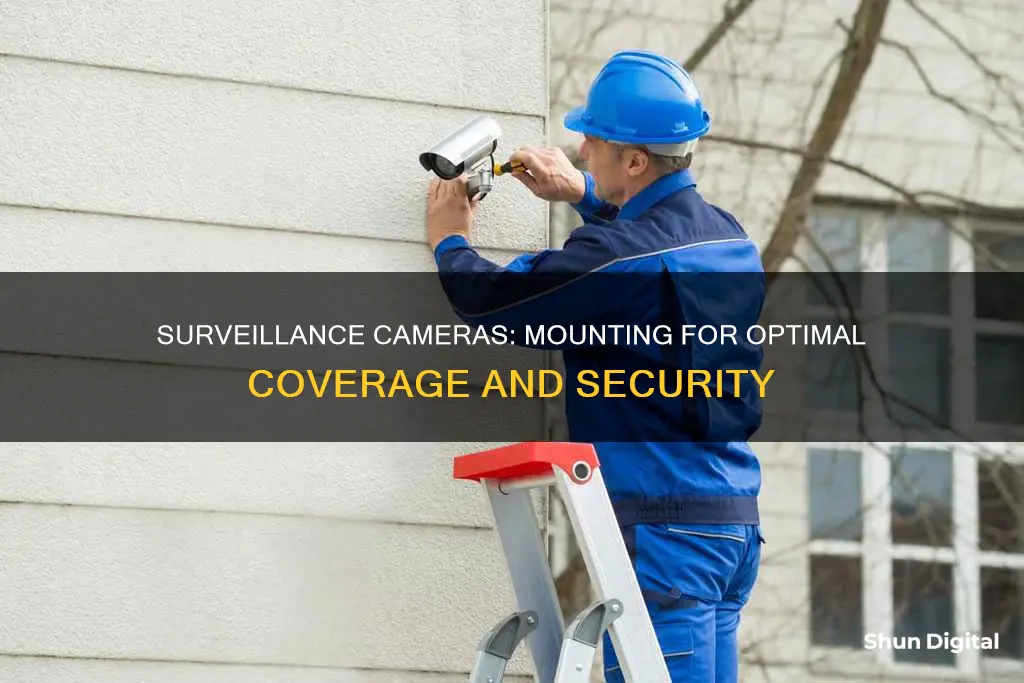
Mounting the camera
Wired Cameras
If you are installing a wired camera, you will need to attach the camera mounts and run the cables to the DVR box. Use the mounting template provided by the manufacturer to drill pilot holes for the mounting screws. Use a spade bit to drill a larger hole in the centre for the cables to exit. Run the security camera cables through the camera mount point and behind the wall until you reach the DVR box mounting point. Use fish tape to help feed the cables through tight spots.
Wireless Cameras
Wireless cameras are typically easier to install and usually come with a mounting bracket that can be screwed into a wall or roof. Use the mounting template to mark the spots for the screws and drill pilot holes. If mounting on a roof, use a sealant under the bracket to prevent leaks. Secure the mounting bracket, then attach the camera.
General Tips
- Before mounting, check for wiring or other obstructions behind the wall, ceiling, or roof.
- For outdoor cameras, choose a placement that is higher than 10 feet and protected from inclement weather.
- Place cameras in corners to achieve the widest possible field of view.
- Avoid direct light, which can cause glare and colour distortion on the footage.
- Opt for a high vantage point to prevent tampering, but make sure the camera is not so high that it can't adequately capture people's faces.
- If your camera requires a power source, measure the power cable to determine how close the camera needs to be to an outlet.
Manual Mode for the S8 Plus Camera: Where is it?
You may want to see also
![]()
Setting up storage
Cloud Storage:
Cloud storage is a convenient option for storing your surveillance footage. It offers the benefit of remote access, allowing you to view your footage from anywhere through a web browser or smartphone app. Cloud storage is also a good choice if you want to avoid the hassle of managing local storage devices. Most cloud service providers offer basic plans for free, which should be sufficient for personal use. However, if you require more storage space or additional features, you may need to subscribe to a paid plan. Keep in mind that cloud storage relies on a stable internet connection, so ensure your internet service is reliable.
Local Storage:
Local storage involves saving your footage on a physical device, such as a hard drive, DVR (Digital Video Recorder), or NVR (Network Video Recorder). This option provides easy access to your footage without the need for an internet connection. Local storage is generally more cost-effective, as it requires only an upfront investment in the storage device with no ongoing monthly fees. However, one disadvantage is the risk of losing your footage in the event of theft, fire, or other damage to the storage device. To mitigate this risk, you can consider installing a NAS (Network Attached Storage) device in a separate location from the recorder, providing a backup solution.
SD Cards:
Using SD cards for storage is a popular option for those who want local storage without a subscription to a cloud service. SD cards are commonly used in security cameras that capture motion-triggered footage. They are safe, relatively inaccessible to others, and suitable for cameras that don't require constant recording. Reolink, for example, offers a battery-powered IP camera with SD card storage, allowing for easy retrieval of recorded videos through their mobile app.
Other Options:
In addition to the options above, you can also explore FTP (File Transfer Protocol) storage, personal computer storage, and NAS (Network-Attached Storage) for your surveillance footage. FTP storage is ideal if you want to avoid cloud storage but don't want to use a local network drive. Personal computer storage allows you to configure your computer to store motion-triggered videos, but it can slow down your system and consume storage space. NAS storage is recommended if you want to record security cameras from different brands, but it usually includes only 2-3 IP channel licenses.
Storage Capacity Considerations:
When deciding on the amount of storage you need, consider the resolution of your cameras and the duration of recording. For motion-based and low-resolution cameras, 6GB to 60GB of storage per camera is sufficient. If you require higher resolutions, opt for storage options ranging from 600GB to 6TB. Additionally, keep in mind that continuous recording will consume more storage space, so motion-triggered recording can help conserve storage capacity.
In conclusion, the choice between cloud and local storage depends on your specific needs and preferences. Cloud storage offers remote access and convenience, while local storage provides greater control and may be more cost-effective. By evaluating the advantages and disadvantages of each option, you can make an informed decision to ensure your surveillance footage is securely stored and easily accessible.
Samsung S7 Edge: Exploring the Macro Camera Mode
You may want to see also
![]()
Customising settings
Once you have mounted your surveillance cameras, you can customise the settings to ensure they work as effectively as possible.
Firstly, you will need to connect the camera to an app on your phone. This will allow you to view the camera feed and adjust the settings. You can download the app by following the instructions in the camera's quick start guide. Once you have downloaded the app, you will need to connect the camera to the app so they can communicate with each other. Make sure your phone is connected to the same Wi-Fi network as your camera. Then, open the app and create an account. You can then add your camera or new device, and scan the QR code on the camera box or select the camera from a list.
Now that your camera is connected, you can adjust the settings. One setting you may want to adjust is the spotlight brightness. You can also set up two-factor authentication, which will help protect your camera system from hackers and thieves by providing an extra layer of security.
If your camera is motion-activated, you can customise the sensitivity. This is important because it determines whether the camera only records when there is a person nearby, or if it is triggered by, for example, a cat. Adjusting the sensitivity will also help to conserve battery power and storage space.
You can also adjust the frame rate. A higher frame rate will result in smoother motion capture but will use more bandwidth and storage. If your camera is above a cash register, for example, you may want a higher frame rate to capture fast-moving hands. However, if your camera is in a low-traffic area, a lower frame rate will suffice.
Another setting you can adjust is the bit rate. This controls the bandwidth consumption of the camera and should be set as low as possible without negatively affecting the image. Start by setting the bit rate at the upper 75% mark of the range, then check the live view. If there is no noticeable difference when you adjust the bit rate to the 40% mark, you can leave it there. If there is a difference, try to find a setting somewhere in the middle.
Finally, you can adjust the resolution. In general, the resolution should be set to the highest available to ensure the clearest image. However, if you can lower the resolution without a noticeable loss in quality, this will reduce bandwidth usage and storage consumption.
Nextrend Camera Systems: Where Are They Manufactured?
You may want to see also
Frequently asked questions
The tools you will need depend on the type of camera you have. For wireless cameras, you will need a drill, screws, and a screwdriver. For wired cameras, you will also need to drill holes and run cables, so a spade bit and fish tape are recommended.
It is recommended to mount your camera about 9 to 10 feet (2.7 to 3.0 m) off the ground. This will prevent people from tampering with it while still allowing you to see people clearly.
Place cameras by doors, garages, driveways, common gathering areas, and anywhere you want to monitor. Avoid placing cameras in bedrooms, bathrooms, or anywhere that might infringe on your neighbors' privacy.