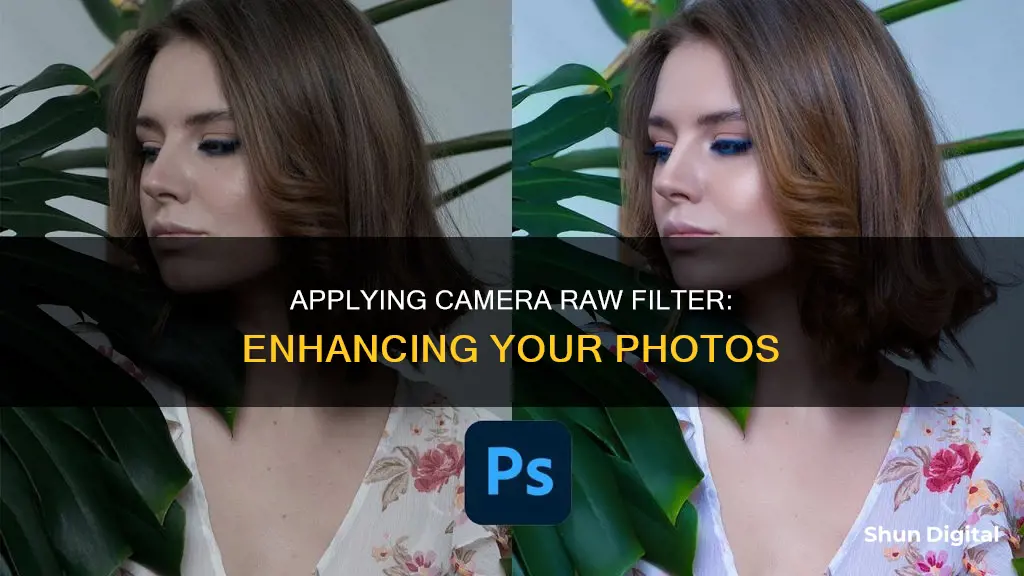
The Camera Raw filter is a powerful tool that offers access to the features of Adobe Camera Raw (ACR) in your Photoshop workflow. It allows you to make powerful non-destructive edits inside Photoshop, even to file formats that ACR doesn't support. You can use the Camera Raw filter at any point in your workflow, not just when you first open an image. To apply the filter, simply select Filter > Camera Raw Filter, and the dialog box will pop up. However, before you do this, you may want to stamp all the layers by pressing Ctrl/Cmd+Shift+Alt/Opt+E. This will combine all of your layers into a new layer from which you can work.
| Characteristics | Values |
|---|---|
| How to access the Camera Raw filter | Go to Filter > Camera Raw Filter |
| When to use the Camera Raw filter | When you want to make powerful non-destructive edits inside Photoshop, when you want to fine-tune adjustments after RAW processing, when you want to apply certain adjustments that are difficult to do in Photoshop’s main interface, when you want to make quick adjustments to certain parts of the image, when you want to add vignettes, and when you want to make final tweaks before finishing your image |
| How to use the Camera Raw filter | Open any image in Photoshop CC, convert the layer you want the filter to act on into a smart object by right-clicking the layer and choosing Convert to Smart Object or choosing Filter > Convert for Smart Filters, then choose Filter > Camera Raw Filter |
| Benefits of using the Camera Raw filter | You can use the filter to sharpen an image and use the Masking slider when sharpening, limiting the areas of the image which are sharpened to just the edges and not areas of flat colour. You also get access to tools that aren't available in Photoshop, such as Clarity, the Graduated Filter, Adjustment Brush, and Radial Filter. The Camera Raw Filter also provides a way to work with a JPG image in ACR, and access to the Split Toning effect sliders, presets, the new upright correction, post-crop vignette, the new chromatic aberration and defringe tools, and the noise reduction sliders |
| Limitations of the Camera Raw filter | You will lose some functionality of the white balance adjustment, as you are not working from a RAW file. You will also lose the Crop and Rotate tools that you would normally have access to when working on RAW files |
What You'll Learn
![]()
Converting a video layer into a Smart Object
- Open the video file in Photoshop: Go to "File > Open" and select your video file. This will open the video in its own tab.
- Convert the video layer to a Smart Object: Right-click on the video layer in the Layers panel and choose "Convert to Smart Object" from the menu. This step is essential for applying transformations without permanently altering the original video.
- Trim the video: If your video clip is longer than desired, you can trim it. Hover your mouse over the end of the video layer until the pointer turns into a black half-square with a double arrow. Click and drag the video clip to the left to shorten it.
- Transform the video layer: Press Ctrl+T (Command+T for Mac) to activate the free transform option. You can now resize, reshape, or reposition your video layer as needed. The Smart Object will preserve the quality of the video, even after transformations.
- Add keyframes for transitions: Move the playhead in the Timeline panel to the position where you want a transition to begin. Click on the Transform stopwatch icon to add a keyframe. Move the playhead to the desired end position, transform the layer again, and press Enter. Photoshop will automatically add the second keyframe, creating a smooth transition.
- Render and export the video: Go to "File > Export > Render Video" to render your video with the applied transformations. Choose the desired settings and export your final video.
By converting the video layer into a Smart Object, you gain the flexibility to experiment with transformations, knowing that you can always adjust and tweak your adjustments without compromising the original video clip.
Charging Your SP815UZ: Battery Power Basics
You may want to see also
![]()
Accessing the Camera Raw Filter
Once you have an image open in Photoshop, the Camera Raw filter can be accessed from the Filter menu. It can also be opened by pressing CRTL+SHIFT+A on Windows or CMD+SHIFT+A on Mac. If you are unable to access the Camera Raw Filter, your image type may not be supported. Only RGB and grayscale images are compatible with the filter. If you are working with CMYK, LAB, or indexed color images, you will need to convert them to RGB or grayscale.
It is worth noting that the Camera Raw filter is compatible with 16-bit-color images as well as 8-bit-color ones. However, some of Photoshop's other filters are not compatible with 16-bit-color images.
To use the Camera Raw filter, select it from the Filter menu, and you will be presented with the Camera Raw interface. Once you are finished making your desired edits and adjustments, click the "OK" button to apply the changes and return to the Photoshop interface.
It is highly recommended to create a duplicate layer to which the Camera Raw filter will be applied. This keeps the original, or "background," layer intact and allows for blending and masking of the edits made with the filter in relation to other layers in your Photoshop file.
Sharpening RAW Files: In-Camera vs Post-Processing
You may want to see also
![]()
Adjusting the white balance
There are three main ways to adjust the white balance in Adobe Camera Raw (ACR): the Temperature and Tint sliders, the White Balance presets drop-down menu, and the White Balance tool.
White Balance Presets
If you've shot in a compressed format like JPEG, the only preset options you'll have under White Balance are Auto or Custom. If you've shot in RAW, you'll have similar options to those on your DSLR. The presets include Cloudy, Daylight, Flash, Fluorescent, Shade, and Tungsten. Each of these presets warms or cools the image to varying degrees. For example, Cloudy and Shade will shift the image towards warmer tones to compensate for darker, greyer days.
Custom White Balance
You can choose a custom white balance by either dragging the Temperature slider along the Kelvin scale until you're happy with the result, or by using the colour dropper tool on the top toolbar to select the colour you want the software to recognise as white or neutral.
White Balance Tool
The White Balance tool is another easy way to set the white balance. Choose the White Balance tool from the toolbar (or press 'I' on your keyboard), and then click on something in your image that is supposed to be grey. By telling ACR, "This area right here is supposed to be neutral grey", it will remove any yellow, blue, or other tints so that area becomes grey, and it will correct all the colours in your image.
Ideally, you'd look for something that is a very light grey (not white). But if there's nothing grey in your photo, try to find a neutral-looking colour. If you click on the wrong area, you'll know instantly because the colours will look awful. If that happens, just click on a different area to try again.
Temperature and Tint Sliders
The Temperature and Tint sliders let you tweak the white balance by dragging towards the colour you want. Adobe has added a colour gradient behind both of these sliders so you can see which way to drag to get the colour you want. For example, if your image looks too blue, you can make it more yellow by dragging the Temperature slider to the right.
Tips
- If you're shooting in JPEG, it's best to change the white balance using the Temperature and Tint sliders or the White Balance tool, as the White Balance preset drop-down menu will only give you the option of Auto.
- If you choose a White Balance preset and then move either the Temperature or Tint slider, the preset menu will now display Custom, which means you started with a preset and then tweaked it.
- If you're doing commercial product photography, where the colour of the product has to be exactly right, you would use a colour checker/grey card during the shoot to set a custom white balance in your camera.
- You can always experiment with different white balance settings because it's easy to start over. Any time things start to look funky, just double-click directly on the White Balance tool and it will reset everything back to the original out-of-camera settings.
Charging the JVC Everio: A Step-by-Step Guide
You may want to see also
![]()
Using the Radial Filter
The Radial Filter tool in Adobe Camera Raw allows you to highlight the subject of an image and direct attention to specific portions of the image. You can use the Radial Filter to draw an elliptical shape around the subject, and adjust the exposure and clarity of the area within the shape to bring more attention to the subject. The Radial Filter can be used even if the subject is off-centre or anywhere in the photograph.
- Open a photo in Adobe Camera Raw.
- Identify the areas where you want to attract the viewer's attention. You can use a Radial filter to weaken the focus on the background and highlight the subject.
- Select the Radial Filter tool from the toolbar or press "J" to toggle it.
- Choose whether you want to create a new filter or edit an existing one using the New and Edit radio button options.
- To create a Radial filter, click and drag across the desired region to draw a circular or elliptical shape. This shape determines the area affected or excluded from your adjustments.
- To edit an existing Radial filter, click on any of the gray handles on the photo. The handle will turn red when selected.
- Choose the "Effect" option (located below the sliders) to determine whether the modifications will be applied inside or outside the selected area.
- Adjust the size and orientation of the Radial filter by clicking and dragging the centre of the filter or by dragging the filter handles.
- Use the sliders to modify the selected Radial filter area. The Feather slider adjusts the falloff of the applied effect.
- Repeat steps 3 to 6 to continue adding or editing Radial filters.
- Clear the Overlay checkbox to preview the final photo without the overlays. If you want to start over, click Clear All (this action cannot be undone).
- Use the Mask option to enable mask visualization or press "Y" to toggle the Mask setting.
You can also modify Radial Filter masks using brush controls. Once you've added a mask, select the Brush option next to New/Edit or press Shift+K to access the brush controls.
Polaroid Camera Battery Replacement: A Step-by-Step Guide
You may want to see also
![]()
Applying vignettes
Step 1: Convert the Background Layer into a Smart Object
Before applying the Camera Raw Filter, it is recommended to convert the layer your photo is on into a Smart Object. This ensures that the vignette effect remains fully editable, and your original image remains untouched and unharmed. To do this, go to the Layers panel, click on the small menu icon in the top right corner, and select "Convert to Smart Object".
Step 2: Select the Camera Raw Filter
Go to the Filter menu, and choose Camera Raw Filter. Your image will appear in the Camera Raw dialog box, where you can access various tools and controls for editing.
Step 3: Choose the Radial Filter
In the top left corner of the Camera Raw dialog box, you will find the Radial Filter tool. Select it to start creating your vignette effect.
Step 4: Adjust the Exposure
In the Radial Filter options panel on the right, start by lowering the Exposure. Click the round minus icon to the left of the Exposure slider to set it to a preset value, and then drag the slider further to the left to darken the image. This step is crucial to creating the vignette effect.
Step 5: Drag Out the Radial Filter
Click near the centre of where you want your vignette effect to appear and drag outward. You can create a perfect circle by holding the Shift key while dragging. If you need to reposition the filter, press and hold the Spacebar and drag it to the desired location. Release the Spacebar to continue dragging and resizing the filter.
Step 6: Adjust the Effect Location
By default, the Radial Filter darkens the inside of the shape while keeping the outside area unchanged. If you want to create a vignette, you will need to change the Effect location. In the Radial Filter options, look for "Effect" with two checkboxes, allowing you to choose whether the effect is applied inside or outside the shape. Select "Outside" to apply the darkening effect around the shape, creating your vignette.
Step 7: Resize, Move, and Rotate the Shape
You can now resize and reshape your Radial Filter by dragging any of the four handles located at the top, bottom, left, and right of the shape. Move the shape by clicking and dragging inside it. To rotate, move your cursor near the edge of the shape and drag when the cursor changes into a curved, double-pointed arrow.
Step 8: Fine-tune the Image Adjustments
Use the various image adjustment sliders in the options panel to fine-tune your vignette effect. You can adjust exposure, contrast, highlights, shadows, clarity, and saturation to create the desired look. Play around with these sliders to achieve the perfect vignette for your image.
Step 9: Adjust the Feathering (Optional)
If you want to adjust the feathering of your vignette, you can do so by using the Feather slider. This slider controls the size of the transition area between the main image and the darkened area of the vignette. Drag the slider left to decrease feathering or right to increase it.
Step 10: Show or Hide the Overlay (Optional)
You can temporarily hide the Radial Filter overlay by unchecking the "Show Overlay" option in the lower right corner of the Camera Raw dialog box. To turn the overlay back on, select the option again or press the letter "V" on your keyboard.
Step 11: Compare with the Original Image (Optional)
By default, you will see a live preview of your changes. To compare your vignette effect with the original image, simply uncheck the "Preview" option at the top of the Camera Raw dialog box. To turn the preview back on, select the option again or press the letter "P" on your keyboard.
Step 12: Add Additional Radial Filters (Optional)
You can add multiple Radial Filters to create more complex vignettes. To add a new filter, select "New" at the top of the Radial Filter panel. Then, follow the same steps as before to adjust the size, shape, and position of the new filter. Remember to switch the Effect to "Inside" if you want the area inside the shape to be affected.
Step 13: Close the Camera Raw Dialog Box
Once you are happy with your vignette effect, click the "OK" button in the bottom right corner of the dialog box to apply the changes and close it. Your vignette effect will now be visible in the Layers panel as a Smart Filter below your image.
Charging Your Fujifilm FinePix: A Step-by-Step Guide
You may want to see also
Frequently asked questions
Go to Filter > Camera Raw Filter. This opens the current layer inside Adobe Camera Raw (ACR).
The Camera Raw filter offers access to most of the features of ACR from inside Photoshop. You can use it on any image and on any layer. It also gives you access to tools that aren't available in Photoshop, such as Clarity, the Graduated Filter, Adjustment Brush, and Radial Filter.
Yes, combining the Camera Raw filter with Smart Objects allows you to make edits and come back to change them at any time. First, convert the layer you want to apply the filter to into a Smart Object, then apply the Camera Raw filter.
You can adjust the white balance, highlights, shadows, whites, blacks, and clarity. You can also use the Gradient Filter and the Radial Filter.
Yes, first convert your video layer into a Smart Object by going to Filter > Convert for Smart Filters. Then go to Filter > Camera Raw Filter and use the controls to adjust the video.