Mounting a camera in your car can be a tricky process, but it's a great way to capture unique shots and add production value to your film. There are a variety of ways to mount a camera, both inside and outside your car, each with its own advantages and considerations. Whether you're using a simple dashboard mount or a more complex rig, safety must always come first. It's important to disable airbags when rigging a camera inside a car and to ensure any equipment is securely fastened to avoid damage or injury in the event of an accident. When attaching cameras to the outside of a moving vehicle, it's crucial to check local laws and regulations, and always have a backup safety system in place in case your primary attachment method fails. With the right precautions and techniques, you can capture smooth and dynamic footage from a variety of angles, enhancing the visual impact of your film.
How to Mount a Car Camera
| Characteristics | Values |
|---|---|
| Mounting location | Dashboard, license plate, headrest, hood, inside/outside of window, rearview mirror area |
| Mounting equipment | Suction cups, magnetic mounts, ratchet straps, adhesives, bolts, L-brackets, sponge, weights, PVC pipe, U-bolts, wingnuts |
| Safety considerations | Disable airbags, use safety lines/tethers, avoid obstructing driver's view, check local laws, avoid cosmetic damage to vehicle |
| Camera angle | Tilt lens slightly upwards for 60% road and 40% sky |
What You'll Learn

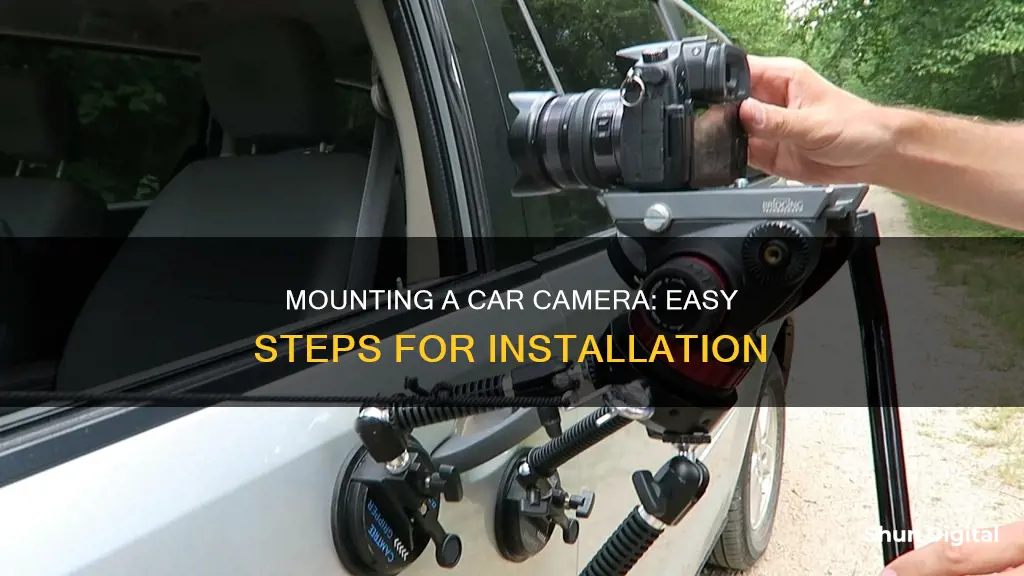
Suction cups and magnetic mounts
The PellKing Car Mount Kit is a versatile option that offers both suction cups and magnetic brackets. The kit includes a double flat suction cup with a 1-inch ball head, a double 88mm magnetic suction bracket, a 114cm selfie stick, and a 1-inch 22cm double socket arm bike mount. These components can be used separately or in combination, allowing for flexible mounting options on various vehicles and surfaces. The PellKing magnetic mount also features a triangle structure design with two strong magnets, providing a stable shooting environment.
For those seeking a more heavy-duty option, the Modus Camera Mounting System offers a professional-grade solution with four vehicle magnets. This system is more expensive, with a regular price of $223, but it provides a secure and stable platform for your camera.
When choosing between suction cups and magnetic mounts, it's important to consider the surface you'll be mounting your camera on. Suction cups perform well on smooth, non-porous surfaces, while magnetic mounts are ideal for cars with metal body panels. Additionally, the type of camera and desired footage can also influence your decision. For example, if you're using a heavy-duty camera or aiming for drone-like shots, a magnetic mount might be a better choice.
It's worth noting that while suction cups are generally reliable, they may not be suitable for all car surfaces. Some users have reported issues with suction cups causing damage to car paint or wraps. As always, it's important to follow the instructions and take the necessary precautions when installing any type of mounting equipment on your vehicle.
Mastering Camera Modes: AV vs TV Settings
You may want to see also

Dashboard base plate and license plate mount
Dashboard base plates and license plate mounts are a great way to add a reverse backup camera to your vehicle. They are easy to install and can be fitted to most vehicles.
Dashboard Base Plate
When mounting a car camera to your dashboard, you will need to ensure that the base plate is securely attached. This can be done using a strong adhesive pad or disc, which will act as a mounting disk for the suction cup of the camera. These adhesive pads are available in different sizes, so be sure to measure the suction cup of your camera before purchasing.
License Plate Mount
License plate mounts are a popular option for car cameras as they are easy to install and provide a clear view of your surroundings. When choosing a license plate mount, you will need to consider the type of camera you have and the spacing of the screw holes. Most license plate mounts are universal, but some may only be compatible with specific camera models or vehicles.
There are a variety of license plate mounts available, including:
- Metal bar-type mounts
- Full-frame mounts
- Concealed mounts
- Bracket mounts
- Infrared illumination mounts
- Night vision mounts
When installing a license plate mount, be sure to follow the instructions carefully and test the camera before securing it in place.
Customizing Your FO76 Camera: A Step-by-Step Mod Guide
You may want to see also

Sponge dashboard mount
A sponge dashboard mount is a cheap and easy way to mount a camera to your car's dashboard. The whole setup can be put together for under $10 and it doesn't take much time to assemble.
What You Need
- A car washing sponge (the peanut shape works well)
- A rug pad or some no-slip grippy material
- Weights (D batteries, a small tube filled with pennies, a roll of coins, etc.)
- An adhesive of your choice
- An Exacto knife
Instructions
- Use the Exacto knife to cut out a camera-shaped hole in the sponge. Trace around the camera with a marker, then cut a little inside the line to ensure a snug fit.
- If you have a lighter camera, add some weights to the sponge to prevent the setup from moving while driving. Cut another hole in the sponge for the weights.
- Attach the rug pad or no-slip grippy material to the bottom of the sponge using your adhesive to prevent the sponge from sliding on the dashboard.
- Place the camera in the sponge and position it on your dashboard.
Tips
- If you need to attach a live view monitor to your DSLR, simply cut an extra hole through the side of the sponge for the cable.
- This setup is best for standard daily commutes. For high-speed driving or off-roading, a sturdier mounting solution is recommended.
Charging the Polaroid Snap Touch: A Step-by-Step Guide
You may want to see also

Headrest mount
The Hague CHM Camera Headrest Mount is a popular choice for mounting a camera to a car's headrest. It is fully adjustable for different widths of the headrest and allows for a great view from the driver's perspective. The camera attaches to a ball mount, making it possible to set the camera in the required position. This product is ideal for cameras up to 2kg and has approximate dimensions of 25 x 25 x 430mm. It is worth noting that this mount is only suitable for headrests with twin posts.
Another option is the Proaim Headrest Car Mount, which is designed for film technicians to mount equipment and accessories inside cars. It can be clamped to the headrest and secured with bolts to hold heavier setups. This mount has multiple threads and holes to accommodate various equipment, such as monitors, video recorders, and LED lights.
If you own a GoPro or another type of action camera, the Tackform Headrest Mount is a heavy-duty solution. It features an all-metal mounting clamp that attaches to any headrest post up to 0.5" in diameter. The mount includes dual omnidirectional locking ball joints and two locking elbow joints, enabling you to achieve the perfect filming angle. The mount is compatible with devices using the GoPro "buckle" system and those utilising a standard "tripod" screw (1/4-20).
Evolution of Camaro: 1964 to Present
You may want to see also

Mounting angle and position
When mounting a camera on your car, there are several factors to consider to ensure the best angle and position. Firstly, it is important to prioritise safety. If you are rigging a camera to the outside of your car, be sure to check local laws and requirements, especially when using public roads. It is also crucial to not obstruct the driver's view. If you are mounting a camera inside the car, make sure to disable airbags to prevent the camera from causing injury if deployed.
The angle and position of your car camera depend on the type of camera and how it is mounted. Some cameras are adjustable within their casing, while others require tools to remove, adjust, and refasten. If your camera enclosure has screws and bolts, you will need a drill or screwdriver with the correct bits to open it. Flush mount cameras, for example, are mounted by drilling a hole in the body of the car and can be angled to improve the view. On the other hand, surface-mount cameras usually come with their own mounting brackets and instructions, and their angle can be adjusted by placing washers or screws between the surface and the mount.
If you are using a suction cup or magnetic mount, be aware that these require a smooth, non-porous flat surface and a metal (iron or steel) surface, respectively. It is recommended to use a safety line or tether to prevent damage in case the mounting system fails.
For dash cams, it is important to mount them outside the driver's sightlines to the road, highway signs, and signals. Top-mounted positioning is recommended for optimal inward-facing AI Event Detection accuracy. The dash cam should be mounted at or above the driver's eye level, approximately 8.5 inches below the upper edge of the windshield area swept by the windshield wipers.
Focusing Your RPi Camera V2: A Step-by-Step Guide
You may want to see also
Frequently asked questions
Front dash cams should be mounted near the centre of the front windshield to ensure an even field of view. This will also avoid blocking the driver's field of vision.
Most car cameras come with an adhesive mount. Before applying the adhesive, clean the area of the windshield with a window cleaner and ensure it is dry and at room temperature. Press your hands against the mount and add pressure for about 10 seconds.
Tilt the lens slightly upwards so the footage displays about 60% road and 40% sky. This will provide a good balance of exposure and clarity, capturing important details such as road signs and license plates.
You can make a cheap DIY camera mount using a peanut sponge, a rug pad, and some weights if you're using a light camera.


