Adobe Camera Raw is a free plug-in for Photoshop that simplifies image processing and development. It can also be used in Adobe Bridge, which has the advantage of improving the speed of your computer and streamlining your workflow. When you're finished editing an image in Camera Raw and close out of it, you're instantly returned to Bridge, ready to select and open the next image. To open and work with Camera Raw directly from within Adobe Bridge, select an image by clicking on its thumbnail, then click on the Open in Camera Raw icon at the top of the Bridge interface, or go to the File menu and choose Open in Camera Raw.
| Characteristics | Values |
|---|---|
| How to open Camera Raw in Bridge | Click on the "Open in Camera Raw" icon at the top of the Bridge interface, or go to File > Open in Camera Raw. |
| How to enable Camera Raw editing in Bridge | You need an active subscription of Adobe Photoshop or Photoshop Lightroom Classic. Launch either of these apps once, then relaunch Adobe Bridge. |
| How to import to Camera Raw | Open Bridge and browse to the location of your image; right-click on it and select "Open in Camera Raw". |
| How to adjust your image in Camera Raw | Use the tools at the top of the window, then move the sliders in the Basic Tab to your preferred settings. |
| How to save your image | Double-click on your image to open it in Photoshop, then press Ctrl+Shift+S to save a copy. |
| How to open JPEG or TIFF files in Camera Raw | Open Adobe Bridge and navigate to the images you would like to edit, then right-click and select "Open in Camera Raw". |
What You'll Learn
![]()
How to open Camera Raw in Bridge
Opening Camera Raw in Bridge is a straightforward process, but there are a few things to keep in mind. Here is a step-by-step guide on how to do it:
Firstly, ensure you have the necessary software installed and activated. To use Camera Raw in Bridge, you need an active subscription to Adobe Photoshop or Photoshop Lightroom Classic. Launch either of these applications at least once to enable the feature in Bridge.
Now, let's move on to the steps for opening Camera Raw in Bridge:
- Open Adobe Bridge: Go to the File menu in Photoshop and choose "Browse in Bridge." This will launch Adobe Bridge.
- Navigate to your images: In Adobe Bridge, navigate to the folder containing the images you want to edit. Bridge will display the images as thumbnails in the Content panel.
- Select the desired image: Click on the thumbnail of the image you want to open in Camera Raw. You can select multiple images if you want to apply the same adjustments to all of them.
- Open the image in Camera Raw: Right-click (Ctrl-click on Mac) on the thumbnail and choose "Open in Camera Raw" from the menu. Alternatively, you can use the keyboard shortcut Ctrl+R (Windows) or Command+R (Mac).
- Edit your image: Once the image is open in Camera Raw, you can start editing. Make the desired adjustments, and remember that you can always restore the original, unedited version if needed.
- Save your changes: When you're done editing, click "Done" to save your changes and close the Camera Raw dialog box. You can also click "Open Image" to open a copy of the adjusted image in Photoshop for further editing.
It's important to note that the default setting in Adobe Bridge is to open RAW files directly in Photoshop. However, you can change this setting to allow direct editing of Camera Raw settings in Bridge. To do this, go to the Adobe Bridge CC menu (on Mac) or the Edit menu (on Windows) and choose Preferences. Then, select "Double-Click Edits Camera Raw Settings in Bridge" to enable direct editing in Bridge.
Additionally, if you're working with JPEG or TIFF files, you can set a preference to open them directly in Camera Raw. In Bridge, go to Edit/Adobe Bridge CC > Camera Raw Preferences. Choose "Automatically Open JPEGs with Settings" or "Automatically Open TIFFs with Settings" depending on your file type.
Charging Muvi Cameras: A Quick Guide to Powering Up
You may want to see also
![]()
How to import images into Camera Raw
To import images into Camera Raw, you can use either Photoshop or Adobe Bridge.
Using Photoshop
To open images in Camera Raw from Photoshop, first, select "File | Open" from the Photoshop menu. This will bring up the Open File dialog. Next, select the file you want to open and click the "Open" button. If the file you've selected is a RAW file, it will automatically open in Camera Raw. If not, continue to the next step.
With the image open in Photoshop, click the "Filter" menu, where you will see the "Camera Raw Filter..." option near the top. Click this to open the image in Adobe Camera Raw.
Alternatively, you can use the keyboard shortcut Shift + Cmd + A (on a Mac) or Shift + Ctrl + A (on a PC) to open Adobe Camera Raw for editing using the selected image layer in Photoshop.
Using Adobe Bridge
To open images in Camera Raw from Adobe Bridge, you can use one of the following three methods:
- Double-click a raw file thumbnail image in the Content panel.
- Click once on any thumbnail image of a Raw, JPEG, or TIFF file, then press Ctrl + R (Windows) or Cmd + R (Mac).
- Click once on any thumbnail image in the Content panel and then choose File > "Open in Camera Raw."
Opening JPEG or TIFF Images in Camera Raw
You can open JPEG or TIFF files from Bridge or Photoshop, directly into Camera Raw.
Using Bridge
- In Bridge, click the thumbnail of the JPEG or TIFF file you want to open.
- Then, click the "Open in Camera Raw" button or press Ctrl-R/Cmd-R.
Using Photoshop
- From Photoshop's File menu, choose "Open As."
- Browse through your folders to find the JPEG or TIFF image you want, then click on the file.
- In the pop-up menu at the bottom right, change the file format to Camera Raw, then click "Open."
Opening Multiple Files in Camera Raw
You can also open multiple files in Camera Raw simultaneously from Adobe Bridge. To do this, first, open the folder holding your photos in Bridge. Then, Shift + Click all of the images you want to open, and choose File > "Open in Camera Raw."
Charging the Heimvision Camera: A Step-by-Step Guide
You may want to see also
![]()
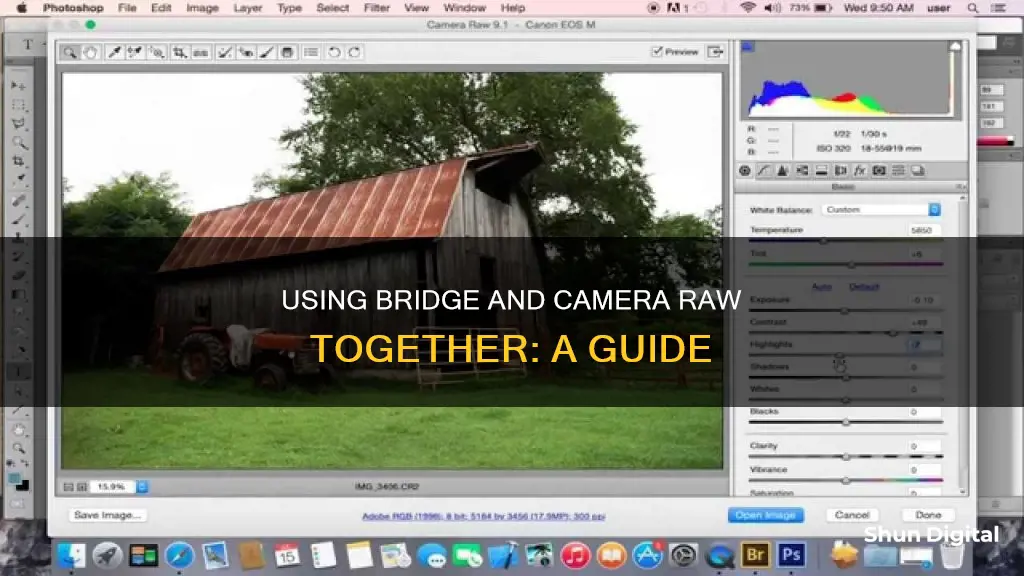
How to adjust your images
Adobe Bridge offers a convenient way to process Camera Raw files without switching between applications. Here are the steps to adjust your images using Bridge:
Navigating to Your Folder:
- In Bridge, go to the Window menu and select Workspace > Essentials.
- Then, go to Window > Workspace > Reset Workspace.
- In the Favorites panel at the top left of the window, click on Desktop.
- Adjust the zoom slider at the bottom right of the window for better readability.
- Double-click on the Class Files folder to open it, then navigate to the Bridge Files and Camera Raw Pics folders.
Adjusting White Balance and Straightening:
- Double-click on a raw image file (e.g., "noble desktop.cr2") to open it.
- Click on the White Balance tool at the top of the window.
- Click on different places in the image to see how the color balance changes.
- Manually adjust the white balance using the Temperature and Tint sliders on the right until you find a suitable setting.
- To straighten the image, select the Straighten tool at the top of the window.
- Find a line in the image that should be vertical or horizontal, and drag from the top to the bottom of the line.
- The cropped area will be indicated by a greyed-out portion of the image.
- Click Done to save the changes and return to the Bridge window.
Adjusting Highlights, Shadows, and Blacks:
- Double-click on another raw image file (e.g., "nyc street horizontal.cr2").
- Adjust the Highlights slider to the right to brighten or to the left to darken the highlights.
- Hold Option (Mac) or Alt (Windows) while dragging the slider to see which highlights will be clipped.
- Set the Shadows to a positive value to brighten them and the Blacks to a negative value to darken them.
- Click Done to save the changes.
Copying Raw Settings:
- If you have multiple images that require similar adjustments, you can copy the settings from one image and apply them to the others.
- Select the image with the desired settings (e.g., "nyc street horizontal.cr2").
- To copy the settings, right-click on the image and choose Develop Settings > Copy Settings, or use the keyboard shortcut Cmd-Opt-C (Mac) or Ctrl-Alt-C (Windows).
- Select the image(s) you want to apply the settings to.
- To paste the settings, right-click and choose Develop Settings > Paste Settings, or use the keyboard shortcut Cmd-Opt-V (Mac) or Ctrl-Alt-V (Windows).
Adjusting Multiple Raw Files Simultaneously:
- Select multiple raw image files that you want to adjust together.
- Double-click on any of the selected images to open the Camera Raw window.
- Click the Select All button at the top left of the window to apply the same changes to all selected images.
- Adjust the Saturation slider to the left to remove colors and convert the images to black and white.
- Fine-tune individual images by selecting them and making specific adjustments.
- Click the Synchronize button and choose Settings from the menu to apply the same settings to all selected images.
Batch Processing Multiple Raw Images:
- Select all the images you want to process by clicking the Select All button.
- At the bottom of the window, click on the Adobe RGB (1998); 8 bit option to open the Workflow Options.
- Ensure that Resize to Fit is unchecked, and set the file format accordingly.
- Click the Save Images button and choose a destination folder for the processed images.
- Specify the file naming convention, file format, and any other required settings.
- Click Done to accept the changes and close the Camera Raw dialog box.
Charging the Floureon Camera: A Step-by-Step Guide
You may want to see also
![]()
How to save your images
Saving your images in Camera Raw is a straightforward process. Here is a step-by-step guide on how to do it:
Step 1: Opening Camera Raw
To start, you will need to open Adobe Camera Raw. This can be done in two ways. The first is by clicking on the "Open in Camera Raw" icon at the top of the Adobe Bridge interface. The second method is to go to the File menu in the Menu Bar and select "Open in Camera Raw". Both options will open the Camera Raw dialog box, allowing you to begin processing your image.
Step 2: Processing Your Image
Once you have the Camera Raw dialog box open, you can start editing your image. You can make various adjustments, such as changing the crop, rotation, and canvas size, or even replacing the sky in your image. Adobe Camera Raw provides a complete image editing environment, so you can fine-tune your photo to your liking.
Step 3: Saving Your Image
After you have finished processing your image, it's time to save your work. In the Camera Raw dialog box, look for the "Save Image" button in the bottom-left corner. Clicking this button will open the "Save Options" dialog box, where you can specify the following:
- The location where you want to save the file.
- The filename, which can include elements such as the date and camera serial number.
- The file format, such as PSD, TIFF, JPEG, or DNG.
Step 4: Processing Multiple Images
If you are working with multiple images, you can save time by processing them together. The Filmstrip view in Camera Raw is ideal for this. When you open multiple images in Camera Raw from Adobe Bridge, the Filmstrip view will appear by default. This view allows you to select a range of images and apply adjustments to all of them simultaneously. You can then fine-tune individual shots later.
Step 5: Automating the Process
For a more streamlined workflow, you can create an action to automate the processing of your camera raw image files. This includes automating the editing process and saving the files in formats like PSD, DNG, JPEG, TIFF, or PDF. In Photoshop, you can use features like the Batch command, the Image Processor, or the Create Droplet command to process multiple image files at once.
By following these steps, you can efficiently save your images in Camera Raw, taking advantage of the editing capabilities of Adobe Camera Raw and Adobe Bridge.
Reviving Camera Batteries: Simple Tricks to Try
You may want to see also
![]()
How to enable Camera Raw editing in Bridge
Adobe Bridge CC is a free-to-download image browser that can be used to view and edit images in their raw file format. To enable Camera Raw editing in Bridge, you need an active subscription to Adobe Photoshop or Photoshop Lightroom Classic.
If you have an active subscription to either of these applications, follow these steps to enable Camera Raw editing in Bridge:
- Launch Adobe Photoshop or Photoshop Lightroom Classic.
- Relaunch Adobe Bridge.
- Camera Raw editing should now be enabled in Adobe Bridge.
Alternatively, if you are using CS6, follow these steps:
- Open Photoshop (with no image open).
- Choose "Open" from the menu.
- Select your JPG file, but don't open it.
- In the bottom left corner of the open dialog window, choose "format"/"camera raw".
- Click on "Open".
If you are using Bridge CC, you can also adjust the settings in the Bridge Preferences so that you can open images in Camera Raw by double-clicking on them. To do this, follow these steps:
- Go to Edit > Preferences (on a Windows PC) or Adobe Bridge > Preferences (on a Mac).
- This will open the Preferences dialog box.
- In the middle of the dialog box, in the Behaviour section, there is an option called "Double-Click Edits Camera Raw Settings in Bridge".
- Click inside the checkbox to enable this option.
- Click "OK" to close the Preferences dialog box.
- Now, every time you double-click on an image in Bridge, it will open in Camera Raw hosted by Bridge.
Converting to Black and White: Camera Raw Techniques
You may want to see also
Frequently asked questions
To enable Camera Raw editing in Bridge, you need an active subscription to Adobe Photoshop or Photoshop Lightroom Classic. Launch either of these apps and then relaunch Adobe Bridge.
Open Bridge and navigate to the location of your image. Right-click on the image and select "Open in Camera Raw". Alternatively, you can select the image by single-clicking on its thumbnail and then clicking on the "Open in Camera Raw" icon at the top of the Bridge interface, or by going to "File" > "Open in Camera Raw" in the Menu Bar.
After you have made your adjustments in Camera Raw, click "Done" to accept your changes and close the dialog box. You will be returned to Bridge, where you can select your next image. To save your changes, double-click on your image to open it in Photoshop. Then, press Ctrl+Shift+S on your keyboard to save a copy of your image.