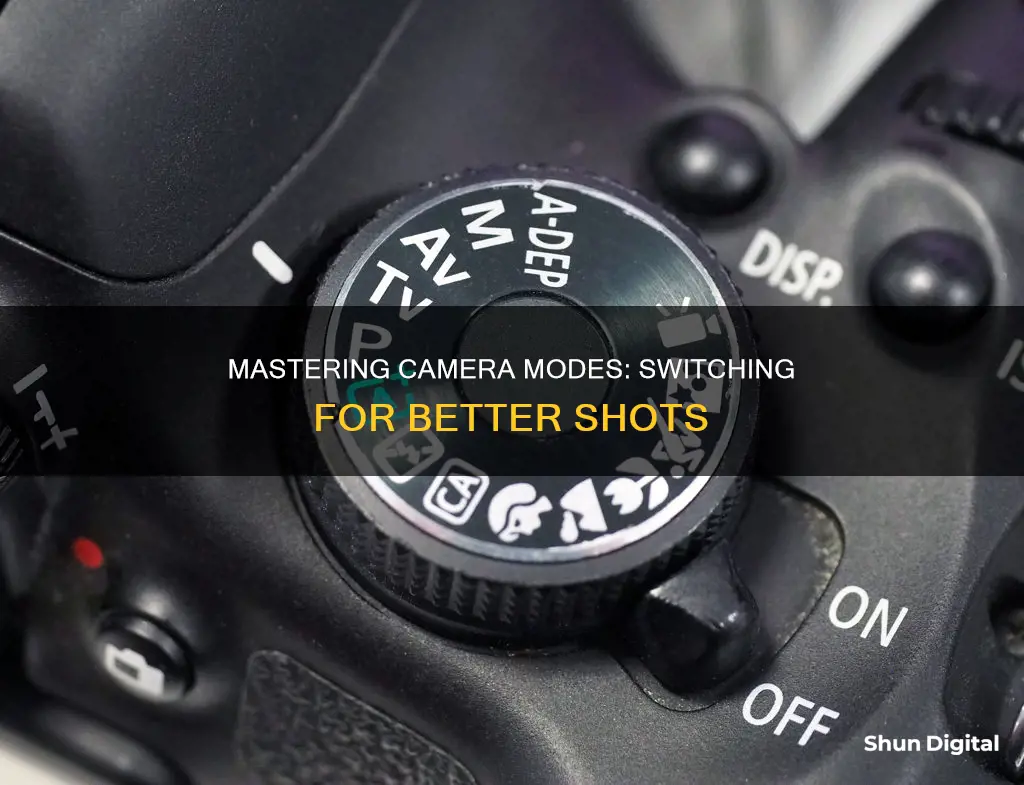
Switching camera modes can help you capture the perfect shot, and most modern cameras offer a range of options. The mode dial is usually the first dial on your camera, and it determines how the camera will behave when you point it at a scene. The best mode to use depends on the type of photograph you want to take. For example, if you're taking a portrait, you might want to use portrait mode, which keeps the subject sharply in focus while blurring the background. If you're taking a landscape photo, you might want to use panorama mode, which allows you to capture a wide-angle view. If you're shooting sports or wildlife, you might want to use shutter priority mode, which lets you control the shutter speed while the camera chooses the appropriate aperture.
| Characteristics | Values |
|---|---|
| Camera modes | Auto, Program, Shutter Priority, Aperture Priority, Manual, AR Emoji, Fast Motion, Hyperlapse, Live Focus, Night Mode, Panorama, Pro, Food, Slow Motion, Super Slow-Mo, Cinematic, Slo-Mo, Time-Lapse, Portrait, Pano |
| How to switch modes | Swipe left or right on the camera screen, or use the mode menu |
| Camera mode functions | Control aperture, shutter speed, exposure, filters, focus, white balance, brightness, sharpness, contrast, etc. |
What You'll Learn
![]()
Switching camera modes on iPhone
Switching camera modes on your iPhone is a simple process that can help you take your photography to the next level. Here's a detailed guide on how to do it:
Step 1: Open the Camera App
Start by opening the Camera app on your iPhone. You can do this by tapping the Camera app icon on your Home screen or swiping left on your locked screen. Alternatively, if you're already using your iPhone, you can swipe down from the top right of the screen (or up from the bottom edge on older models) to access the Control Center and tap the Camera icon.
Step 2: Choose a Camera Mode
Once the Camera app is open, you can select your desired camera mode. The default mode is usually Photo mode, which is suitable for most still-image needs. However, you can easily switch to other modes by swiping left or right on the screen. The available modes may vary depending on your iPhone model, but here are some common options:
- Portrait Mode: Blurs the background while keeping the subject in focus, creating a depth-of-field effect.
- Pano Mode: Allows you to capture panoramic photos by slowly turning your iPhone to the side, resulting in an ultra-wide image.
- Video Mode: Enables you to capture video recordings.
- Cinematic Mode: Available on iPhone 13 and later, this mode automatically adds depth-of-field effects and transitions to your videos.
- Slo-Mo Mode: Allows you to record videos in slow motion.
- Time-Lapse Mode: Captures time-lapse recordings by taking images at selected intervals and stitching them together.
Step 3: Adjust Settings
Each camera mode offers various settings and controls that you can fine-tune to your liking. For example, in Photo mode, you can enable Night Mode for better low-light images, use Burst Mode for action shots, or try Live Photos to capture moments before and after you tap the shutter. In Video mode, you can adjust the video quality, frame rate, and resolution. Play around with the settings to find what works best for your needs.
Step 4: Experiment and Explore
Don't be afraid to experiment with the different camera modes and settings. Try out Portrait mode for stunning portraits or Pano mode for breathtaking landscapes. You can also adjust the exposure, use HDR for high-contrast scenes, or play with filters to add a vintage look to your images. The key is to explore the various options and find what works best for the scene you're capturing.
Step 5: Advanced Settings
If you're looking for more advanced settings, you can tweak your camera's output through the Settings app. Go to "Settings," scroll down, and tap "Camera." Here, you can adjust formats, enable higher-quality photo and video options like Apple ProRaw and Apple ProRes, and control the video resolution for different modes. Keep in mind that some of these advanced settings may only be available on newer iPhone models.
Finding Night Mode: Camera Settings Explored
You may want to see also
![]()
How to change camera modes on Samsung
Changing camera modes on a Samsung device is a straightforward process that gives you access to a variety of shooting modes and settings, allowing you to capture dynamic photos and videos with ease. Here's a step-by-step guide on how to change camera modes on your Samsung device:
Step 1: Access the Camera App
Start by opening the default camera app on your Samsung Galaxy device. You can do this by swiping up from the bottom of your screen to access the Apps menu, and then launching the Camera app.
Step 2: Navigate to Available Modes
Once the Camera app is open, you can navigate through the different modes available. On some Samsung devices, you can swipe right or left to switch between modes. The available options may include "Portrait," "Photo," "Video," "More," "Expert Raw," and "Pro," among others. The specific modes available will depend on your device model and operating system.
Step 3: Select Your Desired Mode
After choosing the mode that suits your needs, you can further customise your settings. For example, in "Photo Mode," you can adjust the flash, timer, aspect ratio, motion photo, and filters. Each mode will offer different customisation options, so feel free to explore and adjust the settings according to your preferences.
Step 4: Add or Rearrange Modes (Optional)
If you wish to add more modes to your quick settings or rearrange their order, you can do so easily. Open the camera app, and below the image finder, you'll see several modes. Simply drag the mode you want to add to the row below the viewfinder. For instance, you can drag "Pro mode" down to create a quick shortcut. To rearrange the order, go back to the mode screen and tap the pencil icon to edit their sequence.
Step 5: Capture Your Shot
Once you've selected your desired mode and customised the settings, it's time to frame your subject and capture your shot. Remember to utilise features like Space Zoom for distant subjects. After taking your photo or video, you can also make use of Samsung's editing features, such as adjusting the background blur or changing the background effect.
Additional Tips:
It's recommended to keep your software up to date to ensure you have access to the latest camera modes and features. Additionally, you can further enhance your photography experience by tweaking settings like video size, grid lines, and intelligent features such as auto-scan documents and QR code detection.
Polaroid 600 Camera: How Long Do Batteries Last?
You may want to see also
![]()
Using manual controls to change camera modes on Nintendo
To change your camera modes using manual controls on the Nintendo 3DS, follow these steps:
- From the HOME Menu, select the Nintendo 3DS Camera icon and tap Open. If you have launched the camera using the L or R button, tap Nintendo 3DS Camera at the bottom of the screen to launch the software.
- From the Nintendo 3DS Camera main menu, flip the lever on the bottom right of the touch screen to the up position.
- Tap the Camera Mode button on the far left of the menu bar. This icon will vary based on the last camera mode used, with a camera as the default.
- Select the camera mode you would like to edit, and then tap Manual Controls. Mystery camera mode cannot be edited.
- From this menu, you can change the film, sharpness, contrast, and brightness of the corresponding mode.
If you would like to revert to the default settings, tap Reset.
Toucan Camera Battery Life: How Long Does It Last?
You may want to see also
![]()
Aperture Priority mode
To enter Aperture Priority mode, turn the PASM dial on your camera to "A" or "Av" (for aperture value). On some cameras, like the Canon, you will need to turn the dial to "Av", while on Fuji and Leica cameras without a PASM dial, you can turn the shutter speed dial to Auto.
Once in Aperture Priority mode, you must select your desired aperture value manually. The camera will never change the aperture once it is set, so it is important to pick the right value for your desired depth of field and other factors. You can then select the proper exposure compensation and ISO value. If your subject isn't moving and you are using a tripod, it is recommended to stick to the base ISO of 100 on most cameras.
Understanding Camera Raw and Lightroom: Are They Similar?
You may want to see also
![]()
Manual Mode
To enter Manual Mode, turn the mode dial to the big "M". Most cameras have at least two dials, and in manual mode, one dial will be for aperture and the other will be for shutter speed.
Shutter speed indicates the amount of time the camera exposes the sensor to light from the scene. Aperture, on the other hand, is the opening in the lens that lets in the light. A wider aperture will let in more light, while a narrower aperture will let in less.
Another benefit of Manual Mode is that it allows you to get consistent exposures. In Auto mode, the camera decides how bright or dark each photo should be, and the exposure may change from shot to shot. In Manual Mode, your settings won't change unless you change them, so you can be certain that you'll get consistent exposures.
Alternative Ways to Charge Your GH2 Camera
You may want to see also
Frequently asked questions
The process of switching camera modes depends on the device being used. On some devices, such as iPhones, you can swipe left or right on the camera screen to switch between photo and video modes. On other devices, like Samsung Galaxy smartphones, you can drag or swipe left or right on the camera screen to access different modes. For the Nintendo 3DS, you can tap the Camera Mode button on the menu bar to switch between modes.
Many smartphones offer a range of camera modes, such as Photo, Portrait, Panorama (Pano), Video, Slow-Motion (Slow-Mo), Time-Lapse, Night Mode, Hyperlapse, Live Focus, and Pro Mode. The availability of specific modes varies across different devices and operating systems.
Photo mode is typically used for capturing still images, while Video mode is used for recording videos. Photo mode is usually the default setting when opening the camera app and will suffice for most general photography needs.
Slow-motion mode allows you to record videos that can be played back at a slower speed, capturing fine details in fast-moving actions. Time-lapse mode, on the other hand, creates videos by combining images taken at selected intervals, resulting in an accelerated view of slow-moving subjects or processes.
The choice of camera mode depends on the desired effect and the subject being photographed. For instance, Portrait mode is ideal for keeping the subject in sharp focus while blurring the background. Night mode enhances low-light photography by adjusting exposure and white balance. For capturing wide-angle landscapes, Pano or Panorama mode is suitable. Experimenting with different modes and understanding their unique characteristics will help you make informed decisions.