Adobe Camera Raw is a free plug-in for Photoshop that can also be run in Adobe Bridge. To enable Camera Raw editing in Bridge, you need an active subscription to Adobe Photoshop or Photoshop Lightroom Classic. Launching either of these apps will resolve the issue of Bridge displaying the message Camera Raw editing is not enabled.
Adobe Bridge's default setting automatically opens Raw files in Photoshop, but this can be changed to allow direct editing of Camera Raw settings in Bridge. To do this, go to the Adobe Bridge CC menu (Mac) or Edit menu (Windows) and choose Preferences. Then, click on General and check Double-Click Edits Camera Raw Settings in Bridge.
Running Camera Raw in Bridge has several advantages. It improves the speed of your computer by reducing the number of programs using up your computer's resources. It also speeds up your workflow as you can instantly return to Bridge after processing an image in Camera Raw, rather than having to manually switch back from Photoshop.
| Characteristics | Values |
|---|---|
| Default setting for opening raw files | Photoshop |
| How to change default setting | Go to Preferences and check "Double-Click Edits Camera Raw Settings in Bridge" |
| How to open Camera Raw in Bridge | Click on "Open in Camera Raw" icon, or go to File menu and choose "Open in Camera Raw" |
| How to enable Camera Raw editing | Launch Photoshop or Photoshop Lightroom Classic, then relaunch Adobe Bridge |
What You'll Learn
![]()
How to enable Camera Raw editing in Bridge
To enable Camera Raw editing in Adobe Bridge, you need an active subscription to Adobe Photoshop or Photoshop Lightroom Classic. Launching either of these apps at least once will allow you to edit Camera Raw files in Bridge.
- Launch Adobe Photoshop or Photoshop Lightroom Classic.
- Relaunch Adobe Bridge.
- Camera Raw editing should now be enabled in Adobe Bridge.
Alternatively, you can change the default setting in Bridge to allow direct editing of Camera Raw settings without opening the file in Photoshop. Here's how:
- In Bridge, go to the Adobe Bridge CC menu (on Mac) or the Edit menu (on Windows) and select "Preferences."
- Click on "General" in the left sidebar.
- On the right, check the box for "Double-Click Edits Camera Raw Settings in Bridge."
- Navigate to your desired folder by going to Window > Workspace > Essentials, then Window > Workspace > Reset Workspace.
- Double-click on the desired folder in the main section of the window to open it.
- Now, when you double-click on a Raw file, you can edit it directly in Bridge without opening Photoshop.
Charging Cove Outdoor Camera: A Step-by-Step Guide
You may want to see also
![]()
How to open Camera Raw in Bridge
Opening Camera Raw in Bridge is a simple process, but there are a few things to keep in mind. Firstly, make sure you have an active subscription to Adobe Photoshop or Photoshop Lightroom Classic. This is necessary to enable Camera Raw editing in Bridge.
Now, follow these steps:
- Launch either Adobe Photoshop or Photoshop Lightroom Classic.
- Relaunch Adobe Bridge.
- In Bridge, go to the Adobe Bridge CC menu (if you're on a Mac) or the Edit menu (if you're on Windows).
- Choose 'Preferences' from the menu. Do not select Camera Raw Preferences as this will not work.
- On the left side of the Preferences dialog box, click on 'General'.
- On the right side, check the box for 'Double-Click Edits Camera Raw Settings in Bridge'.
- Navigate to your desired folder by going to Window > Workspace > Essentials, then Window > Workspace > Reset Workspace.
- Double-click on the desired image file in the folder to open it in Camera Raw.
By following these steps, you will be able to open and edit Camera Raw files directly in Adobe Bridge without having to switch between applications.
Air Travel Camera Battery Rules Explained
You may want to see also
![]()
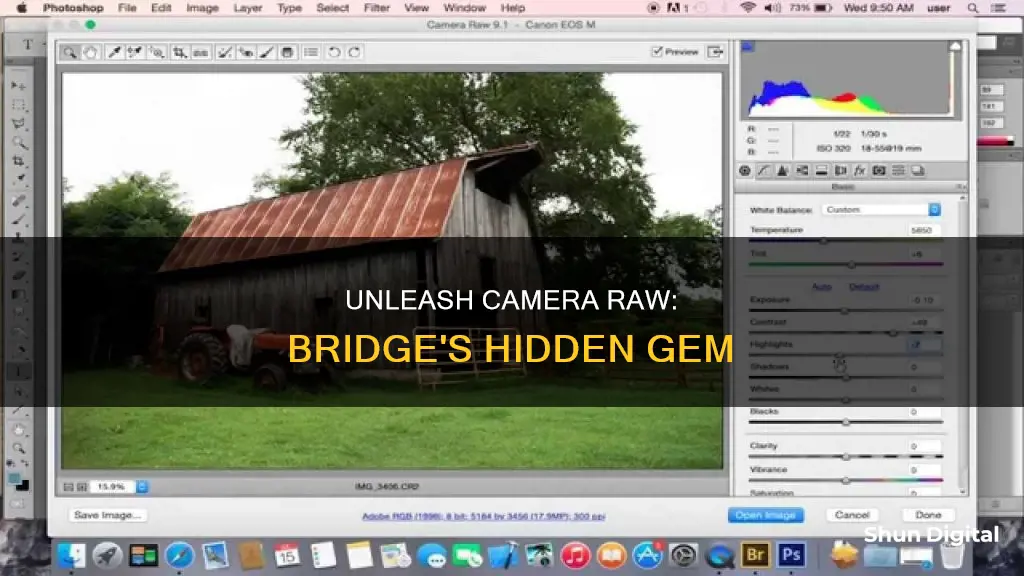
How to adjust image white balance
White balance is the process of removing unrealistic colour casts so that objects that appear white in person are rendered white in your photo. It is one of the most basic yet trickiest aspects of photography.
There are three different ways to set your white balance in Adobe Camera Raw (ACR): the Temperature and Tint sliders, the White Balance presets drop-down menu, and the White Balance tool.
Using the Temperature and Tint Sliders
The Temperature slider is displayed in Kelvin degrees, which is the standard system used to measure the colour temperature of light. Drag the slider towards the colour you want. For example, if your image looks too blue, drag the slider to the right to make the image warmer.
Using the White Balance Presets
Click on the drop-down menu and select 'Auto' to see how your image looks. If it looks right, you're done. If not, try each preset until you find the one that looks best.
Using the White Balance Tool
Choose the White Balance tool from the toolbar and click on something in your image that is supposed to be grey. This will remove any yellow, blue, or other tints so that the area becomes grey, and all the colours in your image will be corrected.
Other Ways to Adjust White Balance
You can also adjust the white balance in Photoshop or Lightroom. In Photoshop, you can use the Curves tool to make a manual or automatic white balance adjustment. In Lightroom, the process is similar to using the Temperature and Tint sliders in ACR.
Mastering Edits: Clear Adjustments in Adobe Bridge and Camera Raw
You may want to see also
![]()
How to copy Raw settings from one file to another
Adobe Bridge allows you to copy and paste Raw settings from one file to another. This is useful when a series of images require the same adjustment.
- Open the Raw images you want to edit in Photoshop. When you click Open in your file window, the Camera Raw window will open automatically.
- Edit one image and select it – the thumbnail of the selected photo will have a white border around it.
- Right-click or Command + click on the selected image thumbnail and select "Copy Settings" or "Copy Edit Settings". You can also use the keyboard shortcut Control + C (Win) or Command + C (Mac).
- Right-click or Command + click on another image thumbnail and select "Paste Settings" or "Paste Edit Settings". You can also use the keyboard shortcut Control + V (Win) or Command + V (Mac). The image and its thumbnail will change to match the settings of the first image.
- To select and paste the settings to multiple images at once, hold Control (Win) or Command (Mac) and click the images you want to edit, then use the keyboard shortcut Control + V (Win) or Command + V (Mac).
You can also copy and paste Camera Raw settings from one image or layer to another in Photoshop without using the filmstrip in Camera Raw. To do this:
- Convert the image layer to a Smart Object by going to Layer > Smart Objects > Convert to Smart Object. Repeat this for each layer or separate image.
- Go to Filter > Camera Raw Filter.
- Make any edits to the layer in the Camera Raw window, then click OK.
- Hold Alt/Option and drag the Smart Filter to the new layer.
Cleaning Camera Battery Contacts: A Step-by-Step Guide
You may want to see also
![]()
How to batch process multiple Raw images
Adobe Bridge is a media browsing application that enables you to view, manage, and organise your digital files, as well as edit your photos without the need to import and file them in various catalogs. It is a great tool for photographers to simplify the first step in the editing process.
Step 1: Load Your Images
Firstly, you need to load your images into a new folder on your computer. It is recommended to download your images directly from your memory card to your computer, using an external USB card reader if your computer does not have a built-in one. Ensure that you put your images in a clearly labelled folder so that you know exactly where to find them.
Step 2: Open Adobe Bridge
Open the Adobe Bridge application. You will need to be subscribed to Adobe CC to access this software. Once opened, you will see the contents of your computer on the left-side navigation menu. Find and click on the folder containing your images, and they will be displayed on the main window.
Step 3: Select Your Raw Files
Select the Raw files that you wish to edit by clicking on them. Raw files will be displayed as CR2 or CRW files for Canon cameras, NEF files for Nikon cameras, and DNG for some other camera models.
Step 4: Open Adobe Camera Raw
With the images selected, open them by clicking on the Camera Raw plug-in icon. Raw files can only be opened and read in Adobe Camera Raw. This is a powerful plug-in that allows you to edit and enhance any photo, including Raw files.
Step 5: Edit Your Images in Camera Raw
Make the desired changes to your images in Camera Raw. You can adjust various settings such as exposure, white balance, contrast, lens correction, and chromatic aberration. Once you are satisfied with your edits, click "Done" to save your changes.
Step 6: Copy and Paste Camera Raw Settings (Optional)
If you have multiple Raw images that require similar Camera Raw processing, you can copy and paste the develop settings from one image to the rest of the selected images. To do this, right-click on the edited Raw photo in Adobe Bridge and navigate to "Develop Settings > Copy Settings". Then, select all the other Raw images you want to apply the same settings to. Right-click and navigate to "Develop Settings > Paste Settings".
Step 7: Batch Rename Your Files (Optional)
If you wish to rename your files, you can do so by selecting the files you want to rename and navigating to "Tools > Batch Rename". This will open the Batch Rename settings, where you can set your filename parameters such as text, sequence numbers, calendar dates, etc.
Step 8: Export Your Images
Finally, you can export your edited Raw images by selecting them all in Adobe Bridge and navigating to "Tools > Photoshop > Image Processor". This will launch Photoshop and open the Image Processor settings. Here, you can input the location where you want to save your images, as well as the file type (JPEG, PSD, or TIFF). You can also choose to resize the images and apply Photoshop actions if needed. Once you have selected your export settings, click "Run" to start the image processing.
Your edited images will now be saved in your chosen destination folder, and you have successfully batch processed multiple Raw images using Adobe Bridge!
Understanding Camera Polarity: Ground vs. Battery Power
You may want to see also
Frequently asked questions
To enable Camera Raw editing in Bridge, you need an active subscription to either Adobe Photoshop or Photoshop Lightroom Classic. Launch one of these apps and then relaunch Adobe Bridge.
Select the file in Bridge and then click on the "Open in Camera Raw" icon at the top of the interface, or go to "File" > "Open in Camera Raw".
When Camera Raw is hosted by Bridge, the "Done" button is active, and pressing "Enter" or "Return" will apply your changes and take you back to Bridge. When Camera Raw is hosted by Photoshop, the "Open Image" button is active, and pressing "Enter" or "Return" will bring the file into Photoshop.
Yes, you can use Camera Raw with JPEG, TIFF, and PSD file formats. However, if you want to open a non-Raw file in Photoshop, you will need to use the "File" > "Open in Camera Raw" command.
Yes, you can use the Adobe Camera Raw(ACR) bundled with Photoshop Elements(PSE) with Bridge Creative Cloud. However, there are some limitations, such as the lack of advanced tools and the need to keep PSE open at all times.