Adobe Bridge and Camera Raw are two powerful tools for managing and editing images. While both applications offer robust features for enhancing your photos, you may sometimes want to revert your changes and clear your edits. Here's a quick guide on how to do that:
In Adobe Bridge, if you've edited a RAW photo in Camera Raw, you'll notice a small, round, two-slider icon below the thumbnail of your RAW image. To remove those edits and restore the original version, simply Control-click (or right-click) on the thumbnail and choose Clear Camera Raw Settings. Alternatively, you can go to Develop Settings and select Clear Settings.
In Camera Raw, any adjustments you make are typically saved within an XMP file associated with the image. To undo your edits, you can simply delete this XMP file. Another option is to reopen the raw file in Camera Raw and manually undo the changes using the various tools available. Additionally, you can use the Camera Raw Defaults option to reset the image to its original state.
| Characteristics | Values |
|---|---|
| How to clear edits in Adobe Bridge | Right-click on the photo's thumbnail and choose "Clear Settings" under "Develop Settings" |
| How to clear edits in Camera Raw | Control-click (PC: Right-click) on the thumbnail and choose "Clear Camera Raw Settings" |
| Adobe Bridge's default setting | Automatically opens Raw files in Photoshop |
| Adobe Bridge's alternative setting | Direct editing of Camera Raw settings in Bridge |
| How to adjust image white balance | Click on the White Balance tool and click on different places on the image to see how the color balance changes |
| How to manually adjust the white balance | Use the Temperature and Tint sliders on the right |
| How to straighten an image | Use the Straighten tool at the top of the window |
| How to remove a crop | Click and hold the Crop tool and choose "Clear Crop" |
What You'll Learn
- Clearing edits in Adobe Bridge: Right-click on the thumbnail and choose 'Clear Camera Raw Settings'
- Clearing edits in Camera Raw: Use the 'Clear Settings' option in the 'Develop Settings' menu
- Camera Raw files: These contain unprocessed picture data from a camera's image sensor
- Adobe Bridge keyboard shortcuts: Use Ctrl + Alt + Shift (Windows) or Command + Option + Shift (Mac OS) to reset settings
- Adobe Bridge troubleshooting: Try updating to the latest version, resetting preferences and purging the cache
![]()
Clearing edits in Adobe Bridge: Right-click on the thumbnail and choose 'Clear Camera Raw Settings'
If you've edited a RAW photo in Camera Raw, you will see a little round two-slider icon below the RAW photo's thumbnail in Bridge. If you want to remove those edits and revert the image to its original, unedited version, you can do so by right-clicking on the thumbnail and choosing "Clear Camera Raw Settings". This will remove all changes made to the image and restore it to its original state.
To clear edits in Adobe Bridge, follow these steps:
- Locate the RAW photo in Adobe Bridge and look for the little round two-slider icon below the thumbnail.
- Right-click on the thumbnail.
- From the menu that appears, select "Clear Camera Raw Settings".
- Your edits will be removed, and the image will revert to its original state.
It is important to note that you should always work on copies of your images and avoid editing files directly on your memory card. Always transfer your images to a folder on your computer before making any changes. This way, you can easily revert to the original version if needed.
Additionally, when you edit a RAW image in Camera Raw, the changes are typically saved in an XMP file associated with the image. If you delete this XMP file, your adjustments will be lost, and the image will revert to its original state. So, if you want to remove your edits, you can simply delete the XMP file associated with the RAW image.
By following these steps, you can easily clear edits in Adobe Bridge and restore your images to their original state.
Charging GoPro Hero 4: In-Camera Battery Charging Guide
You may want to see also
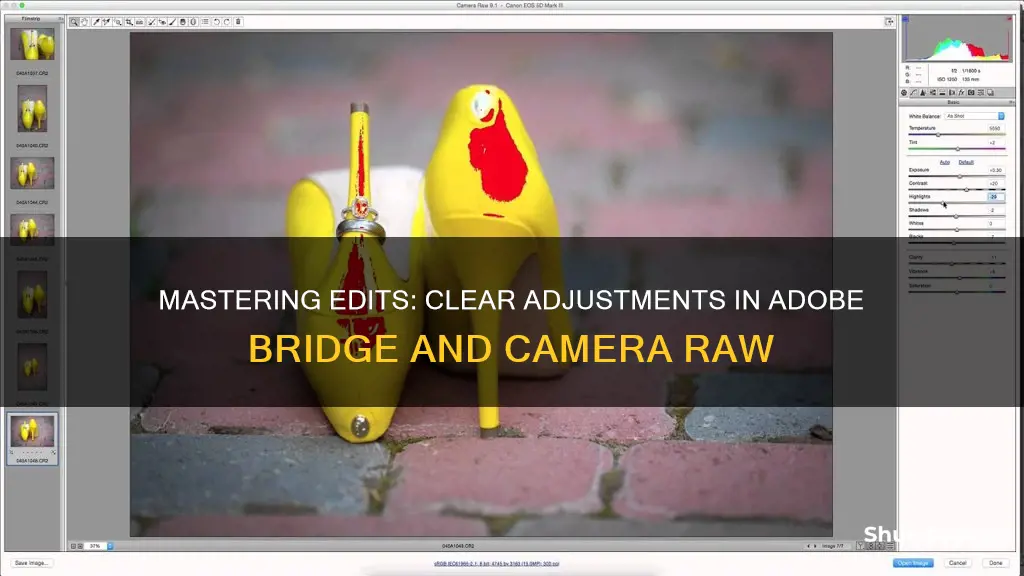
![]()
Clearing edits in Camera Raw: Use the 'Clear Settings' option in the 'Develop Settings' menu
Clearing edits in Camera Raw is a straightforward process that can be done in a few simple steps. Here's a detailed guide on how to do it:
Clearing Edits in Camera Raw:
When working with Camera Raw, it's essential to understand that any changes made are typically saved within an XMP file associated with the image. This XMP file acts as a footprint of the adjustments, and deleting it will remove the edits. While this is the case for most users, it's worth noting that you can choose to save your changes in a central database instead.
Now, if you want to remove your edits and revert to the original image, follow these steps:
Use the Clear Settings Option in the Develop Settings Menu:
This method is applicable when you want to clear edits from multiple images simultaneously. First, ensure that all the images you want to revert are selected. Then, follow these steps:
- Right-click on any of the selected images.
- Navigate to "Develop Settings" in the context menu.
- Choose "Clear Settings" from the options.
By selecting "Clear Settings," you will effectively remove all the changes made to the selected images. This action ensures that your raw images are restored to their original state, free from any edits or adjustments.
Additionally, if you want to clear edits from a single image, you can follow a similar process:
- Right-click on the thumbnail of the image with the edits you want to clear.
- Choose "Clear Camera Raw Settings" from the menu.
This action will remove the edits specifically from that image, allowing you to start fresh with your adjustments.
It's important to remember that while clearing edits is helpful, you can also use the "Copy Settings" and "Paste Settings" options to apply the same adjustments to multiple images. This feature showcases the versatility of working with raw images, as you can always revert changes or experiment with different settings.
So, the next time you need to clear edits in Camera Raw, simply follow the steps outlined above, and you'll be able to efficiently manage your image edits.
Charging the Canon Powershot A620: A Quick Guide
You may want to see also
![]()
Camera Raw files: These contain unprocessed picture data from a camera's image sensor
Camera Raw files contain unprocessed picture data from a camera's image sensor. They are named 'raw' because they are not yet processed and contain large amounts of data that may be redundant. Raw files are often converted into a viewable file format such as JPEG or PNG for storage, printing, or further manipulation.
Raw image files are sometimes incorrectly referred to as "digital negatives". A more accurate description would be exposed but undeveloped film, which can be converted (electronically developed) multiple times to reach a desired image. Like undeveloped film, a raw digital image may have a wider dynamic range or colour gamut than the developed image.
The purpose of raw image formats is to save data obtained from the sensor with minimal loss of information. They capture the radiometric characteristics of a scene, including physical information about the light intensity and colour, at the best of the camera sensor's performance. Most raw image file formats store information according to the geometry of the sensor's individual photo-receptive elements, rather than points in the expected final image.
Raw files contain the information required to produce a viewable image from the camera's sensor data. They often follow a common structure, including a short file header, camera sensor metadata, and image metadata. The sensor metadata includes information such as the size of the sensor and its attributes, while the image metadata can include exposure settings, camera model, date and place of the shoot, and authoring information.
To clear Camera Raw adjustments from your photo in Adobe Bridge, right-click on the photo's thumbnail and choose "Clear Settings" under "Develop Settings". This will remove any edits and return the image to its original, unedited version.
Belkin Camera Battery Charging: A Step-by-Step Guide
You may want to see also
![]()
Adobe Bridge keyboard shortcuts: Use Ctrl + Alt + Shift (Windows) or Command + Option + Shift (Mac OS) to reset settings
To reset settings in Adobe Bridge, you can use the keyboard shortcut Ctrl + Alt + Shift (Windows) or Command + Option + Shift (Mac OS). This shortcut is particularly useful for resetting your workspace to its original layout and settings.
Here's a step-by-step guide on how to use this keyboard shortcut effectively:
- Launch Adobe Bridge: Open Adobe Bridge on your computer. You can do this by double-clicking on the Adobe Bridge application icon or selecting it from your list of programs.
- Navigate to the workspace you want to reset: Before using the reset shortcut, ensure you have selected the specific workspace you want to reset. You can use the keyboard shortcut Ctrl + Tab (Windows) or Cmd + Tab (Mac) to cycle through open workspaces if you have multiple projects.
- Press and hold the shortcut keys: Once you have the desired workspace selected, press and hold the Ctrl, Alt, and Shift keys together (for Windows) or Command, Option, and Shift keys together (for Mac) to initiate the reset function.
- Release the keys: After a brief moment, release the keys. You should see your workspace reset to its original layout and settings. Any changes you made to the workspace, such as moving or resizing panels, will be undone.
In addition to resetting your workspace, Adobe Bridge offers a variety of other keyboard shortcuts to streamline your workflow. For example, you can use Ctrl + O (Windows) or Cmd + O (Mac) to open files, Ctrl + S (Windows) or Cmd + S (Mac) to save your work, and Ctrl + Z (Windows) or Cmd + Z (Mac) to undo any changes.
You can also customize your keyboard shortcuts in Adobe Bridge to suit your specific needs. To do this, go to the Edit menu and select Keyboard Shortcuts. Here, you can easily assign new shortcuts to various functions or reset them to their default settings.
By utilizing the Ctrl + Alt + Shift (Windows) or Command + Option + Shift (Mac OS) keyboard shortcut and exploring other available shortcuts, you can work more efficiently in Adobe Bridge and enhance your overall editing experience.
Troubleshooting Lytro Camera Charging Issues
You may want to see also
![]()
Adobe Bridge troubleshooting: Try updating to the latest version, resetting preferences and purging the cache
If you're experiencing issues with Adobe Bridge, there are several troubleshooting steps you can take to try and resolve the problem. Here are some detailed instructions focused on updating to the latest version, resetting preferences, and purging the cache:
Update to the Latest Version:
Go to Help > Updates in Adobe Bridge to download and install the latest version.
Reset Preferences and Default Workspace:
- Start by opening Adobe Bridge.
- Immediately press Ctrl+Alt+Shift (Windows) or Command+Option+Shift (Mac OS) until the Reset Settings dialog box appears.
- Select the "Reset Preferences" and "Reset Standard Workspaces" options, then click OK.
Purge the Cache:
- Go to Edit > Preferences (Windows) or Bridge > Preferences (Mac OS).
- Select the Cache panel.
- Click "Purge All Cache Now" to remove all cache files.
- Alternatively, you can manually purge the cache by navigating to the Cache folder and deleting it. The path to the Cache folder can be found in the Cache panel settings.
- Note: Purging the cache may result in the loss of some labels and ratings.
By following these steps, you can effectively troubleshoot common issues with Adobe Bridge, including freezes and performance problems.
Fixing the Camera Raw Filter Glitch: A Step-by-Step Guide
You may want to see also
Frequently asked questions
To clear edits in Adobe Bridge, select the image thumbnail and Control-click (PC: Right-click) on it. Then, choose "Clear Camera Raw Settings".
To clear edits in Camera Raw, open the raw file and undo the changes. For example, if you want to undo cropping, select the crop tool, right-click, and clear the crop. You can also find the little pop-up menu on any of the right-hand panes and click on it to select "Camera Raw Defaults", which will restore the image to its original state.
To prevent edits from being saved to the original image, do not click "Done" after making changes. Instead, hit "Cancel" or the "ESC" button on your keyboard.