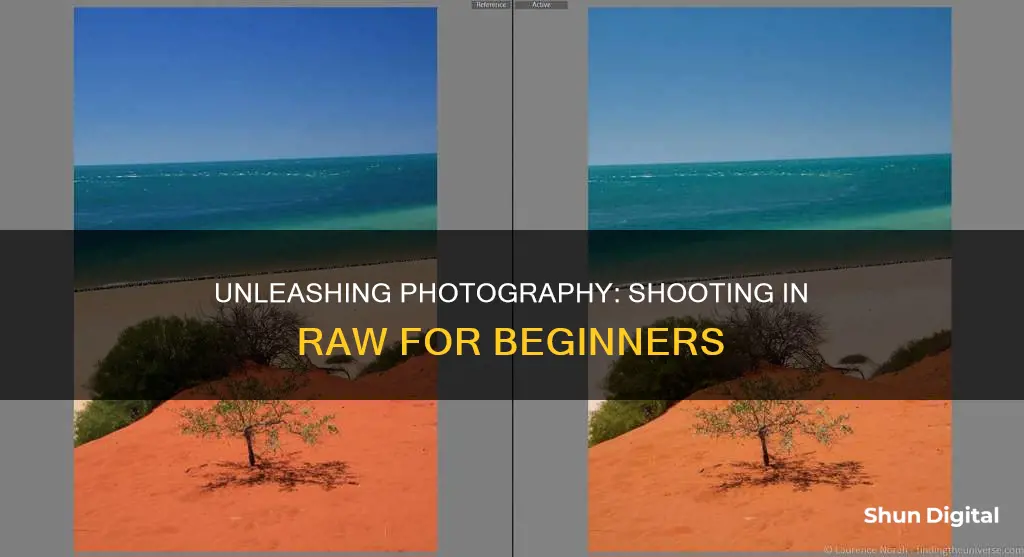
Shooting in RAW gives you more control over your images and allows for greater flexibility when it comes to post-processing. RAW files are uncompressed, which means they capture a lot more image data than JPEGs or other compressed file formats. This gives you more information to work with in the post-processing phase and allows you to make adjustments to the white balance, shadows, sharpness, and noise.
However, there are some downsides to shooting in RAW. RAW files are much larger than JPEGs, so you'll need to have enough storage space on your memory card and computer. Additionally, shooting in RAW can add time to your workflow as you'll need to edit the files before sharing them.
| Characteristics | Values |
|---|---|
| File format | Lossless, uncompressed data from camera sensor |
| File size | Larger than JPEG |
| Image quality | Higher than JPEG |
| Image editing | More flexibility than JPEG |
| Image sharing | Require editing before sharing |
| Image control | Greater control over final image than JPEG |
| Image printing | Not suitable for direct printing |
| File type | Unique to each camera |
| File storage | Require more storage space |
What You'll Learn

RAW files are uncompressed, giving you more data to work with
Shooting in RAW gives photographers more flexibility with their post-processing. This is because RAW files are uncompressed, capturing all the data from your camera sensor without any reduction in size or quality.
An uncompressed RAW file is like a digital negative, containing all the "raw ingredients" of a photo that will need to be processed to bring out the picture's full potential. With no compression algorithm applied, an uncompressed RAW file contains all the data from your camera sensor. This gives you more information to work with when editing, allowing you to tweak settings like white balance and exposure to a larger degree than with a compressed file.
The trade-off for these detailed files is that they are much larger than compressed files, such as JPEGs. This means they take up more space on your memory card and computer. However, this extra space is worth it for many photographers, as it gives them more data to work with when editing.
With an uncompressed RAW file, you have the freedom to manipulate aspects of the photo like brightness, colour, sharpness, and noise reduction with minimal quality loss. This is because all the image data is stored with no impact on quality. This is in contrast to compressed files, where data is lost in the compression process, reducing the amount of information available for editing.
Shooting in uncompressed RAW is recommended when both high image quality and developing speed are required. While the file sizes are larger, the benefit of having more data to work with can result in higher-quality images after post-processing.
Battery Pack Cameras: Powering Remote Photography
You may want to see also

You can edit RAW files without damaging the original photo
Shooting in RAW gives you greater control over your images, but it can be intimidating for beginners. RAW files are uncompressed, which means they capture more data from your camera sensor. This gives you more information to work with in post-processing, but it also means that RAW files are much larger than JPEG files.
The benefit of shooting in RAW is that you can edit these files without damaging the original photo. This is called non-destructive editing. You can export your RAW files as JPEGs, TIFFs, DNGs, and more, giving you more flexibility to further manipulate the image without losing the original file.
For example, if you've accidentally overexposed or underexposed your photo, you can recover details and rescue what might otherwise be lost. You can also adjust the white balance, which is useful if your photo has an unwanted yellow or green tint due to the lighting conditions when the photo was taken.
To edit RAW files, you'll need a digital camera capable of shooting in RAW and a dedicated RAW photo editor like Adobe Lightroom or Adobe Camera RAW.
- Set your camera to RAW in the camera settings.
- Take some pictures in RAW mode.
- Connect your camera to your computer and upload the photos.
- Open your RAW files in your chosen photo editing software.
- Play around with the sliders to adjust the exposure, contrast, brightness, colour tones, shadows, saturation, and more according to your creative vision.
- Once you're happy with the result, save your work and export your image as a JPEG or other printer-friendly format.
Remember, shooting in RAW will make your workflow longer, and you'll need more storage space for your larger files. But if you're looking to improve your photos and have more control over the final image, shooting in RAW is a great option.
Charging Camera Batteries: International Travel Guide
You may want to see also

You can rescue photos that are underexposed or overexposed
Shooting in RAW gives you a lot more flexibility in post-processing. You can rescue photos that are underexposed or overexposed, and you can make a decent photo out of a not-so-decent one.
If your camera fails to record information in a scene with contrasting colours, you will lose detail in the highlights or shadows, and these areas will appear as solid white or black. However, if you are shooting in RAW, you will often find that some detail has been captured, and this can be recovered.
In Lightroom, you can use the 'Shadows & Highlights' sliders to recover lost details. The highlights slider will recover overexposed areas by adjusting parts of the image that appear very white, while the shadows slider will brighten and bring detail back to underexposed parts of the image. You can also use the graduated neutral density filter to darken one side of a photograph more than another.
In Photoshop, when you open a RAW file, you will be faced with Adobe Camera Raw, which will let you make your initial RAW adjustments before opening the file fully in Photoshop. Here, you will also see the separate 'Highlights' and 'Shadows' sliders.
If you are shooting in JPEG, you will have already thrown away most of the information you need to recover lost details.
Charging Your Bird Buddy Camera: A Quick Guide
You may want to see also

RAW files give you more control over the final image
This means that you have total control over the final product. You can adjust the image according to your vision without relying on the baked-in settings of your camera's JPEG engine. You can make a decent photo out of a not-so-decent one. For example, if you over-exposed or under-exposed your photo, you will be able to recover details and rescue what may otherwise be lost.
Additionally, RAW files are lossless, meaning they capture uncompressed data from your camera sensor. This results in a higher image quality and gives you more data to work with when editing. You can tweak the white balance and exposure to a much larger degree than with a JPEG.
However, it is important to note that shooting in RAW will make your workflow longer. RAW files are also much larger than JPEGs, so you will need to have enough storage on hand when shooting in this format.
Charging the Wyze Outdoor Camera: A Step-by-Step Guide
You may want to see also

You can recover shadows and highlights in post-processing
Shooting in RAW gives you a lot more flexibility in post-processing. One of the most significant benefits of shooting in RAW is the ability to recover shadows and highlights without introducing the grainy noise associated with high ISO settings.
When you open a RAW file in Adobe Camera Raw, you can make your initial adjustments before opening the file in Photoshop. You will see separate 'Highlights' and 'Shadows' sliders. The highlights slider will recover overexposed areas by adjusting parts of the image that appear very white, and then it will attempt to recover the lost detail. The shadows slider will do the opposite, brightening and bringing detail back to underexposed parts of the image.
It's important not to overdo it with the sliders, as this can make the photo look artificial. If you go too far, you may not be able to bring the details back. A good way to check if there is any detail left in those areas is to pull the exposure slide all the way to the left or right. If the over or underexposed areas remain white or black, the details are lost forever.
Shooting in RAW gives you a second chance to get your photo right. You can rescue a photo that was not well-lit, or had contrasting colours, by recovering details and rescuing what may otherwise have been lost.
Charging the Garmin Virb: Battery Power Explained
You may want to see also
Frequently asked questions
RAW format is a digital image format for digital cameras and some smartphone camera apps. RAW files are uncompressed and lossless, meaning they capture a lot more image data than JPEGs or other compressed file formats.
Shooting in RAW gives you better files and more flexibility with your post-processing. RAW files contain a lot more image data than JPEGs, so you can recover details and rescue what might otherwise be lost. For example, if you overexposed or underexposed your photo, you will be able to recover details and restore highlights that are overexposed.
The main drawback of shooting in RAW is the amount of space the files take up. RAW files are much bigger than JPEGs, so you will need to have enough storage on hand. They also take longer for the camera to write, which decreases the frames per second.
The steps to enable RAW support will vary depending on your camera, but usually involve accessing an image quality setting in the menu system. On Canon cameras, for example, you can access the image quality setting from the menu.


