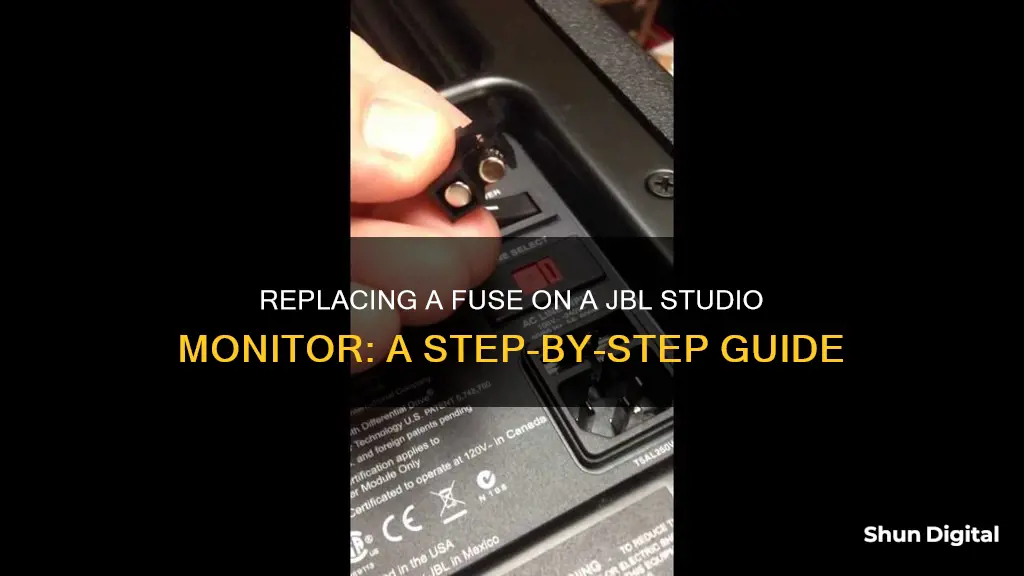
If your JBL studio monitor won't turn on, it could be due to a blown fuse. The fuse is a crucial component that safeguards your monitor from potential damage caused by power surges. To replace the fuse, you'll need a small flat-headed screwdriver. Before proceeding, ensure the power cable is disconnected to prevent any risk of electrical shock. The fuse holder is typically located near the power input, either inside a small plastic drawer or outlined by a red box. Using the screwdriver, gently prize open the holder, inspect the fuse, and if necessary, replace it with a new one of the same rating. In some cases, there may be a spare fuse in the holder, which you can swap in.
| Characteristics | Values |
|---|---|
| Reason for replacing the fuse | The monitor won't turn on |
| First step | Test your monitor with a new power source, preferably in a different room |
| Second step | Test with a different power cable |
| Tools | Small flat-headed screwdriver |
| Step-by-step process | 1. Turn the speaker around and remove the power cable. 2. Open the fuse holder located just below where you plug in the power. 3. Check the fuse. 4. If the fuse is dark in colour, it has blown. 5. If there is a spare fuse in the holder, swap them around and put the holder back in. If not, replace the fuse with one of the exact same rating and re-test. |
| Next steps if the monitor still won't turn on | Contact technical support |
What You'll Learn

Testing your monitor with a new power source
Firstly, try the new power source in a different room. This step is important as it rules out any issues with the power outlet in your current room.
Next, test the monitor with a different power cable. This will help you determine if the issue is with the cable and not the monitor itself.
If the monitor still doesn't turn on, proceed to the next step of changing the fuse. You will need a small flat-headed screwdriver. Remove the power cable from the monitor to ensure it is safe to work on.
The fuse holder is located just below where you plug in the power cable. Using the screwdriver, carefully prize open the fuse holder and check the fuse.
If the fuse is dark in colour, it has blown and will need replacing. If there is a spare fuse in the holder, swap them over and put the holder back in place. If there is no spare, replace the fuse with one of the exact same rating.
Once you have replaced the fuse, re-test the monitor with the new power source. If the monitor still doesn't turn on, the issue may lie elsewhere.
At this point, you could try more advanced troubleshooting techniques, such as using a multimeter to test the power supply, or you could seek professional assistance.
Hacking GPS Ankle Monitors: Techniques and Countermeasures
You may want to see also

Testing your monitor with a different power cable
If your JBL studio monitor is not turning on, there could be a problem with the power cable. Before attempting to replace the fuse, it is a good idea to test your monitor with a different power cable. This will help you determine if the issue is with the original power cable or if there is another problem with the monitor.
To test your monitor with a different power cable, start by locating a power cable that is similar to the one that came with your monitor. Make sure that the new cable is compatible with your monitor in terms of voltage and connection type. You can try using a power cable from another working monitor, or you can purchase a replacement power cable if necessary.
Once you have the new power cable, follow these steps:
- Turn off your monitor and disconnect the original power cable.
- Check the power cable connections at the back of the monitor to ensure they are secure.
- Connect the new power cable to the monitor, making sure it is firmly plugged in.
- Plug the other end of the new power cable into a working power outlet, surge protector, or power strip. Ensure that the power source is functioning properly.
- Turn on the monitor and check if it powers on.
- If the monitor turns on, try adjusting the brightness and contrast settings to ensure that the display is working properly.
- Leave the monitor on for a while to ensure that it stays on and doesn't shut off abruptly.
- If the monitor works with the new power cable, it confirms that the original power cable was faulty and needs to be replaced.
By testing your JBL studio monitor with a different power cable, you can narrow down the issue and determine if the problem lies with the power cable or if there is another component that needs attention.
Safely Packing and Moving Your LCD Monitor
You may want to see also

Identifying a blown fuse
A blown fuse in a JBL studio monitor may be indicated by a dark colour on the fuse. If you encounter a situation where your monitor will not power on, a blown fuse could be the reason. To identify a blown fuse, you can perform the following steps:
- Test your monitor with a new power source, preferably in a different room.
- If the issue persists, try using a different power cable.
- If the monitor still does not turn on, proceed to check the fuse.
- Remove the power cable from the monitor to ensure there is no possibility of receiving an electrical shock.
- Locate the fuse holder, which is usually situated just below where you plug in the power.
- Using a small flat-head screwdriver, carefully prise open the fuse holder and inspect the fuse.
- If the fuse appears dark in colour, it is likely blown.
If you determine that the fuse is indeed blown, you can replace it with a spare fuse of the exact same rating. If the issue persists after replacing the fuse, there may be a more serious problem with the monitor, and it is recommended to seek technical support or the assistance of a qualified technician.
Uninstall Mindspark Toolbar: A Step-by-Step Guide
You may want to see also

Locating the fuse holder
The fuse holder is usually easily accessible and can be identified by its red colour, as outlined in the picture accompanying the PreSonus support article. If you are unable to locate the fuse holder, refer to the user manual or a visual guide for your specific JBL studio monitor model. It is important to ensure that the power cable is disconnected before attempting to locate or access the fuse holder to avoid any possibility of electrical shock.
For ESI studio monitors, the fuse is placed inside the 3-pin connector that connects to the mains/power outlet. This means that the fuse is not located on the studio monitor itself but rather within the power connector. This design may vary across different brands and models, so it is always a good idea to consult the manufacturer's documentation or support resources if you are unsure.
In some cases, the fuse holder may be more challenging to access and may require additional steps or tools for removal. For example, it may be secured with screws that need to be carefully removed before accessing the fuse. Again, refer to the specific instructions or diagrams provided for your particular JBL studio monitor model to ensure you are following the correct procedure.
Once you have located the fuse holder, you can proceed to the next step of removing the old fuse and installing a new one. Remember to exercise caution and follow electrical safety guidelines throughout the process.
Abbott Precision Xtra Glucose Ketone Monitor: Buying Guide
You may want to see also

Replacing the fuse
A blown fuse could be the reason your JBL studio monitor won't turn on. Before attempting to replace the fuse, it is recommended to test your monitor with a new power source, preferably in a different room, and then test with a different power cable. If your monitor still won't turn on, then you can try changing the fuse.
To replace the fuse, you will need a small flat-headed screwdriver. First, turn the speaker around and remove the power cable to ensure that there is no possibility of receiving an electrical shock. The fuse holder is located just below where you plug in the power. Using the screwdriver, open the fuse holder and check the fuse. If the fuse is dark in colour, it has blown.
If there is a spare fuse in the holder, swap them around and put the holder back in. If there is no spare fuse, you can replace the fuse with another one of the exact same rating and re-test. Make sure that the replacement fuse is the correct one for your speaker model. Fuses can be purchased from most music or electronic retailers, as well as many mail-order companies or local shops that supply electrical parts.
Easy Ways to Check if Your Monitor has HDR
You may want to see also
Frequently asked questions
If your studio monitor won't turn on, it could be due to a blown fuse. To check, you should test your monitor with a new power source, preferably in a different room, and then test with a different power cable. If your monitor still won't turn on, the fuse may be blown and needs to be replaced.
First, ensure the monitor is unplugged and there is no possibility of receiving an electrical shock. The fuse holder is located just below where you plug in the power. Using a small flat-headed screwdriver, you can open the fuse holder, remove the fuse, and replace it with a new one of the exact same rating.
The type of fuse you need will depend on your specific speaker model. Fuses are inexpensive and can be purchased from most music or electronic retailers, as well as many mail-order companies and local shops that supply electrical parts.
If your studio monitor still won't turn on, there may be another issue. The fuse likely blew for a reason, so you should check voltages and meter your way along the path of the power from the mains power connection inward to find any issues. If you can't identify the problem, you may need to contact technical support for further assistance.


