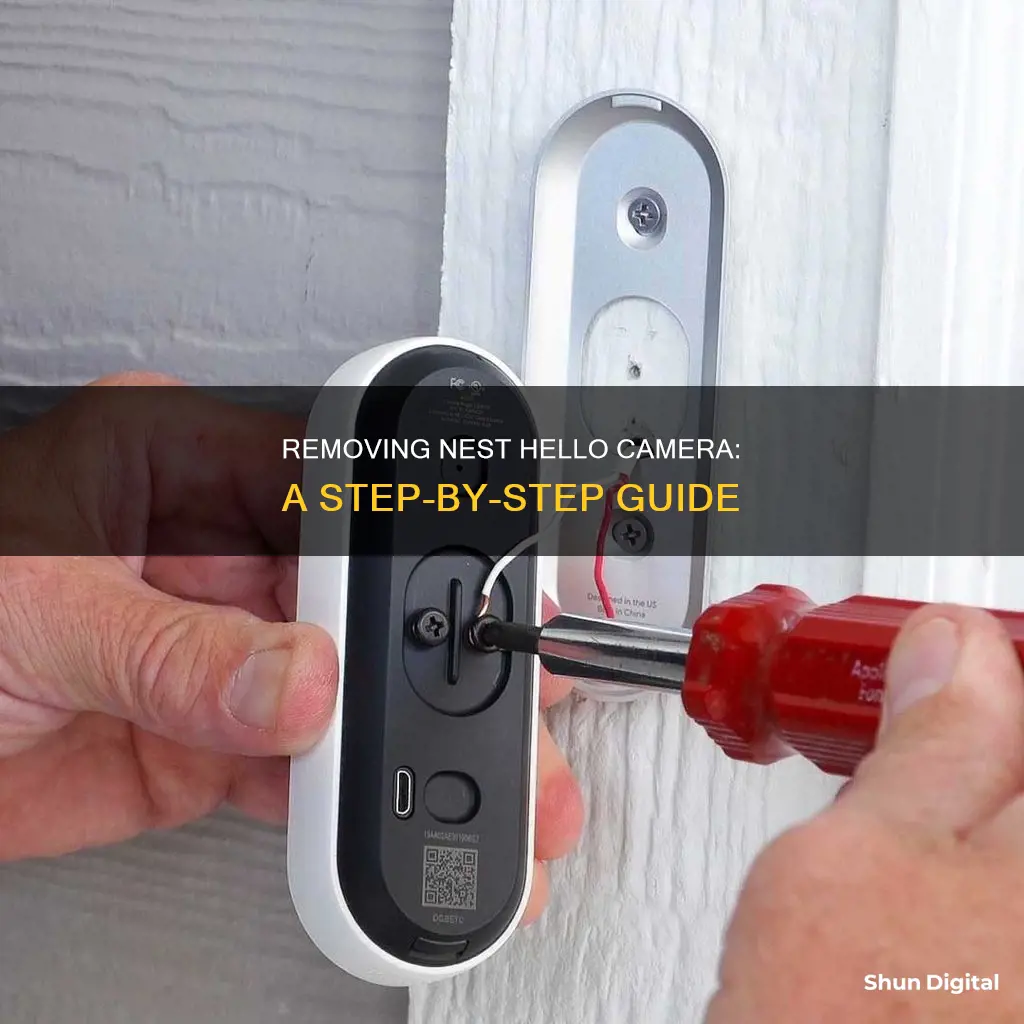
The Google Nest Hello is a video doorbell that offers a range of features, including high-quality HD imaging, a modern design, and familiar face detection. While it is known for being difficult to uninstall, the process is quite straightforward and can be done by following a few simple steps. Firstly, it is important to note that the Nest Hello is designed to snap into a wall mount, so to remove it, you must unmount it. This can be done by using the release tool included in the package or an unfolded paperclip. Insert the release tool into the hole at the bottom of the Nest Hello, and press upward until it snaps off the base. Be careful not to use too much force when pushing the Nest Hello upward, as the camera may come unstuck. Finally, grip the bottom of the camera and pull it away from the wall.
| Characteristics | Values |
|---|---|
| Ease of Installation | Not easy to install or uninstall |
| Installation Process | Snap into a wall mount |
| Unmounting Process | Remove the camera from the base |
| Unmounting Tools | Release tool, unfolded paperclip |
| Ease of Uninstallation | Easy and less time-consuming than installation |
What You'll Learn

Using the Nest app to remove the Nest Hello camera from your account
To remove your Nest Hello camera from your account using the Nest app, follow these steps:
- Sign in to the Nest app.
- If you have multiple homes set up in the app, tap "Menu" on the app home screen, then select the home that has the Nest Hello camera you want to remove.
- On the app home screen, tap "Settings".
- Tap the Nest Hello camera you want to remove.
- Scroll down and select "Remove [product name]".
- Confirm your choice when prompted.
Please note that removing the camera from your account will permanently delete all recorded video history associated with that camera. If you want to save any video footage before removing the camera, be sure to create video clips or timelapses and download the files to your phone or computer.
Additionally, if you have migrated your Nest camera to the Google Home app, you may need to transfer it back to the Nest app in order to remove it from your account.
Removing Camera HUD: Simple Steps for a Clear View
You may want to see also

Removing the camera from its wall mount
Removing the Nest Hello camera from its wall mount is a straightforward process, but there are a few things to keep in mind to ensure you don't damage the device or your property. Firstly, it's important to identify the type of Nest Hello camera you have, as the removal process varies slightly between models.
If you have the Nest Cam Indoor, it is attached to a metal wall plate with a magnet. To remove it, simply grip the camera and pull it away from the metal plate. The process is similar for the Nest Cam Outdoor, which is also attached to a metal plate with a magnet.
For the Nest Cam IQ Indoor, the process depends on how it is mounted. If it is attached to a wall mount with screws, gently twist the camera until the screws become loose. If it is resting on a flat surface, there is no need to do anything as the camera stand and base cannot be detached from the camera head.
Now, if you have the Nest Doorbell (battery), you'll need the release tool that came with it. If you don't have the tool, you can use a flathead screwdriver. Insert the tool or screwdriver into the hole at the top of the doorbell and press down to release it from its mount. Then, gently pull the doorbell away from the wall.
For the Nest Doorbell (wired), use the provided release tool and insert it from below. Press upward until the doorbell snaps off the base, then gently pull it away from the wall.
Finally, if you have the Nest Doorbell (wired, 2nd gen), you'll need the included hex key. Insert the hex key into the top of the doorbell and turn it counterclockwise to loosen the screw. Once the screw is loosened, carefully pull the doorbell up and away from the wall.
In all cases, ensure that you have a firm grip on the camera or doorbell when pulling it away from the wall to avoid dropping it. Additionally, always refer to the manufacturer's guidelines to avoid damaging your device or voiding the warranty.
Removing Canary Cameras: A Step-by-Step Account Guide
You may want to see also

Using the release tool to remove the camera from its base
To remove the Nest Hello camera from its base, you'll need to use the release tool that came with the device. This is the same tool used in phones to remove SIM cards. If you don't have the release tool, you can use a flathead screwdriver or purchase a new release tool online.
The release tool is used to detach the camera from its mount. To do this, insert the tool into the hole at the bottom of the doorbell, behind the speaker holes. Press the tool all the way in, and then pull it out. Your Nest Hello camera should now be released from its mount.
If your Nest Hello camera is connected to a power cable, make sure to unplug the power adapter from the electrical outlet before removing the camera from its base.
Once the camera is released from its mount, gently pull it away from the wall, holding it firmly. You may hear a slight pop as it detaches. Be sure to grip the base of the camera, not the camera head, when removing it from the wall.
Clearing Camera Uploads: Freeing Space in Dropbox
You may want to see also

Removing the secure loop from the wall mount
To remove the secure loop from the wall mount of your Nest Hello camera, you'll need to open the loop. This is done by pulling down on its tab until it can slip off the wall mount.
The secure loop is designed to keep your Nest Hello camera safely attached to the wall mount. When you're ready to remove the camera, simply pull down on the tab of the secure loop. This will open the loop and allow you to slip the camera off the wall mount.
Once you've removed the camera, you can use the secure loop as a wrist strap to safely carry the camera. This is a convenient way to keep your camera secure while you're repositioning or storing it.
If you're looking for additional security measures to prevent theft, there are a few options to consider. One method is to use hot glue to secure the Nest Hello to the wall mount. By applying a small amount of hot glue to the pin area, you can prevent the insertion of the pin required to release the camera. To remove the camera in the future, simply heat up the bottom bracket with a hairdryer to soften the glue.
Alternatively, you can use a metal strap to secure the Nest Hello to the wall mount. This method involves strapping a metal strap around the front of the camera and attaching it to the frame. This makes it more difficult for someone to simply pull off the camera or release it with a pin.
Keep in mind that these additional security measures may make it more difficult for you to remove the camera in the future, so plan accordingly.
Removing IR Filters: Enhancing E700 Camera Performance
You may want to see also

Resetting the camera
Resetting the Nest Hello camera can be done in two ways: restarting and factory resetting. Restarting the camera is a good idea if it's frozen, having trouble connecting to the internet, or not working normally. This will keep all your settings and reconnect the camera to the same Wi-Fi network. To restart the Nest Hello camera, separate the doorbell from its base using the pin tool or an unfolded paper clip. Then, put the pin tool into the pinhole on the back of the device and hold for around 10 seconds until the light switches off.
Factory resetting the camera, on the other hand, erases all your personalized settings, deletes the entire video history, and restores the factory default settings. It won't automatically reconnect to Wi-Fi, and you'll need to set it up again. Before performing a factory reset, make sure to save any video clips or timelapses you want to keep by downloading them to your phone or computer. To factory reset your Nest Hello camera, use the pin tool that came with the device or a paper clip to detach the doorbell from the base on the wall. There's a pinhole at the bottom of the Nest Hello where you can insert the release tool and separate the doorbell from the stand. Now, put the pin tool into the pinhole on the backside of the Nest Hello. If you press the doorbell button on the front side while holding down the release tool, the device will reset to factory defaults. You will see the light start to spin blue, flash yellow, and finally shut down. After releasing the buttons, your camera will chime, and the lights will turn blue. Finally, remove the camera from your Nest App by going to Settings and then selecting Remove camera. Confirm your choice and wait for an email from the Nest support team.
Removing Moisture from Your Dodge Reverse Camera: A Guide
You may want to see also
Frequently asked questions
You will need a release tool, which comes with the Nest Hello package, or an unfolded paperclip. Insert the release tool into the hole on the bottom of the Nest Hello, then press upward with your other hand until the camera snaps off the base. Grip the bottom of the camera and pull it away from the wall.
Yes, the Nest Hello can be removed by using a removal tool, similar to the one used to open a SIM card holder on a phone. Insert the tool into the hole behind the speaker holes at the bottom and press until it pops out.
Open the Nest app and tap on your Nest Hello feed. Tap on the settings cog in the top right corner of your screen, then scroll down to 'Remove Camera' and confirm.
You can reset your Nest Hello Camera by pressing and holding the reset button on the back of the camera for 5 seconds. The status light will be steady and solid white when it restarts.


