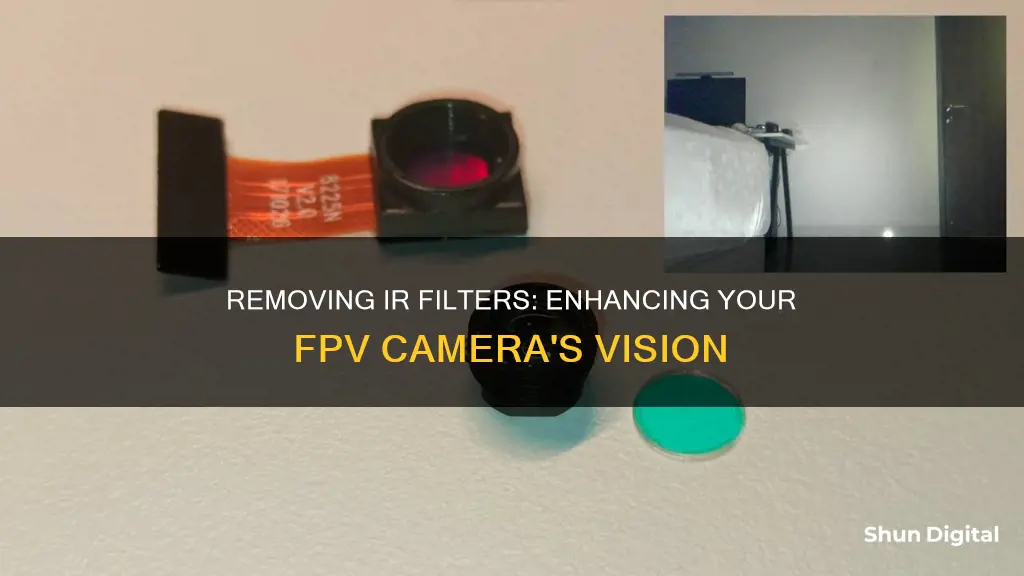
Removing the IR filter from an FPV camera is a complex process that requires technical expertise and precision. It is important to note that modifying your camera in this way may void its warranty. Before attempting any modifications, it is crucial to research the specific camera model and understand the potential risks and consequences involved. This includes the possibility of permanently altering the camera's functionality, making it exclusively suitable for infrared photography, and affecting autofocus and white balance accuracy. The process of removing the IR filter involves disassembling the camera, locating the filter, and carefully removing it without causing any harm to the camera's internal components. For those who wish to explore infrared photography without permanently modifying their equipment, some camera models offer the option to have the IR filter removed or replaced by the manufacturer.
| Characteristics | Values |
|---|---|
| Required skill level | Advanced technical knowledge and skills |
| Potential risks | Damage to internal components, voided warranty, dust and debris, sensor damage, loss of autofocus and white balance accuracy |
| Tools needed | Precision screwdrivers, tweezers, clean workspace, replacement filter (optional) |
| Steps | Turn off camera and remove battery, open camera, locate IR filter, remove filter, clean sensor, reassemble camera |
What You'll Learn

IR filter removal methods: glued vs screwed
IR filters are placed in cameras in two ways: glued or screwed. The glued IR filter is attached directly to the lens holder, whereas the screwed IR filter is held in place by a removable retainer that is screwed to the lens holder.
Glued IR Filter Removal
For cameras with glued IR filters, the only way to remove the filter is to destroy it. It is recommended to remove the lens holder completely from the camera before attempting to remove the filter. This can be done by heating up the lens tube to soften the glue, and then using a tool such as a hot-air soldering iron or a hair dryer to unscrew the lens holder.
Screwed IR Filter Removal
For cameras with screwed IR filters, the removal process is more straightforward. To remove the IR filter, simply remove the plate mounting screws and then take out the filter. If you wish to replace the IR filter, you can insert a new filter into the retainer and screw it back into place, ensuring that the side with the AR coating (identified by a green reflection when held at a 45-60 degree angle) is facing the sensor.
It is important to note that removing the IR filter may void the camera's hardware warranty and can alter the optical path of the camera, potentially causing issues with obtaining proper focus. Additionally, it exposes the camera's image sensor and electronics, increasing the risk of damage or dust accumulation. Therefore, it is recommended to work in an industrial clean room when performing these removal procedures.
OLED LG Smart TV: Built-in Camera?
You may want to see also

Tools and techniques for IR filter removal
The removal of an IR filter from an FPV camera can be a complex process requiring careful consideration and specific tools. The IR filter is usually fixed in front of the camera's image sensor, and its removal can be challenging and may void the camera's warranty.
- Precision Tools: You will need a set of precision screwdrivers and tweezers to carefully open the camera and remove the IR filter. It is crucial to be gentle and precise to avoid damaging any internal components.
- Clean Workspace: Before beginning the removal process, ensure you have a clean and dust-free workspace. This is important to minimise the risk of dust or debris entering the camera and affecting image quality.
- Camera-Specific Guides: Refer to detailed guides or tutorials specific to your camera model. The disassembly process can vary, so it is important to follow instructions tailored to your camera to avoid any damage.
- Filter Removal Tool: Some cameras may require a specialised filter removal tool. These tools are designed to safely remove the IR filter without causing any damage to the camera. They typically consist of a small wrench-like device that fits over the filter.
- Replacement Filter: If you plan to replace the IR filter with a new one, ensure you have the correct replacement filter and know how to identify the side with the AR coating. As per the guide, "When inserting the new filter, ensure that the side with the AR coating is placed facing the sensor. To identify the side with the AR coating, hold the filter at a 45-60-degree angle. The side with a green reflection is the AR coating (a pink reflection indicates no coating)."
- Static Discharge: Before beginning any work on the camera, it is important to discharge any static electricity by touching a grounded object. This will help prevent any static discharge from damaging the camera's sensitive electronic components.
- Sensor Cleaning: Once the IR filter is removed, take the opportunity to clean the sensor using a specialised sensor cleaning kit. This will ensure optimal image quality and help maintain the camera's performance.
- Warranty Considerations: Note that removing the IR filter will likely void the camera's hardware warranty. If you are unsure about performing this modification, consider consulting a professional or a specialised camera modification service.
By following these tools and techniques, you can successfully remove the IR filter from your FPV camera. However, always proceed with caution and thoroughly research your specific camera model before attempting any modifications.
Removing Camera from M6 Grill: A Step-by-Step Guide
You may want to see also

Step-by-step guide to IR filter removal
Removing the IR filter from your FPV camera can be a complex process and should be done with caution as it may void the camera's warranty. It is important to note that this process requires advanced technical knowledge and skills, and it is not recommended for inexperienced individuals. Here is a step-by-step guide to help you remove the IR filter:
- Gather the necessary tools: You will need a small screwdriver set, a clean workspace, and, if desired, a replacement filter. It is important to work in an industrial clean room to minimise the risk of damaging the image sensor or introducing dust into the camera.
- Prepare your camera: Turn off your camera and remove the battery to ensure safety. Discharge any static electricity by touching a grounded object.
- Open the camera: Carefully remove the screws that hold the camera body together, keeping track of the screws and their locations, as they may vary depending on the camera model.
- Locate the IR filter: Once the camera body is open, you will find the IR filter positioned in front of the camera sensor. It is usually a small, rectangular piece of glass.
- Remove the filter: Gently lift the IR filter using a pair of tweezers or a small tool. Take care not to damage the sensor or any other components.
- Clean the sensor: Before reassembling the camera, clean the sensor using a specialised sensor cleaning kit to ensure optimal image quality.
- Reassemble the camera: Carefully put the camera body back together, making sure to align the screws correctly. Double-check that everything is secure and in its proper place.
It is important to note that there are different methods for removing the IR filter, depending on how it is placed in the camera. Some IR filters are glued directly to the lens holder and can only be removed by destroying them. In other cases, the IR filter is held in place by a removable retainer that is screwed to the lens holder. Consult your camera's manual or a professional for guidance on the specific method for your camera model.
Using LG V30 Camera: Full-Screen View Guide
You may want to see also

Risks and precautions when removing the IR filter
Removing the IR filter from an FPV camera can be a complex process that carries certain risks and requires several precautions. Here are some detailed instructions to help you safely remove the IR filter from your FPV camera:
Risks and Precautions:
- Damage to the Camera's Internal Components: Removing the IR filter requires disassembling the camera and working with delicate internal components. Mishandling these parts or using incorrect tools can result in irreparable damage to your camera.
- Voiding the Warranty: It is important to note that removing the IR filter or protective glass will likely void the camera's hardware warranty. Manufacturers typically do not support modifications made by users.
- Dust and Debris: During the disassembly process, there is a high risk of introducing dust and debris into the camera, which can affect image quality. To minimize this risk, it is recommended to work in an industrial clean room or a dust-free environment.
- Sensor Damage: The camera's image sensor is extremely sensitive and vulnerable to damage. Any contact with the sensor or mishandling during the modification process can result in permanent damage.
- Autofocus and White Balance Issues: Removing the IR filter alters the camera's optical path and may cause problems with autofocus and white balance accuracy. This can lead to inconsistent or inaccurate results in certain shooting conditions.
- Technical Expertise Required: This modification requires advanced technical knowledge and skills. It is not recommended for inexperienced individuals. Consult a professional technician or a specialized camera modification service to ensure safe removal.
- Inaccurate Color Reproduction: By removing the IR filter, your camera will be more sensitive to infrared light, resulting in images with an infrared look. This modification is intended for specific types of photography, such as infrared, landscape, or astrophotography. For regular photography, the absence of the IR filter will result in inaccurate color reproduction.
- Difficulty in Reversing the Modification: While some cameras allow for easy replacement of the IR filter, others may require purchasing a new lens holder or even a different camera to revert to the original setup.
- Permanent Alteration: Removing the IR filter permanently alters the camera's functionality, making it exclusively suitable for infrared photography. If you intend to use the camera for regular photography as well, consider purchasing a dedicated camera for infrared photography instead of modifying your existing one.
- Camera Model-Specific Challenges: Different camera models have unique designs and methods of placing the IR filter. Some cameras might have the IR filter integrated into the sensor, making it extremely difficult or impossible to remove. Always research your specific camera model before attempting any modifications.
By following these precautions and seeking professional assistance when needed, you can minimize the risks associated with removing the IR filter from your FPV camera.
Troubleshooting ProPresenter: Camera Not Detected
You may want to see also

Reassembling the camera after IR filter removal
- Before beginning the reassembly process, ensure that your workspace is clean and free of dust or debris. Even a small amount of dust can affect image quality.
- Carefully align the different components of the camera body, making sure that they are in their proper places. Take your time with this step, as rushing can lead to misalignment and damage.
- When putting the camera body back together, pay close attention to the screws. Make sure to use the correct screws in their respective locations and tighten them securely, but be careful not to over-tighten as this can strip the threads or damage the camera body.
- Once the camera body is reassembled, it is important to check that everything is secure and in its proper place. Double-check all connections and ensure that no tools or loose parts are left inside the camera.
- After reassembling the camera, it is a good idea to test it to ensure that it is functioning properly. Take some test images and videos to verify that the camera is focusing correctly and producing the desired results.
- If you encounter any issues during the reassembly process or if the camera is not functioning properly after reassembly, do not force anything. Consult a professional technician or seek advice from experienced photographers or online forums.
It is important to note that removing the IR filter may void your camera's warranty, so proceed with caution and consider consulting a professional if you are unsure about any steps.
Infrared Vision: Not All Cameras Can See It
You may want to see also
Frequently asked questions
Removing the IR filter from your FPV camera is a complex process that requires technical expertise and precision. It is not recommended for inexperienced individuals as it can potentially damage the camera. The process involves disassembling the camera, locating the IR filter, and carefully removing it without causing harm to the internal components. It is best to consult a professional technician or a specialised camera modification service for assistance.
You will need a set of precision screwdrivers, tweezers, and a clean workspace. It is also important to have a replacement filter if desired.
Removing the IR filter may void your camera's warranty. It can also permanently alter the camera's functionality, making it exclusively suitable for infrared photography. There is also a risk of damaging the camera's internal components during the process.


