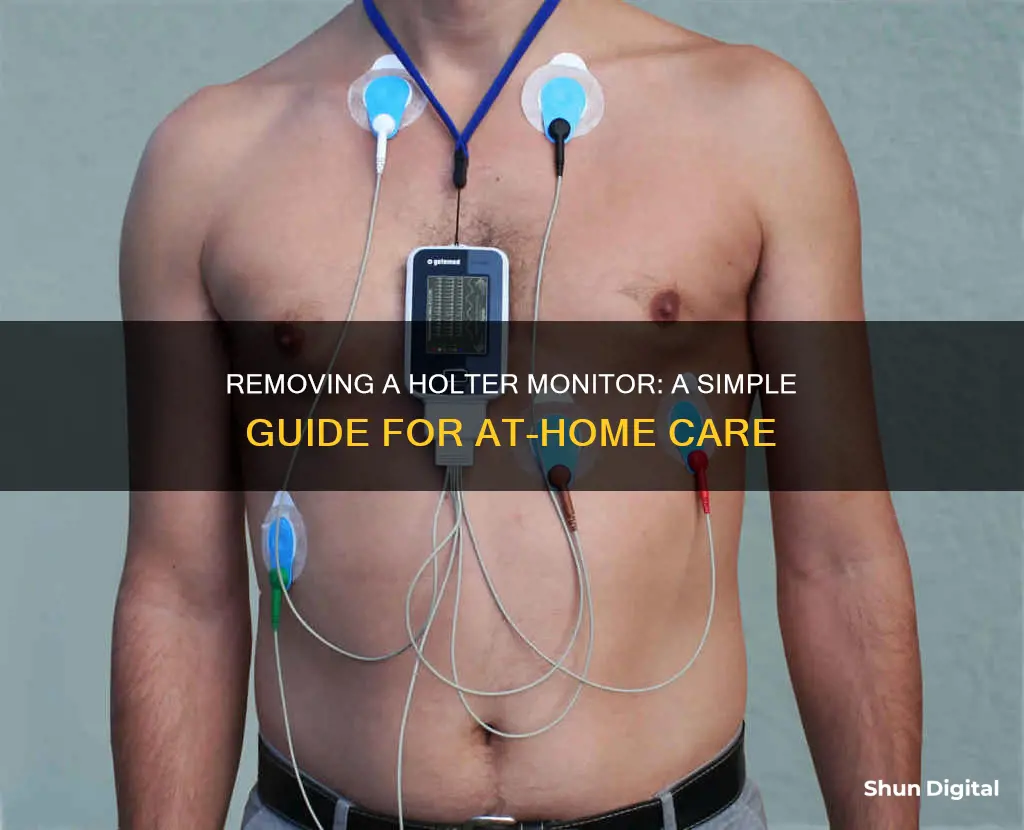
A Holter monitor is a small device that records an individual's heart rate and rhythm over a 24-48 hour period. It is typically worn by those who have been diagnosed with irregular cardiac symptoms, such as arrhythmias, to ensure their medications are working, or to see if their heart is getting enough oxygen. The monitor is put on at the hospital by a technician, who will clean the patient's chest with an alcohol pad and place small stickers called electrodes on the chest, which are connected to the Holter monitor. The monitor is then returned to the hospital for analysis.
| Characteristics | Values |
|---|---|
| How to remove a Holter monitor | Dispose of the electrodes, put the device back into its box or packaging, and return it to the cardiologist within a specified period. |
| When to remove a Holter monitor | After the data measurement period is over. |
| What to do after removing the monitor | Return the monitor to the cardiologist. If you were asked to keep a diary, give that to your doctor, too. |
| How to remove the adhesive marks on the skin | Use water, alcohol, mineral oil, or lotion. |
What You'll Learn

Removing the electrodes
To remove the electrodes, start by washing your skin with water or using the cleansing wipes provided. This will help to remove any adhesive residue or stickiness from your skin. You can then gently peel off the electrodes, taking care not to irritate your skin. If you experience any redness, itching, or a rash, these symptoms are usually mild and will go away on their own.
After removing the electrodes, you may still have some adhesive marks on your skin. These can be removed with water, alcohol, mineral oil, or lotion. Gently rub the chosen substance onto the marks until they disappear.
Once all the electrodes have been removed, gather the wires and dispose of the electrodes in the appropriate waste bin. It is important to handle the equipment with care and follow any specific disposal instructions provided by your healthcare provider.
Finally, place the wires, Holter monitor, case, strap, and diary (if applicable) in the provided self-addressed envelope. This package can then be placed in your mailbox for pickup or in a public mailbox.
Am I Being Watched on Facebook?
You may want to see also

Disposing of the device
Once the Holter monitor has finished recording, you can remove it from your body. The monitor is a rental device, so it must be returned to the cardiologist within a specified period. If you do not return it, you may be charged for the equipment.
Before returning the monitor, you should dispose of the electrodes and put the device back into its original box or packaging. You can use water, alcohol, mineral oil, or lotion to remove any adhesive marks on your skin.
Place the monitor, wires, case, strap, and diary in the self-addressed, postage-paid envelope provided. If you were given a diagram, ensure the wires are correctly coloured and located. Place the envelope in your mailbox for the postal service to pick up, or in a public mailbox.
After sending back the monitor, it usually takes about 10 days for the results to be ready. Your doctor will go over the results and any recommendations with you.
Is Your Webcam Spying? How to Know for Sure
You may want to see also

Cleaning skin marks
To clean the skin marks left by a Holter monitor, you can use water, alcohol, mineral oil, or lotion. Firstly, wash the area with soap and water to remove any residue or adhesive. If there are still marks or residue left on your skin, you can use one of the following methods to remove them:
Using Alcohol
Using alcohol is an effective way to remove adhesive residue and clean the skin. Soak a cotton ball or pad in alcohol and gently rub it on the affected area in a circular motion. This will help to dissolve the adhesive and remove any remaining residue.
Mineral Oil
Mineral oil is a gentle and effective way to remove adhesive marks. Apply a small amount of mineral oil to a cotton ball or pad and gently rub it on the affected area. The oil will help to break down the adhesive and make it easier to remove.
Lotion
Lotion can also be used to remove adhesive marks and moisturise the skin. Take a small amount of lotion and gently massage it onto the affected area until the adhesive marks are gone. This will help to nourish and soothe the skin while removing the residue.
It is important to be gentle when removing the adhesive marks to avoid irritating the skin. If the skin is irritated, red, or itchy, a mild rash may appear, but this should go away on its own. If the irritation persists or becomes worse, it is recommended to consult a doctor or healthcare provider.
Accessing Your ASUS Monitor's Backlight: A Step-by-Step Guide
You may want to see also

Returning the equipment
Returning the Holter Monitor
Once the data measurement period is over, it's time to return the Holter monitor and its accompanying equipment. Here are the steps to follow:
- Disposing of the Electrodes: Remove the monitor from your body and dispose of the electrodes that were attached to your skin. Electrodes are usually meant for one-time use and cannot be reused.
- Packing the Equipment: Place the Holter monitor, wires, case, strap, and any other accessories back into their original box or packaging.
- Returning the Diary: If you were provided with a diary to record your symptoms and activities, make sure to include it with the equipment. This diary is an important part of the data collection process.
- Returning Options: Depending on the instructions provided by your cardiologist, you may need to physically return the equipment to their office, or you may be given the option to mail it back. If mailing, use the provided self-addressed, postage-paid envelope, and place it in your mailbox or a public mailbox for pickup.
- Timely Return: It is important to return the equipment within the specified period. The Holter monitor is typically rented from the doctor's office and needs to be returned promptly to avoid any additional charges.
- Follow-up Appointment: After returning the equipment, schedule a follow-up appointment with your cardiologist to review the results of the Holter monitor test. They will interpret the data and discuss any findings and potential treatment options with you.
Choosing the Right-Sized Drawing Tablet Monitor for You
You may want to see also

Scheduling a follow-up
After you have removed your Holter monitor, you will need to schedule a follow-up appointment with your cardiologist to review the results. This is typically done a week or two after the Holter test. During the follow-up, your cardiologist will interpret the data from the monitor and discuss any findings and potential treatment options with you. In some cases, your cardiologist may choose to have this discussion over a phone call instead of an in-person appointment.
The results from the Holter monitor will provide information about your heart's electrical activity and help identify any irregular heartbeats or rhythm disorders (arrhythmias). These arrhythmias can include conditions such as atrial fibrillation, bradycardia, tachycardia, or premature ventricle contractions.
It is important to keep in mind that the follow-up appointment is a crucial step in understanding your cardiac health and determining the next steps in your treatment plan, if any. Make sure to schedule and attend this appointment to ensure you receive the necessary care and guidance from your cardiologist.
If you are unsure how to schedule the follow-up, you can contact your cardiologist's office for guidance. They will be able to assist you in setting up the appointment and provide you with any additional information or instructions you may need before the follow-up.
How to Identify Your Monitor: LCD or CRT?
You may want to see also
Frequently asked questions
When the data measurement period is over, carefully dispose of the electrodes and put the device back into its box or packaging.
The monitor is basically a rental from the doctor’s office—it is not yours to keep. You must return it to the cardiologist within a specified period. If you don’t return it, they may charge you for the equipment.
If you were asked to keep a diary, give that to your doctor, too.
You can get rid of adhesive marks on the skin with water, alcohol, mineral oil, or lotion.


