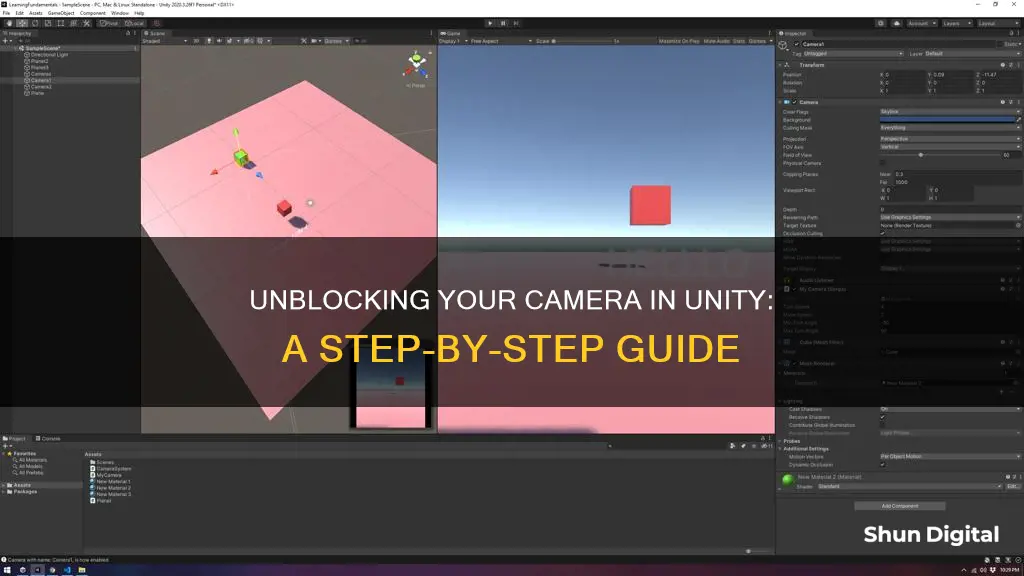
If you're having issues with your camera being blocked or intersecting with obstacles in Unity, there are a few potential solutions. One suggestion is to use Unity Cinemachine, which is much easier for creating a third-person camera and includes a component that handles passing through objects. Alternatively, you can treat the camera as a physics object and ensure that a rigid body and collider are attached to the camera's game object. This will require using rigidbody.MovePosition(pos) and rigidbody.MoveRotation(rot) instead of transform.position and transform.rotation. Additionally, you can try line casting to predict if the camera will be obscured and start zooming the camera accordingly to avoid obstacles.
What You'll Learn

Use Unity Cinemachine
Unity's Cinemachine is a collection of camera tools that allow you to create different types of camera systems without coding. Cinemachine is highly customizable and typically easy to use, with a wide range of ready-made cameras. It is free and available for any project.
Cinemachine works by connecting one or more virtual cameras to your main camera, allowing you to arrange multiple shots within a scene. It is often associated with linear media, such as computer-animated videos and in-game cutscenes, due to its compositional and framing options. However, it also provides support for in-game camera controllers, with options for third-person cameras, orbital cameras, and side-scrolling 2D cameras.
To use Cinemachine, you need to install it using the Package Manager in Unity. Once installed, you can create Virtual Cameras in your scene, which will work with your main camera to change its view. Each virtual camera acts as a different shot, allowing you to switch between viewpoints easily.
Cinemachine offers a range of body profiles that determine how the virtual camera will move in response to the object it is following. For example, the "Do Nothing" profile keeps the camera stationary, while the "Transposer" profile moves the camera towards a target with a basic offset. The "Framing Transposer" is useful for creating a 2D side-scrolling camera that follows the transform position of its target.
Cinemachine also includes a Collider component that helps to keep your camera from intersecting with objects in the world. The Collider post-processes the final position of the virtual camera, moving it away from GameObjects that obstruct the view and attempting to preserve the line of sight with the camera's "Look At" target.
Cinemachine provides a versatile set of tools for camera behaviour, including procedural targeting, where the camera automatically rotates to keep subjects at any position in the screen space. You can also track multiple subjects and adjust their weight and influence within a group. Additionally, Cinemachine supports a range of 2D-specific features, such as orthographic rendering and 2D framing, making it easy to set up a powerful 2D camera.
In summary, Cinemachine in Unity is a powerful and flexible tool for creating and customizing camera systems, offering a range of options for both 2D and 3D games or films. Its code-free approach allows for quick experimentation and prototyping, making it a valuable asset for any project.
Anfield's TV Camera Setup: A Behind-the-Scenes Look
You may want to see also

Add a collider and rigidbody to the camera
To prevent objects from blocking the camera in Unity, you can add a collider and a rigidbody to the camera. This will allow the camera to detect collisions and move without clipping through objects.
In Unity, a collision occurs when two GameObjects occupy the same physical space. Colliders are Unity components that define the shape of a GameObject for collision purposes, and they can be invisible. There are different types of colliders, including static colliders, rigidbody colliders, dynamic colliders, and kinematic colliders. Static colliders have no rigidbody, while rigidbody colliders have both a collider and a rigidbody. Dynamic colliders have a dynamic rigidbody with Is Kinematic disabled, and kinematic colliders have Is Kinematic enabled.
To add a collider and rigidbody to the camera in Unity, follow these steps:
- Select the camera GameObject in the Hierarchy panel.
- In the Inspector panel, locate the "Add Component" button and click on it.
- Search for "Collider" in the search bar and select the appropriate collider type for your camera (e.g., box collider, sphere collider, capsule collider, etc.).
- Repeat the process to add a rigidbody component to the camera GameObject.
- Adjust the settings of the collider and rigidbody to suit your specific requirements. For example, you can control the friction and bounciness of the collider's surface.
By adding a collider and rigidbody to the camera, you can enable more realistic and intuitive movement and collision detection. However, it is important to consider the potential for unpleasant jerking movements if the camera collides with objects. Raycasting may be a more suitable alternative for smooth camera movement without clipping through objects.
Parkway Cameras: Viewing New Jersey's Roads and Traffic
You may want to see also

Use rigidbody.MovePosition(pos) and rigidbody.MoveRotation(rot)
To prevent your camera from being blocked by or intersecting obstacles in Unity, you can use the rigidbody.MovePosition(pos) and rigidbody.MoveRotation(rot) functions. These functions allow you to move and rotate a Rigidbody object while complying with the interpolation settings.
Here's a step-by-step guide on how to use these functions:
- Attach a Rigidbody and Collider to your Camera's GameObject: Before using rigidbody.MovePosition(pos) and rigidbody.MoveRotation(rot), ensure that your camera's GameObject has a Rigidbody and Collider attached to it. This will allow the camera to interact with other objects in the scene as a physics object.
- Fetch the Rigidbody in the Start() function: In your camera's script, create a Rigidbody variable (e.g., m_Rigidbody) and use the GetComponent
() function to fetch the Rigidbody attached to the GameObject. - Move the Camera with rigidbody.MovePosition(pos): In your FixedUpdate() function, you can use rigidbody.MovePosition(pos) to move the camera smoothly. Calculate the desired movement vector based on user input or any other logic, and then apply it to the current position. For example:
Csharp
Vector3 movement = new Vector3(Input.GetAxis("Horizontal"), 0, Input.GetAxis("Vertical"));
M_Rigidbody.MovePosition(transform.position + movement * Time.deltaTime * m_Speed);
Rotate the Camera with rigidbody.MoveRotation(rot): To rotate the camera, you can use the rigidbody.MoveRotation(rot) function. Calculate the desired rotation using Quaternions or Euler angles, and then apply it to the current rotation. For example:
Csharp
Quaternion deltaRotation = Quaternion.Euler(m_EulerAngleVelocity * Time.fixedDeltaTime);
M_Rigidbody.MoveRotation(m_Rigidbody.rotation * deltaRotation);
- Understanding Interpolation: When Rigidbody interpolation is enabled, using rigidbody.MovePosition(pos) and rigidbody.MoveRotation(rot) will create a smooth transition between frames. This means that the camera will gradually move or rotate towards the target position or rotation, resulting in a smooth animation. If interpolation is disabled, the camera will teleport instantly to the new position or rotation.
- Teleporting the Camera: If you want to teleport the camera to a new position or rotation without interpolation, you can directly set the Rigidbody's position and rotation. For example:
Csharp
M_Rigidbody.position = new Vector3(0, 10, 0);
M_Rigidbody.rotation = Quaternion.Euler(0, 45, 0);
By following these steps and using rigidbody.MovePosition(pos) and rigidbody.MoveRotation(rot), you can effectively prevent your camera from being blocked by obstacles in your Unity project.
Unexplained: Caught on Camera' Streaming Options Explained
You may want to see also

Predictively zoom the camera
Predictively zooming the camera involves line casting to predict if the camera will be obscured and then pre-emptively zooming the camera towards or away from the player. This is a common feature in third-person camera games.
Unity offers three main methods for zooming a camera: Perspective Zoom, Movement Zoom, and 2D Orthographic Zoom.
Perspective Zoom works by changing a camera's field of view, creating a telescopic effect. The basic method of zooming a camera in Unity involves reducing the camera's Field of View property. This creates a zoom effect similar to looking through a sniper scope or a telescope.
Movement Zoom, on the other hand, physically moves the camera object closer to the subject. This method is used to adjust the position of a third-person camera or a top-down camera angle.
The 2D Orthographic Zoom increases or decreases the viewable area of a 2D camera by changing its orthographic size. This method is commonly used in 2D games as it renders the scene without any depth, allowing for a flat, 2D view of the game world.
Locate Your Computer's Camera: A Quick Guide
You may want to see also

Smoothly interpolate camera movements
To smoothly interpolate camera movements in Unity, you can use a technique called "lerping" or linear interpolation. This involves moving the camera gradually from one position to another over a period of time, resulting in smooth and fluid camera movements. Here's a step-by-step guide on how to achieve this:
Step 1: Set Up Variables
Create a script and attach it to your camera. Define the necessary variables, such as the target object to follow, the desired smooth speed, and an offset value. These variables will allow you to control the behaviour of the camera.
Csharp
Public Transform target;
Public float smoothSpeed = 15f;
Public Vector3 offset;
Step 2: Use LateUpdate() or FixedUpdate()
Use Unity's LateUpdate() or FixedUpdate() function to ensure that the camera updates its position after all other objects have updated theirs. This helps maintain smooth camera movements relative to other objects in the scene.
Step 3: Calculate Desired Position
In the LateUpdate() or FixedUpdate() function, calculate the desired position of the camera. This is typically based on the target object's position and the offset value.
Csharp
Vector3 desiredPosition = transform.position + offset;
Step 4: Smoothly Interpolate Position
Use Unity's Vector3.Lerp() function to smoothly interpolate between the camera's current position and the desired position. The smoothSpeed and Time.deltaTime values control the rate of interpolation, resulting in a smooth transition.
Csharp
Vector3 smoothedPosition = Vector3.Lerp(transform.position, desiredPosition, smoothSpeed * Time.deltaTime);
Step 5: Update Camera Position
Finally, update the camera's position to the smoothed position calculated in the previous step.
Csharp
Transform.position = smoothedPosition;
By adjusting the smoothSpeed value, you can control how quickly the camera catches up to the target. Play around with different values to achieve the desired radius effect.
Additionally, if you're still encountering jittery movements, consider using FixedUpdate() instead of LateUpdate(). While it's not considered best practice, it can often provide a smoother experience by updating the camera at a fixed interval, typically in sync with the physics loop.
Here's a full example of the camera interpolation script:
Csharp
Public Transform target;
Public float smoothSpeed = 15f;
Public Vector3 offset;
Void LateUpdate()
{
Vector3 desiredPosition = transform.position + offset;
Vector3 smoothedPosition = Vector3.Lerp(transform.position, desiredPosition, smoothSpeed * Time.deltaTime);
Transform.position = smoothedPosition;
}
Remember to set the target GameObject in the Unity editor; this should be the object you want the camera to follow, typically your player character.
CCTV Cameras: How Do They Work?
You may want to see also
Frequently asked questions
You can try adding a collider and rigidbody to the camera's GameObject. You should then use rigidbody.MovePosition(pos) and rigidbody.MoveRotation(rot) instead of transform.position = pos and transform.rotation = rot.
This issue can be addressed by making the camera more predictive and smoothly interpolating camera movements. Instead of linecasting to check if the camera is obscured, you can try line casting to predict if the camera will be obscured and adjust the camera position accordingly.
You can use Unity's Cinemachine, which is a component that handles passing through objects. The documentation for Cinemachine can be found at https://docs.unity.cn/Packages/[email protected]/manual/index.html.
Third-person cameras can be challenging to work with, and issues such as camera clipping or unexpected behaviour when avoiding obstacles are common. It's important to remember that third-person cameras are not solved mathematical problems.
Yes, there is a GDC talk by the developer who worked on Journey's third-person camera, which may provide valuable insights.


