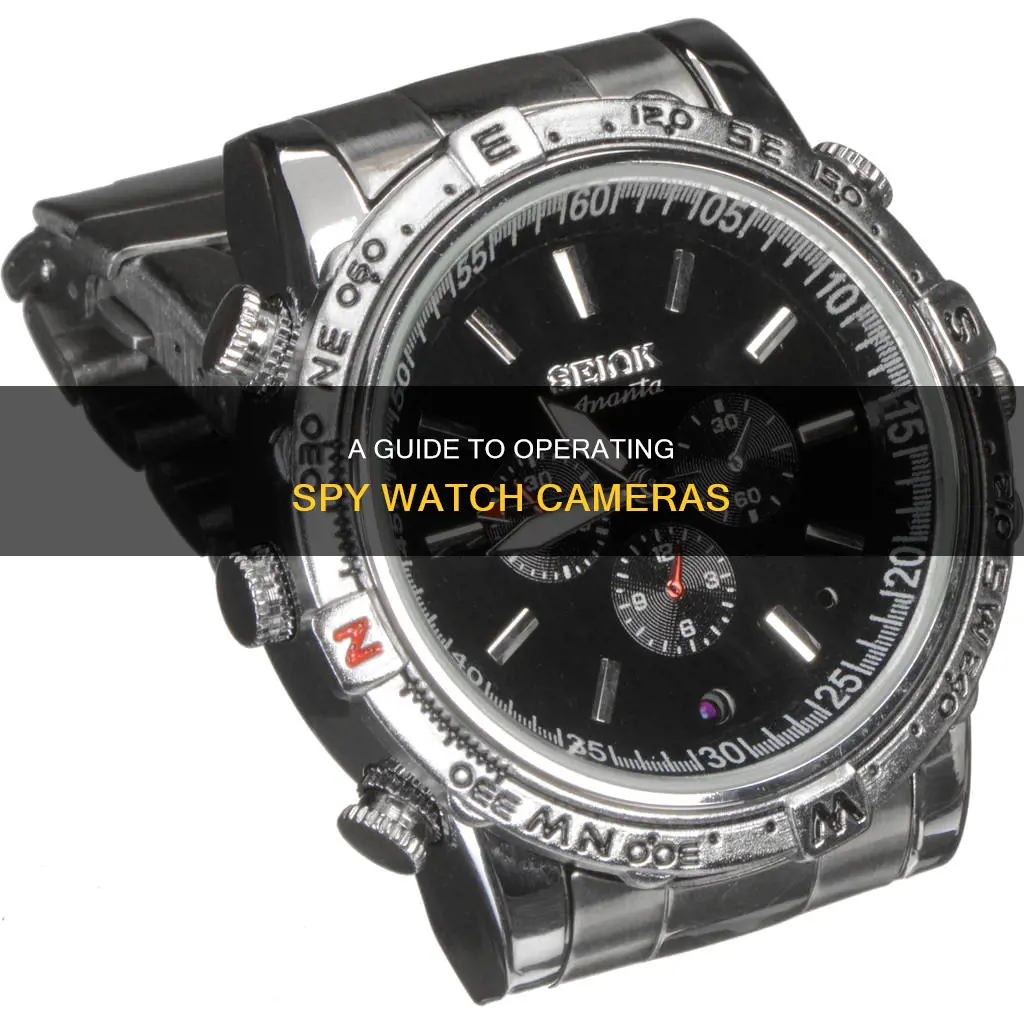
Operating a spy watch camera can be tricky, but with the right instructions, you'll become a pro in no time. First, it's important to locate the charging port, typically on the side or back of the watch, and charge your device. Once charged, you can explore memory and storage options, inserting a micro SD card if necessary. Pairing your device with a smartphone or computer via Bluetooth will allow you to manage your recordings. Familiarise yourself with the button functions—usually located at the 10 and 2 o'clock positions—and you're ready to start recording! Press and hold the 10 o'clock button to start and stop video recording, indicated by a flashing red LED light. To capture photos or activate night vision, use the 2 o'clock button. Remember to maintain your device by keeping the battery charged, storage empty, and the lens clean.
What You'll Learn

Charging the battery
To operate your spy watch camera, you'll need to ensure it is charged. Here is a step-by-step guide to charging your spy watch:
Locating the Charging Port:
The charging port is typically located on the side or back of the watch. It may be covered by a small rubber or silicone flap to maintain the watch's discreet appearance.
Connecting the Charger:
Take the provided USB charger and connect it to the charging port on your spy watch. Ensure a proper connection by gently pushing the connector into the port until it is firmly in place.
Power Source:
Now, plug the other end of the USB cable into a power source. This can be a computer, a wall adapter, or a portable power bank. Any standard USB power source should be suitable.
Charging Indicators:
Keep an eye out for visual indicators that show your watch is charging. Typically, a red or orange light indicates the device is charging, while a green light or the absence of a light indicates that the device is fully charged. Refer to your user manual for specific details regarding your model.
Disconnecting the Charger:
Once the watch is fully charged, remember to disconnect the charger. This step is important to preserve the life of your battery. Some models may require the device to be powered off for effective charging, so be sure to check your watch's user manual for any specific instructions.
By following these steps, you can ensure your spy watch camera is charged and ready for use. Now you can move on to setting up memory and storage options and pairing your device with your smartphone or computer.
DPS and Privacy: Cameras Watching Your Every Move?
You may want to see also

Memory and storage options
Memory and storage are essential components of your spy watch camera, enabling you to save all your captured videos and photos. Here's a comprehensive guide to help you understand the memory and storage options for your device:
Check the Specifications:
Before you begin, it's important to consult the specifications of your spy watch camera. Check the user manual or the manufacturer's website to understand the memory and storage options available for your specific model. This information will guide your next steps.
Built-in Internal Memory:
Some spy watch cameras feature built-in internal memory, eliminating the need for a separate memory card. This internal memory allows you to store your recordings directly on the device. However, the storage capacity may vary, so it's important to check the specifications to know how much recording time you have available.
Micro SD Card:
Other spy watch cameras may require the use of a micro SD card to expand their storage capacity. If your device falls into this category, locate the card slot and insert a compatible micro SD card. Ensure that the card is compatible with your watch and that it provides sufficient storage space for your needs.
Format Storage:
In some cases, you may need to format the storage to prepare it for use. You can typically do this through the watch's menu settings or by connecting the device to a computer. Formatting will erase any existing data on the storage medium, so make sure you have backed up any important files beforehand.
Storage Capacity:
When choosing a micro SD card, consider the storage capacity that best suits your needs. Spy watch cameras typically support a range of storage capacities, such as 16GB, 32GB, or even higher. Assess how much recording time you require and choose a card with sufficient capacity.
Transferring Data:
To free up space on your spy watch camera, you can transfer your recorded videos and photos to another device, such as a computer or smartphone. Connect your spy watch to the other device using a USB cable or Bluetooth, if available. Then, access the files on the memory card and transfer them to the desired location for safekeeping.
Managing Storage:
It's important to manage your storage efficiently to ensure you have enough space for new recordings. Periodically review the content on your spy watch camera and delete any unnecessary files. Additionally, consider backing up your recordings to a computer or external hard drive to create more space on your device.
By understanding the memory and storage options available for your spy watch camera, you can ensure you have sufficient space to capture and store all your important recordings. Remember to refer to your device's user manual for specific instructions related to your particular model.
Walgreens Surveillance: Are Shoppers Being Watched?
You may want to see also

Pairing with a smartphone or computer
Pairing your spy watch camera with your smartphone or computer is essential for viewing and managing your recordings. Here is a step-by-step guide on how to do it:
Firstly, turn on your spy watch camera. If your device has Bluetooth, enable this feature. From your smartphone or computer, search for available Bluetooth devices. Select your spy watch camera from the list of available devices and follow the on-screen instructions to pair. You may be asked to enter a pairing code, which can be found in your watch manual. Alternatively, the system might guide you through a connection app.
Once your spy watch camera is paired with your smartphone or computer, you can easily access, view, and manage your videos and photos. You can also use your smartphone or computer to format the storage if necessary.
If you wish to transfer recorded videos from your spy watch camera to your computer, you will need to locate the USB port on your watch, usually hidden beneath a cover or as part of the wristband for discretion. Connect a USB cable to the USB port, and then plug the other end of the cable into an available port on your computer. Your computer should then automatically detect the device, allowing you to access and transfer files. You may need to install specific drivers or software for your spy watch camera to be recognised by your computer; simply follow the manufacturer's instructions.
Ulta's Camera Surveillance: What You Need to Know
You may want to see also

Navigating the buttons
Here's a step-by-step guide to navigating the buttons:
- Familiarize yourself with the buttons and their functions: Before attempting to use the device, take some time to understand what each button does. Refer to the user manual or instructions that came with your spy watch camera. Knowing the functions beforehand will ensure you don't accidentally activate the wrong feature.
- Firmly press the buttons: When activating a function, apply a gentle yet firm press to the buttons. This helps prevent accidental activation or recording.
- Master the power and recording buttons: Typically, the 10 o'clock button is used for powering the watch, voice recording, and video recording. To start video recording, press and hold this button until a red LED light flashes. Release it, and let the light flash momentarily as the camera initializes. Once the flashing stops, your spy watch will be recording. To stop recording, press and hold the same button again.
- Understand the photo and mode button: The 2 o'clock button is usually dedicated to taking photos, switching between different modes, and turning on night vision. Depending on your watch model, you may need to press this button once or hold it down to take a picture.
- Explore advanced features: Some spy watches offer additional features like motion detection. For example, pressing the 2 o'clock button twice might activate night vision mode, allowing you to capture images or videos in low-light conditions. Always refer to your user manual to understand the specific functions and button combinations for your particular spy watch camera model.
Big Brother: Government Surveillance and Our Cameras
You may want to see also

Starting and stopping video recording
To start recording video on your spy watch camera, you will need to locate the button on the right side of the watch, in line with the two o'clock mark. Hold this button down to activate the camera. On some models, this may be the 10 o'clock button instead, so always check the user manual for your specific device. Once activated, a red LED light will flash. Release the button and let the light flash for a moment as the camera initializes. When the flashing stops, the watch will be recording video.
To stop the video recording, simply press and hold the same button again. The red LED light will blink a few times to indicate that the recording is being saved.
The process for starting and stopping video recording on a spy watch camera may vary slightly depending on the model, so it is important to refer to the user manual for specific instructions.
Controlling Your Camera with Apple Watch: The Ultimate Guide
You may want to see also
Frequently asked questions
First, locate the charging port, usually on the side or back of the watch, and connect the provided USB charger. Plug the other end of the cable into a power source such as a computer, wall adapter, or power bank. The light indicator will show when the device is charging and when it is fully charged.
Check the specifications of your device for memory options. If your watch uses a micro SD card, insert it into the card slot. Some watches have built-in memory, negating the need for a separate card.
Ensure your spy watch is turned on and Bluetooth is enabled. From your smartphone or computer, search for available Bluetooth devices and select your spy watch, following the on-screen instructions to pair. You may need to enter a pairing code or use a connection app, as outlined in your watch manual.
To start, press and hold the 10 o'clock button until the red LED light flashes and then stops flashing, indicating that your watch is now recording. To stop the recording, press and hold the 10 o'clock button again, and the red LED light will blink a few times to indicate that the recording is being saved.


