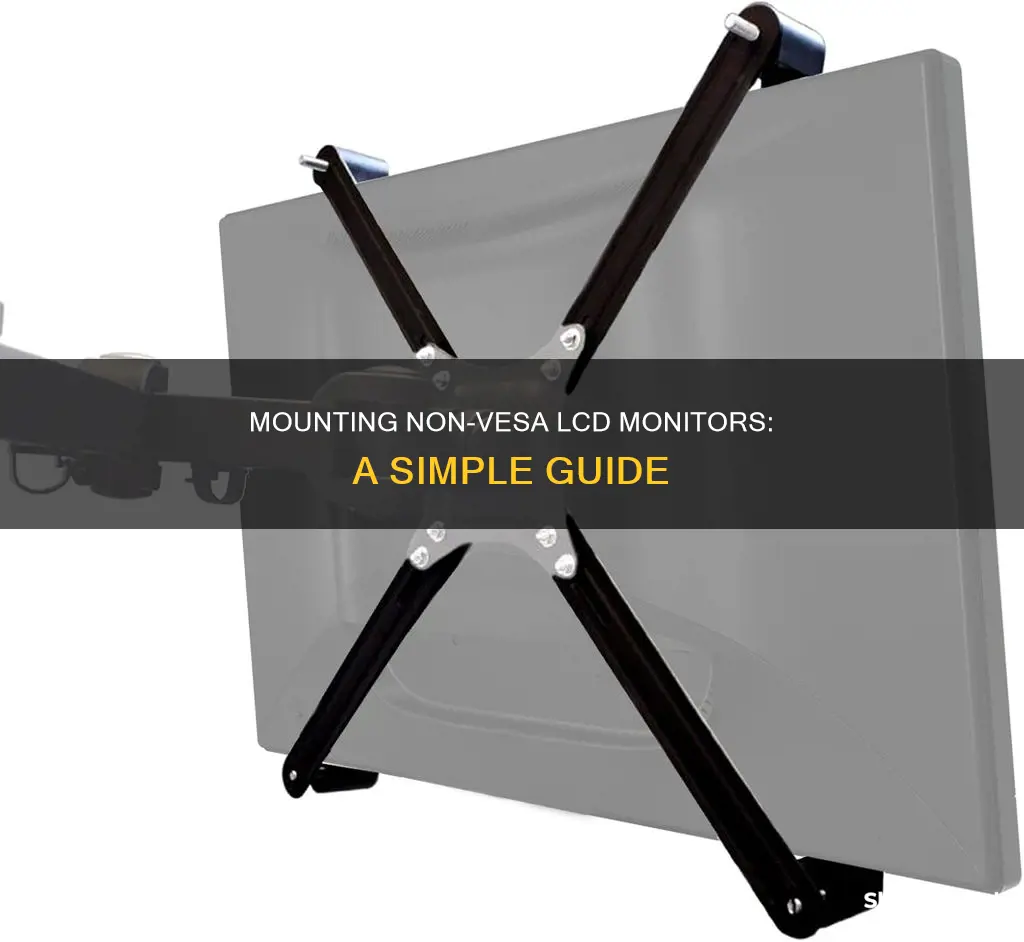
If you want to mount a non-VESA monitor, you'll need to use a VESA adapter. These are brackets that attach to your monitor and come with mountable VESA holes. You can find these adapters online, and they're usually made from high-grade steel or heavy-duty plastic. The process of mounting a non-VESA monitor involves disassembling the monitor, sliding in a mock-VESA plate, and then putting it back together. This requires some tools, like a hacksaw, a drill, and glue. You'll also need to remove the factory stand, as it can get in the way of the adapter. While it's possible to mount a non-VESA monitor, there are some drawbacks, such as the visibility of the adapter and the complexity of the process.
| Characteristics | Values |
|---|---|
| Tools required | Hacksaw, drill, vice or clamp, general-purpose glue, DIY bracket sheet, nut and bolt kits |
| Steps | 1. Disassemble the monitor, 2. Make the VESA bracket, 3. Fit the VESA bracket, 4. Put the LCD back together and attach it to the VESA arm |
| VESA adapter kits | EZM VESA Mount Bracket Adapter Kit, NOBER VESA Mount Adapter Bracket Kit, ACELUXE Universal VESA Mount Bracket Adapter Kit, MOUNTUP Dual VESA Monitor Mount Adapters |
What You'll Learn

Disassembling the monitor
To disassemble a non-VESA LCD monitor, you will need to take it apart, insert a mock-VESA plate, and put it back together. This process will vary depending on the model of your monitor, so it is recommended to search for a disassembly guide specific to your monitor. However, here is a general step-by-step guide on how to disassemble a non-VESA LCD monitor:
Place the monitor on a soft, flat surface: Ensure that the monitor is placed on a soft, flat surface with enough room to work. Disconnect the power cable and any peripherals connected to the monitor.
Remove the base and stand: The first step is to remove the monitor's base and stand. On some models, the stand is screwed into the base, while on others, it snaps into place with plastic tabs. Use the appropriate tool for your model.
Remove screws: Next, remove all the case screws fastening the back panel to the front panel. These screws are typically located around the perimeter and in the middle of the back panel. Once all the screws are removed, lift the back panel off gently to expose the internal components.
Disconnect components: At this point, you will need to disconnect various components, such as the shield lamp and the LVDS cable. You may need to use a flat-head screwdriver to pry up tabs and gently pull on cables to remove them from their sockets.
Remove the LCD panel: After disconnecting the necessary components, you should be able to lift the LCD panel away from the frame. Be extremely careful when handling the LCD panel, as it is fragile and sensitive.
Bezel removal: To remove the bezel, start by making sure all cables are unplugged and put aside. On some monitors, the bezel can simply be pulled out, while others may require screws or the disengagement of plastic clips. Use a sharp object, like a screwdriver, to carefully pry the bezel apart at the join. Once you can get your fingers between the bezel and the monitor, carefully remove the rest of the bezel, being cautious around buttons or control cables.
Inserting a mock-VESA plate: At this stage, you can insert a mock-VESA plate. Ensure that the plate fits snugly against the rear of the monitor's plastic cover. You may need to remove any protruding plastics or use glue to secure the plate.
Remember to be cautious throughout the disassembly process, as LCD monitors contain sensitive electronic components. It is also recommended to search for a specific guide or video tutorial for your monitor model to ensure you are taking the correct steps.
Choosing the Right Monitor Size for Security Cameras
You may want to see also

Using a VESA adapter
Step 1: Choose the Right VESA Adapter
First, you need to select an adapter that is compatible with your monitor. Consider the weight, screen size, and thickness of your monitor. There are different types of VESA adapters available, such as budget-friendly options or low-visibility adapters. You can also find monitor-specific VESA adapters designed for certain brands like Acer, Dell, and MSI Optix.
Step 2: Prepare Your Monitor
Before attaching the VESA adapter, you may need to remove the factory stand from your monitor. This might require disassembling the back panel to access the stand removal screws. Removing the factory stand is important as it can get in the way of the adapter and may not be aesthetically pleasing.
Step 3: Attach the VESA Adapter
Now, you can attach the VESA adapter to your monitor. Follow the instructions provided with your specific adapter, as the steps may vary depending on its design. Typically, the adapter will attach to the existing mounting holes or slots on your monitor. Ensure that the adapter is securely attached before proceeding to the next step.
Step 4: Mount Your Monitor
Once the VESA adapter is in place, you can now mount your monitor onto a VESA-compatible stand, arm, or wall mount. Follow the instructions provided with your chosen mounting hardware to securely attach your monitor. Make sure to consider the weight and size of your monitor to ensure the mounting hardware can support it.
Step 5: Adjust and Enjoy
With your monitor successfully mounted, you can now adjust the height, tilt, and swivel to achieve your desired viewing angle and ergonomic position. VESA adapters often offer adjustable positioning options, so you can customize your setup to maximize comfort and productivity.
Monitoring Sub-Panel Electrical Usage: A Step-by-Step Guide
You may want to see also

Removing the factory stand
Disconnect and Prepare
Before beginning the removal process, ensure you have a screwdriver and a soft cloth or towel to protect the monitor's surface. Start by disconnecting all cables from the monitor, including the power cable. Then, turn off the monitor and place it face down on a soft surface to protect the screen.
Remove the Base
The base is the part of the stand that provides stability and can be shaped like a circle or rectangle. To remove it, invert the monitor and look for a screw that holds it in place. Some monitors may have a hook that you need to rotate anti-clockwise to remove the screw. Once the screw is removed, gently lift the base plate away from the monitor.
Remove the Vertical Stand
The vertical stand is the part that stays upright and connects to the base. Check for any connection points or screws holding the vertical stand in place. If there are screws, remove them, and then gently pull the stand away from the monitor. Be careful not to hold the monitor by its screen; hold it firmly by the sides instead. Some monitors, like Dell and Acer, may have a dedicated button that you need to press to remove the vertical stand. If the stand does not come out easily, a small amount of mechanical oil can be applied to the joints to help loosen it.
Remove the Vertical Stand Holder (if present)
Some monitors may have an additional component called the vertical stand holder, which connects the vertical stand to the monitor. To remove this, you may need to remove the back panel of the monitor. Since this component is connected from the inside, it is recommended to refer to the user manual or seek assistance from a local electronic repair shop if you are unsure about disassembling the monitor.
In summary, removing the factory stand from an LCD monitor involves disconnecting cables, unscrewing components, and gently pulling apart the various stand pieces. Always handle your monitor with care and refer to specific instructions for your monitor model when available.
Monitoring Internet Usage: Tracking Activity by IP Addresses
You may want to see also

DIY bracket sheet
To create a DIY bracket sheet to mount a non-VESA LCD monitor, you will need the following tools and materials:
- Hacksaw or another metal-cutting tool (e.g., angle grinder, metal bandsaw, or Dremel)
- Drill with 3/4/5mm drill bits
- Vice or clamp for cutting
- General-purpose glue
- DIY bracket sheet (100mm x 600mm) from your local hardware store, also known as metal lattice, sheet metal grid, or custom bracket sheeting. Alternatively, you can use sheet steel and drill your own holes.
- Nut and bolt kits (assorted sizes)
- Insulation tape (e.g., duct tape)
Step 1: Monitor Disassembly
Ensure all cables are unplugged and set aside. Remove the base of the monitor. Some bases can be simply pulled out, while others may be clipped in or require screws to be removed. Disengage any plastic clips holding the monitor together and carefully pry the monitor bezel apart using a sharp object like a screwdriver. Be careful not to damage the soft plastic. Remove the back cover of the monitor and set the LCD panel aside in a safe place.
Step 2: Making the VESA Bracket
Acquire a DIY bracket sheet (metal lattice/grid) that aligns with at least two holes of your VESA plate on the monitor stand. Secure these holes with nuts and bolts, and use a permanent marker to mark the additional holes that need to be drilled. Cut the bracket as needed, ensuring you blow off any metal shavings to prevent them from getting near the monitor's electronics.
Step 3: Fitting Your VESA Bracket
Remove any protruding plastics from the monitor's back cover to ensure the bracket sits flat against it. Use pliers to pull away any obstructions. You can use glue to attach the bracket to the inside of the back cover, positioning it level and central. Once the glue dries, drill holes through the plastic that align with the drilled holes in your DIY VESA plate and temporarily secure them with bolts.
Step 4: Insulation and Assembly
Use duct tape or insulation tape to completely cover the plate and screws. Ensure no pieces of metal are visible or exposed. This will hold the screws in place and insulate the metal bracket from the monitor's electronics. Gently place the LCD panel back into the front bezel of the monitor, carefully reconnecting any cables. Attach the back of the LCD, which is still separated, to the VESA arm by inserting the arm through the screws. Tighten it with the appropriate-sized nuts. Finally, place the plastic backing over the LCD and gently apply pressure to snap it back into place.
Monitoring Verizon Data Usage on Your Galaxy S7
You may want to see also

Attaching the LCD to the arm
Now that you have your VESA adapter bracket kit, you can attach your LCD monitor to the arm. This process will differ slightly depending on the specific adapter kit you purchased, but the general steps will be as follows:
- Decide on the exact placement of the adapter arms on your monitor. You will want to ensure that the arms do not block any buttons, connectors, or ports on your monitor.
- Assemble the adapter arms and brackets according to the instructions provided with your kit. This may involve attaching the arms to a separate square plate that will then be mounted to the arm, or attaching the arms directly to the arm itself.
- Attach the adapter arms to your monitor. This typically involves sliding the arms under the front edge of the screen and securing them in place with screws.
- Connect your monitor to the arm by lining up the holes in the adapter plate with the holes in the arm and securing them with screws.
- Make any necessary adjustments to ensure that your monitor is secure and level.
It is important to follow the specific instructions provided with your adapter kit to ensure a safe and secure installation. Once you have attached your LCD monitor to the arm, you can enjoy the flexibility and convenience of your new mounting setup.
Asus Monitor Drivers: A Comprehensive Guide for Users
You may want to see also
Frequently asked questions
You will need to use a VESA adapter. These are brackets that mount to other features of your monitor and come with mountable VESA holes.
'VESA Mount' is the name of the standard defining the screw pattern on the back of monitors. It has screws spaced out in a square pattern. For monitors, this is usually 75x75mm or 100x100mm.
Here are some VESA adapters that are compatible with non-VESA monitors:
- EZM VESA Mount Bracket Adapter Kit
- ACELUXE Universal VESA Mount Bracket Adapter Kit
- Pholiten VESA Mount Bracket Adapter Monitor Arm Mounting Kit


