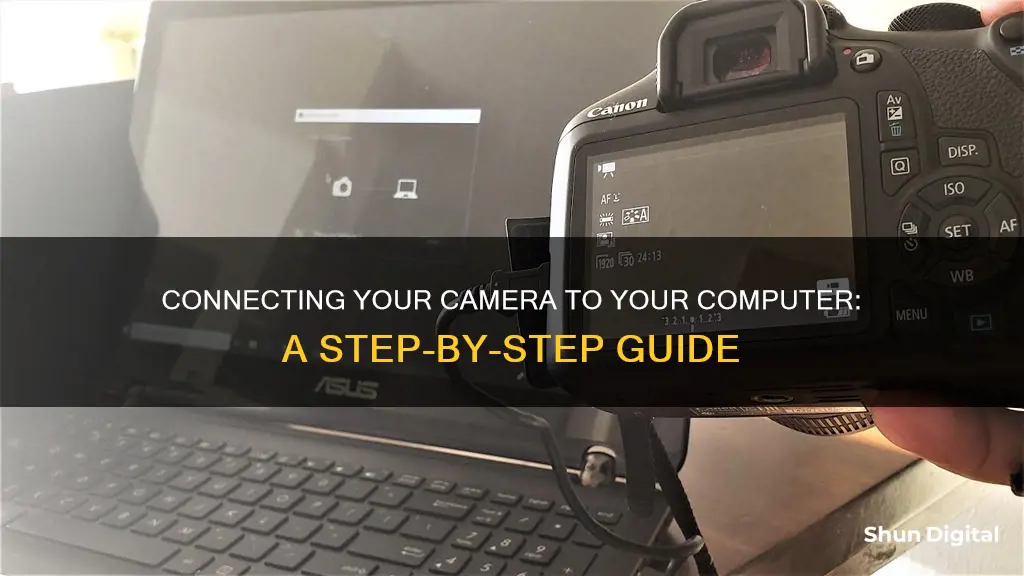
Connecting your camera to your computer is a straightforward process that can be done in a few simple steps. This process is useful for transferring photos, editing videos, or even using your camera as a webcam. The first step is to check that your camera and computer have compatible ports, with most digital cameras and computers today using USB ports for connection. Once you have the right ports and cables, simply plug one end of the cable into your camera and the other into your computer. Ensure your camera is turned on and set to the correct mode, such as Play mode, so that your computer can recognise it. Your computer should then automatically detect your camera and install the necessary drivers. You may then be prompted with a pop-up window that asks you what you would like to do with your camera, such as importing photos, opening a folder, or launching specific software.
| Characteristics | Values |
|---|---|
| Connection type | USB cable |
| Cable shape | Rectangular USB end, smaller camera end |
| Cable function | Transfers data, charges camera |
| Software | Windows Live Movie Maker, Windows Photos app, Mac Photos app, Windows Movie Maker, iMovie, SparkoCam, Camera Live |
| Camera mode | Playback, PC, Webcam |
What You'll Learn
![]()
Check your camera and computer ports
To connect your camera to your computer, you will need to use a USB cable. Before you begin, ensure that your camera came with a USB cable and that it is compatible with your computer. Most point-and-shoot cameras use mini-USB connectors, so check that your USB cable has the correct connector. If you cannot find the USB cable that came with your camera, you may need to purchase a new one.
Once you have the correct USB cable, you will need to locate the USB slot on your camera. This can sometimes be tricky, as camera manufacturers sometimes hide the slot behind a panel or door, which is usually designed to blend in with the camera's overall design. Many cameras have a USB logo on them, which can help you locate the slot. The USB slot may also be found in the same compartment as the battery and memory card, so be sure to check the sides and bottom of your camera. If you are still unable to locate the USB slot, consult your camera's user guide.
After you have located the USB slot on your camera, connect the USB cable. Ensure that the connector is aligned correctly with the slot. Forcing the connector into the slot the wrong way can damage the cable and the camera. Make sure that any panel or door hiding the USB slot is completely out of the way, as you could pinch it between the cable and the slot, preventing the connector from inserting fully. Additionally, check that you are inserting the cable into the USB slot and not another slot, such as an HDMI slot, which may be located behind the same panel.
With your camera connected, you can now plug the other end of the USB cable into your computer. The USB end of the cable is rectangular and should fit into a USB port on your computer's side or CPU for desktop units. Ensure that the hollow side of the USB end is facing up.
Smoke Detector Camera Batteries: How Long Do They Really Last?
You may want to see also
![]()
Connect your camera and computer with a cable
Connecting your camera to your computer is a great way to transfer photos and videos. To connect your camera and computer with a cable, follow these steps:
Firstly, check that your camera and computer have compatible ports. Most digital cameras have a USB port, while some may also have an HDMI or mini-HDMI port. Your computer may need a USB-A, USB-C, or HDMI port to connect to your camera. If you don't have matching ports, you may need an adapter or a cable that can convert the signals.
Once you have the correct ports and cables, ensure your camera is turned off and your computer is on. Plug one end of the cable into your camera, and the other end into your computer. Now, turn on your camera and switch it to the appropriate mode. This could be a playback, PC, or webcam mode, depending on your camera model.
Your computer should then automatically detect your camera and install the necessary drivers. You may see a pop-up window asking what you want to do with your camera. You can choose to import photos, open a folder, or launch specific software.
If you are having issues with this process, ensure your cable is securely plugged in, your camera is on and in the right mode, and your computer has the latest drivers and updates.
Connecting your camera and computer with a cable is a straightforward process that will allow you to easily transfer and manage your photos and videos.
Focusing on Infinity: Landscape Photography Camera Techniques
You may want to see also
![]()
Use a software to access your camera
To use a software to access your camera, you can follow these steps:
Firstly, ensure that your camera is turned on and connected to your computer via a USB cable. The small end of the cable plugs into your camera, while the rectangular USB end plugs into a port on your computer. You may need to purchase a specific USB cable for your camera model.
Next, open up the software you wish to use to access your camera. This could be the software that came bundled with your camera or a third-party application. If you're using Windows, you can also use the built-in Camera app.
Once the software is open, you may need to grant it permission to access your camera. This can usually be done through the settings menu of the software.
With the software open and permissions granted, you should now be able to use your camera. The specific controls and features available will depend on the software you are using.
If you encounter any issues, you can try updating your camera drivers. This can be done through the Device Manager in Windows.
The 1970 Cameros: A Comprehensive Production Overview
You may want to see also
![]()
Troubleshooting common issues
If you're having trouble connecting your camera to your computer, there are several things you can try.
Firstly, check that you have the correct USB cable and that it is connected properly at both ends. The small end of the cable connects to your camera, and the rectangular USB end connects to a port on your computer. Ensure that the hollow side of the USB is facing upwards when you insert it.
If your camera is not being recognised by your computer, try connecting it to a different USB terminal. You can also try deleting the camera information using the Device Manager. To do this, go to File Explorer, right-click on 'This PC', click on 'Properties', then 'Device Manager', and 'Portal Devices'. Select your camera name and delete the information. Then, click on 'Scan for hardware changes'.
If you are still having issues, check your camera's privacy settings and ensure that your apps have permission to access the camera. On Windows 10, go to 'Settings', 'Privacy & Security' or 'Privacy', and then 'Camera'. Make sure 'Camera access for this device' is turned on. You can then choose which apps should have access to your camera.
If your camera still isn't working, try updating the camera driver. Go to 'Device Manager', expand 'Imaging devices', 'Cameras', or 'Sound, video, and game controllers'. Right-click on your camera and select 'Update driver'.
If you are still experiencing problems, try restarting your computer and your camera.
Unlocking Camera Raw: Load Your Presets Like a Pro
You may want to see also
![]()
Enjoy your camera and computer connection
Now that you have successfully connected your camera to your computer, you can explore the many benefits of this connection. Here are some ways to enjoy your camera and computer connection:
Transfer and Manage Photos
One of the primary advantages of connecting your camera to your computer is the ability to transfer photos from your camera to your computer for safekeeping. This frees up memory space on your camera, allowing you to capture more memories. You can use the built-in Windows Photos app or the Mac Photos app to import and organise your photos. Additionally, you can view, edit, and delete photos directly from your computer, making it easier to manage your photo collection.
Edit Videos
If you're into videography, connecting your camera to your computer opens up video editing possibilities. You can use video editing software like Windows Movie Maker or iMovie to edit your footage and create captivating videos. This connection allows you to enhance your videos and add a professional touch to your creations.
Use Your Camera as a Webcam
With the right software, you can even use your camera as a webcam for live streaming, video conferencing, or online teaching. This is especially useful if you're looking for better video quality than what your built-in webcam offers. Software like SparkoCam or Camera Live can help you turn your camera into a virtual webcam, elevating your online presence.
Back Up Your Photos and Videos
Don't forget the importance of backing up your photos and videos. Once you've transferred your media to your computer, make sure to create backup copies on external hard drives or cloud storage services. That way, even if something happens to your camera or computer, your precious memories will be safe and easily accessible.
Enhance Creativity and Communication
The connection between your camera and computer empowers you to express your creativity and communicate your stories to the world. Whether you're a photographer, videographer, or live streamer, this connection enables you to share your unique perspective with others. It also allows you to connect with like-minded individuals and build a community around your passions.
By following the steps to connect your camera to your computer, you've unlocked a world of possibilities. Enjoy exploring the creative and communicative potential of this connection!
The Evolution of Camera Materials: Past, Present, Future
You may want to see also
Frequently asked questions
You will need a USB cable to connect your camera to your computer. The small end of the cable plugs into your camera, and the rectangular end plugs into your computer.
Most digital cameras have a USB port that can be used to connect to a computer. Check that your camera and computer have compatible ports before attempting to connect them. If you don't have matching ports, you may need to use an adapter or a cable that can convert the signals.
If your computer doesn't recognise your camera, make sure that your cable is securely plugged in, your camera is on and in the right mode, and your computer has the latest drivers and updates. You may also need to install the camera's software using the CD that came with your camera or by downloading it from the manufacturer's website.