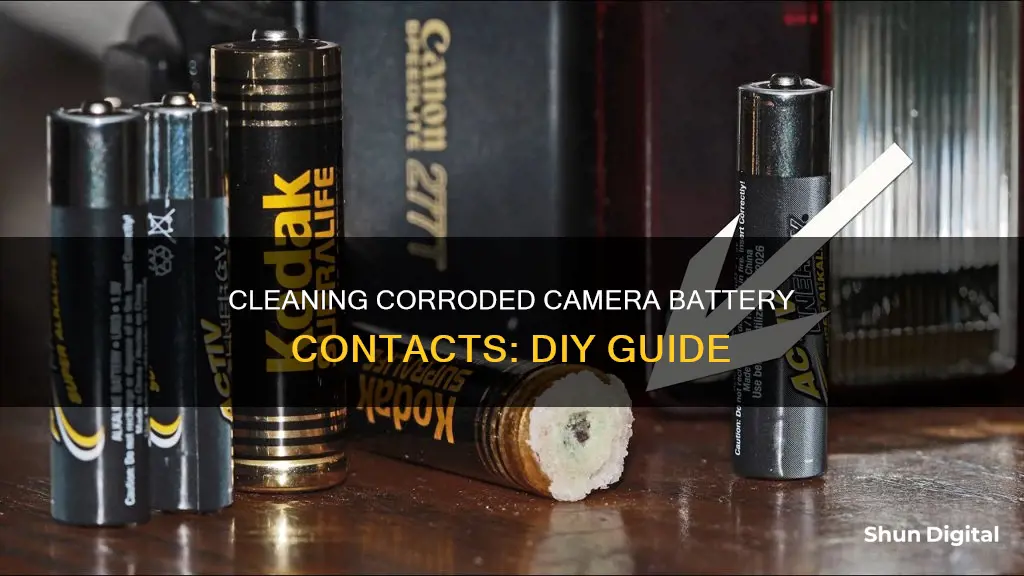
If you've ever pulled out a camera that's been sitting unused for a while, you may have noticed a white, crusty residue on the battery and its compartment. This is caused by battery corrosion, which occurs when batteries are left in a device for a long time and slowly discharge, causing a build-up of gas to leak out in the form of battery acid. While this may seem like the end for your device, it is possible to clean the corrosion and get your camera working again. In this article, we will discuss the steps you can take to clean corroded camera battery contacts and restore your device to its former glory.
| Characteristics | Values |
|---|---|
| Protective gear | Gloves, safety glasses |
| Tools | Cotton swabs, old toothbrush, pencil eraser, microfiber cloth, small flathead screwdriver, toothpick, fine-grit sandpaper, emery board, compressed gas |
| Liquids | White vinegar, lemon juice, isopropyl alcohol, baking soda |
| Procedure | Remove and dispose of corroded batteries, clean corrosion on the battery compartment and contacts, wash surfaces with alcohol, dry |
What You'll Learn

Wear gloves and eye protection
When cleaning corroded camera battery contacts, it is important to prioritize your safety by wearing gloves and eye protection. This is because the process of cleaning corroded contacts involves the use of chemicals that can be harmful to your skin and eyes. By wearing gloves, you create a protective barrier between your skin and the corrosive materials, preventing any potential irritation or chemical burns. Gloves also help prevent the spread of infection and contamination, which is crucial when dealing with hazardous substances.
The type of gloves you choose is important and should be based on the specific hazards involved in the cleaning process. Nitrile gloves, for example, offer protection against most chemicals and infectious agents, while rubber gloves provide a defence against mild corrosive material. If you are working with solvents, oils, or mild corrosive materials, neoprene gloves are a suitable option. It is recommended to avoid latex gloves, as many people are allergic to this material or can develop allergies with prolonged exposure.
In addition to gloves, wearing eye protection is crucial when cleaning corroded contacts. Safety goggles or glasses will safeguard your eyes from any corrosive substances and flying debris during the cleaning process. This protective gear will create a physical barrier to prevent chemicals from splashing into your eyes, reducing the risk of eye damage or irritation.
By taking these precautions and wearing the appropriate protective equipment, you can help ensure your safety while cleaning corroded camera battery contacts. It is also advisable to work in a well-ventilated area or use a respirator to avoid inhaling any harmful fumes or vapors that may be released during the cleaning process.
GH5 Camera Battery Life: How Long Does It Last?
You may want to see also

Remove and dispose of corroded batteries
Removing and disposing of corroded batteries is a careful process that requires attention to safety. Corroded batteries are considered damaged and hazardous to the public and the environment. Here is a step-by-step guide to safely removing and disposing of corroded batteries:
Wear Protective Gear: Put on protective gloves, such as rubber or latex gloves, to avoid skin contact with the corrosive material. Additionally, wear safety goggles or other eye protection to shield your eyes from any flying debris or chemicals.
Choose a Well-Ventilated Area: Corroded batteries may release fumes, so it is essential to perform the removal process in a well-ventilated area to avoid inhaling harmful substances.
Power Off the Device: Before removing the batteries, ensure that the device is powered off. This step is crucial for safety and to prevent any accidental activation during the process.
Remove the Corroded Batteries: Gently take out the corroded batteries from the device, being careful not to touch the corrosive material with your bare skin. Place the batteries in a plastic bag or another disposable container to isolate them and prevent further contamination.
Clean the Device: Use a cotton swab or a soft brush to remove any visible corrosion debris from the device. You can dampen the swab or brush with distilled vinegar or lemon juice to help neutralize and dissolve the corrosion. Gently scrub the affected areas until most of the corrosion is removed.
Neutralize Remaining Corrosion: To neutralize any remaining corrosion, mix a small amount of water with baking soda to form a paste. Apply this paste to the affected areas using a cotton swab or a soft cloth. This mixture will help neutralize and remove any stubborn corrosion.
Dry the Device: Once you have finished cleaning, use a damp cotton swab or a cloth to wipe away any residual baking soda or cleaning solution. Ensure that you dry the device thoroughly, especially the internal components, such as the battery compartment, before replacing the batteries. Leave the device open in a dry, well-ventilated area to ensure complete drying.
Dispose of Corroded Batteries Properly: Corroded batteries should not be thrown into regular trash bins. Instead, place the batteries in a plastic bag and seal it securely. Contact your local waste management authority or recycling facility to inquire about hazardous waste disposal or battery recycling programs. Some organizations, like Call2Recycle, offer specialized recycling services for damaged batteries.
By following these steps, you can safely remove and dispose of corroded batteries while minimizing any potential risks to your health and the environment. Remember always to handle corroded batteries with care and take the necessary precautions to protect yourself and your surroundings.
Charging the Wyze Outdoor Camera: How Long Does It Take?
You may want to see also

Clean with vinegar or lemon juice
To clean corroded camera battery contacts with vinegar or lemon juice, you can follow these steps:
Firstly, it is important to protect yourself and your workspace. Spread newspaper over your work surface and put on protective gear, specifically gloves and safety glasses. The chemicals inside batteries can burn your skin and you want to avoid getting them on your skin or in your eyes.
Next, remove the corroded batteries from the battery compartment and dispose of them. Check with your local sanitation department to find out how to dispose of batteries properly.
Now it's time to clean the corrosion from the battery compartment and contacts. Using a cotton swab, gently dab a little vinegar or lemon juice on the corroded area. Wait a minute or two, and then wipe away the crystalline corrosion from the battery contacts and other areas in the battery compartment where it may have spread. For stubborn spots, try scrubbing with a toothbrush. Scrape off any lingering residue with a toothpick. For heavier corrosion, you can try using fine sandpaper, an emery board, or a small flathead screwdriver, but be gentle.
Finally, wash the surfaces with rubbing alcohol and then dry them. Dip a fresh swab into some rubbing alcohol and clean off any residue on the contacts or in the battery compartment. A pencil eraser can be used to polish the surfaces. Dry the contacts and battery compartment with a microfiber cloth and blow away any fibres. Use compressed gas for hard-to-dislodge debris. Let everything dry completely before installing fresh batteries and powering up your camera.
Alternative Ways to Charge Your GH2 Camera
You may want to see also

Dry the battery compartment
After cleaning the corrosion, it's important to dry the battery compartment thoroughly before replacing the batteries. Here are some detailed steps to ensure the compartment is completely dry:
First, use a dry cotton swab or a microfiber cloth to remove any remaining moisture from the compartment. Make sure to wipe down all the surfaces, including the contacts and any crevices where moisture might be trapped. It's important to be gentle during this process to avoid damaging any sensitive components.
Next, leave the battery compartment open and allow it to air-dry completely. This step is crucial, as any remaining moisture can cause further corrosion or damage to the device. Depending on the climate and humidity, it may take several hours or even a full day for the compartment to dry completely. Be patient and don't rush this step.
Once the compartment feels dry to the touch, use a canister of compressed gas, specifically designed for cleaning electronics, to blow away any remaining debris or moisture. This step will help remove any pesky fibres or residue that may be left behind. Gently blow the gas into the compartment, taking care not to angle it too closely to any sensitive components.
After using the compressed gas, let the compartment sit open for a few more minutes to ensure that any residual moisture has evaporated. You can also use a hairdryer on a cool setting to speed up the drying process, but be careful not to overheat the compartment or blow dust into the device.
Finally, before replacing the batteries, give the compartment a final inspection to ensure that it is completely dry and free of any debris or residue. Use a flashlight to look for any signs of moisture or leftover corrosion. If the compartment is not fully dry, repeat the previous steps as necessary until it is completely moisture-free.
GoPro Camera Battery Life: How Long Does It Last?
You may want to see also

Insert new batteries
Once you have cleaned the corroded contacts of your camera, you can insert new batteries. Here is a step-by-step guide:
First, make sure you have the correct type of batteries for your camera. Check the camera manufacturer's instructions or the battery compartment to identify the required battery type and size. It is important to use the correct batteries to avoid damaging your camera.
Next, remove the camera from its mount or housing, if applicable. This will give you access to the battery compartment. If your camera has a battery compartment cover, open it carefully. Some covers may slide or twist open, while others may have a locking mechanism that needs to be released.
Now, carefully insert the new batteries into the compartment. Ensure that the batteries are aligned correctly according to the polarity markings. Most battery compartments will have markings or indicators to show which way the batteries should be inserted. Check that the positive (+) and negative (-) ends of the batteries match the corresponding symbols in the compartment.
After inserting the batteries, securely close the battery compartment cover. Make sure it is locked or fastened correctly to prevent it from accidentally opening.
Finally, remount your camera if necessary, and test it to ensure it is functioning properly.
It is important to note that you should always handle batteries with care and dispose of old batteries responsibly. Additionally, it is recommended to replace all batteries in the camera at the same time to ensure optimal performance.
Testing Camera Battery Chargers: A Step-by-Step Guide
You may want to see also
Frequently asked questions
It is important to protect your skin and eyes from any harmful substances when cleaning corroded battery contacts. Wear gloves and safety goggles, and cover your work surface with newspaper, disposable cloths, or paper towels.
Distilled white vinegar, lemon juice, cotton swabs, old toothbrushes, baking soda, and pencil erasers can all be used to clean corroded camera battery contacts.
First, put on protective gloves and goggles. Remove the batteries from the camera and dispose of them properly. Next, dip a cotton swab or toothbrush into distilled white vinegar or lemon juice and scrub the corroded areas of the battery case. Use a paper towel to dry the battery case and contacts, and polish the contacts with a pencil eraser if necessary. Finally, insert new batteries into the camera.


