Focusing a high-power microscope camera is a straightforward process, but it requires careful attention to detail. The first step is to ensure the microscope is set up correctly, with the light turned on and the lowest magnification selected. The slide should be placed on the stage, centred under the objective, and secured with clips. The coarse focus knob is then adjusted until the object comes into view, followed by the fine focus knob for a sharper image. The stage can be moved up, down, left, and right for further adjustments. To increase magnification, the nosepiece is rotated clockwise, and the focus is adjusted again. This process is repeated for each magnification level, ensuring each objective lens is focused before moving to the next.
| Characteristics | Values |
|---|---|
| Magnification range | 40X-1600X |
| Eyepieces | WF10X and WF16X |
| Objectives | 4X, 10X, 40X (spring), 100X (oil, spring) |
| Stage dimensions | 4-3/8" x 4-3/4" (110x120mm) |
| Camera sensor | 1/4" Aptina CMOS (colour) |
| Magnification | 40X |
| Reduction lens | 0.37x |
| Frame rate | 30@640x480, 80@320x240 |
| Camera compatibility | Windows (32/64 bit) XP/Vista/7/8/10, Mac OSX, Linux |
| Stage type | Single-layer with clips |
What You'll Learn
![]()
Set up the microscope on a flat, well-lit surface
Setting up a microscope requires a careful and detailed approach. Here is a step-by-step guide to placing your microscope on a flat, well-lit surface:
Firstly, ensure you have a clean, undisturbed environment, free from debris and potential hazards. A laboratory table or workbench is ideal. Clear a space, wipe the surface with a cleaner, and dry it with a clean cloth. This step is crucial as you are working with a delicate instrument.
Now, carefully lift the microscope, supporting its weight by holding both the arm and the base. Place the microscope on the prepared surface, taking care not to drop or slam it down.
If your microscope has an electric illuminator, plug it into a power source and turn it on. Adjust the light intensity if necessary. If your microscope uses a mirror, carefully turn it to reflect the light onto the diaphragm.
At this point, you should rotate the nosepiece to select the lowest power objective lens, usually the shortest lens. This will ensure you have sufficient space to mount your specimen slide.
The next step is to mount the slide. Place the slide in front of the raised end of the clip and push it inwards, ensuring the specimen is directly under the objective lens and illuminated from below. Use any adjustment screws to precisely position the slide.
Finally, adjust the light amount by controlling the diaphragm until you achieve a comfortable brightness level for your eye.
Now, your microscope is ready to use, and you can proceed with further focusing adjustments.
Unleash Special Effects: Camera Raw Power
You may want to see also
![]()
Adjust the nosepiece to the lowest magnification
To adjust the nosepiece to the lowest magnification, follow these steps:
First, make sure that the microscope is properly set up and placed on a stable surface. Ensure that the light source is turned on.
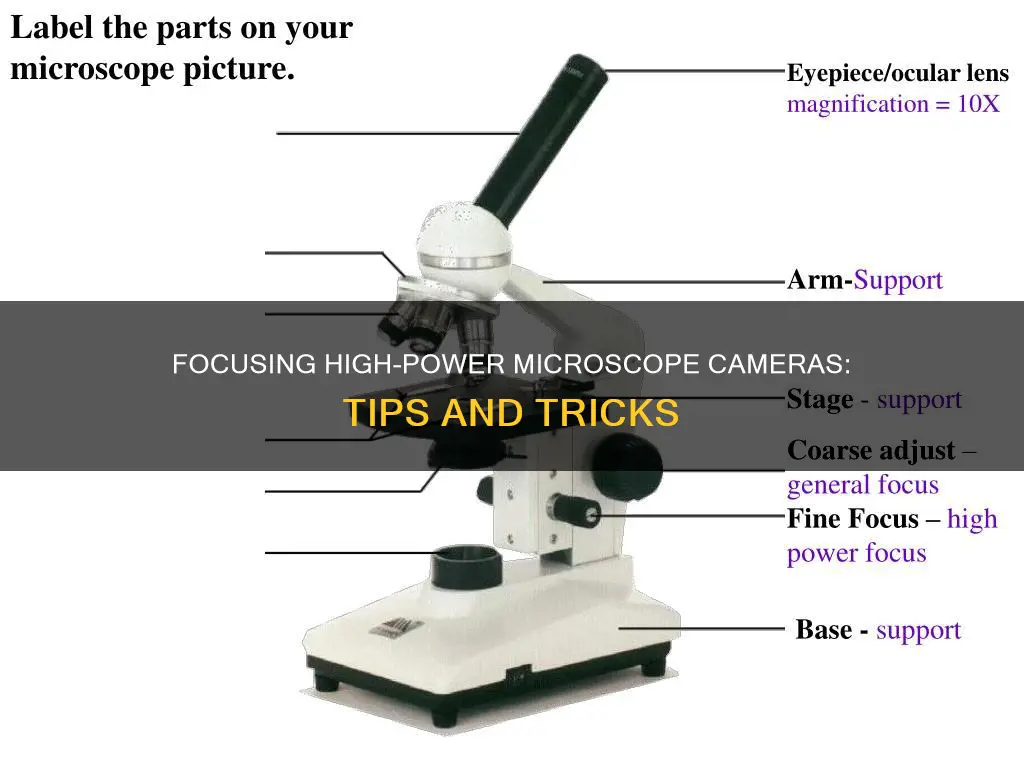
Locate the nosepiece, which is typically situated between the ocular lens (eyepiece) and the stage of the microscope. It is usually attached to the lower portion of the microscope's arm, near the base. The nosepiece is circular and holds three to five cone-shaped lenses.
Rotate the nosepiece so that the lowest power objective lens (usually 4X or 5X) is directly above the stage and aligned with the light source. Listen for an audible click to ensure that the lens is locked into place.
Place the slide with the specimen on the stage and secure it using the stage clips. Ensure that the slide is positioned correctly, with the specimen directly over the circle of light.
Look through the eyepiece and use the coarse focus knob to lower the objective lens towards the slide without touching it. Then, slowly turn the coarse focus knob in the opposite direction to raise the lens until the specimen comes into focus. Make fine adjustments, if necessary, using the fine focus knob to achieve a clear image.
With the lowest power objective in place, you can now observe the specimen at low magnification. Take note of the overall structures and features of the specimen.
If you need to switch to a higher magnification, gently rotate the nosepiece in either direction until the desired objective lens is positioned above the stage and aligned with the light source. Remember to refocus if needed, as changing the objective lens may slightly alter the focus.
By adjusting the nosepiece to the lowest magnification, you can start your observation with a broader view of the specimen and then gradually increase the magnification for more detailed examinations.
Wide Camera Mode: Is it Available on the Samsung Note 9?
You may want to see also
![]()
Place the slide on the stage, centring the object under the objective
To centre the object under the objective, place the slide on the stage with the specimen directly over the circle of light. This will give you a 90% chance of finding the specimen as soon as you look through the eyepiece.
If your microscope is monocular, close or cover your other eye for accuracy and comfort when viewing. If your microscope is binocular, adjust the interpupillary distance by sliding or rotating the eyepieces until you can see only one circle of light with both eyes open.
If you wear glasses, take them off. If you see only your eyelashes, move closer. If your microscope comes with high-eye point eyepieces, you do not need to take off your glasses.
If you are on the lowest magnification level, focus the image by turning the coarse focus knob. If you can’t get it into focus using the coarse knob, switch to the fine focus knob.
Adjust the diaphragm as you look through the eyepiece. You will begin to notice that more detail is visible when you allow in less light. Too much light will tend to give the specimen a washed-out appearance.
Once you have focused the specimen on low power, centre the specimen in your field of view. Then, without changing the focus knobs, switch to a higher magnification objective. If you don’t centre the specimen, you will lose it when you switch to higher powers.
Once you have it on a higher power magnification, only use the fine focus knob to bring the image into focus. This will prevent you from scratching the lens and cracking the slide.
Understanding Shutter Priority Mode: Creative Control for Photographers
You may want to see also
![]()
Adjust the coarse focus knob for optimum clarity
The coarse focus knob is an essential component of a microscope, enabling users to achieve initial focusing and bring the specimen into view. It is typically located on the side of the microscope, above the base, and is the larger of the two knobs. Turning the coarse focus knob moves the stage, or platform, on which the slides and samples sit, either up or down. This rapid movement allows for quick adjustments, ensuring the specimen is roughly in focus before utilising the fine focus knob for more precise alterations.
The coarse focus knob facilitates large adjustments, moving the objective lens closer to or further away from the specimen. It is important to note that the coarse focus knob should be used cautiously, especially when working with high magnification objectives. While it is suitable for lower magnification lenses, such as 4x or 10x, it must not be used with high-power objectives of 40x or 100x. The distance between the objective lens and the sample slide at higher magnifications is significantly smaller, and using the coarse control can result in the slide crashing into the lens, causing potential damage to both the slide and the lens.
The coarse focus knob is typically used first when setting up a microscope for observation. It is recommended to lower the knob so that the stage is at its lowest point before adding the slide to the mount. This helps prevent any damage to the lens or slide. With the lowest power objective lens in place, the coarse focus knob can then be slowly turned to bring the specimen into focus.
Once the specimen is roughly in focus using the coarse adjustment, the fine focus knob can be employed to achieve a more detailed and precise image. The fine focus knob makes smaller, slower, and more controlled movements, allowing for delicate adjustments that enhance the clarity and detail of the specimen.
In summary, the coarse focus knob is a vital tool for initially focusing the microscope and bringing the specimen into view. Its rapid adjustments ensure the specimen is roughly in focus, setting the stage for the fine focus knob to make the final, precise adjustments necessary for optimal clarity and detail.
Understanding Dual File Formats in Photography
You may want to see also
![]()
Fine-tune the focus with the fine focus knob
The fine focus knob is an integral part of a microscope's focusing system. It is used to fine-tune the focus on the specimen and to focus on various parts of the specimen. The fine focus knob is typically located on the microscope's frame and works in tandem with the coarse adjustment knob. While the coarse adjustment knob facilitates initial focusing, the fine focus knob is used to make more subtle adjustments.
To use the fine focus knob effectively, it is important to first achieve a rough focus using the coarse adjustment knob. This ensures that you are in the correct focal range to make precise adjustments. Once the coarse focus is set, you can then use the fine focus knob to make minor adjustments. The fine focus knob moves the objective lens only a fraction of a millimeter, so it is important to make subtle turns. Slowly rotate the knob in the direction that improves the focus, observing the changes through the eyepiece.
When using a binocular microscope, it is recommended to keep both eyes open while adjusting the fine focus knob. This prevents eye strain and allows for accurate monitoring of the changes in focus. Achieving optimal focus may take time, especially with challenging samples, so patience is key.
The fine focus knob is particularly useful when observing small or intricate structures, such as cellular components. It allows for delicate adjustments that reveal finer details that might otherwise be missed. It is also important to use the fine focus knob when working with high-powered objective lenses, as it helps to increase the resolution of the specimen.
In summary, the fine focus knob is a critical component of a microscope, enabling users to make precise adjustments and achieve optimal clarity and detail in their images. By understanding its function and following the recommended techniques, users can unlock the hidden wonders of the microcosm.
Latest Adobe Camera Raw: Unlocking Raw Power
You may want to see also
Frequently asked questions
The first step is to ensure your microscope is set up on a flat, well-lit surface, with the light source switched on.
Start with the lowest magnification (e.g. 4X or 10X) and adjust the coarse focus knob, followed by the fine focus knob.
The slide should be about 1/4" away from the objective lens. Adjust the microscope stage up or down to get the correct distance.
No, when using a high-power objective lens, only use the fine focus knob to avoid damaging the slide or lens.