Dodging and burning are techniques that were traditionally used in darkrooms to either lighten or darken specific areas of a photograph by blocking or directing light. Today, dodging and burning can be done easily in Photoshop, Adobe Camera Raw, or Lightroom. In this article, we will focus specifically on how to dodge and burn in Camera Raw.
| Characteristics | Values |
|---|---|
| Dodging and Burning Technique Origin | Darkroom |
| Purpose | Fix photos, Creative |
| Dodging | Lighten, Brighten |
| Burning | Darken |
| Dodging and Burning Tools | Adjustment Brush, Graduated Filter, Radial Filter |
| Dodging and Burning Tools Effects | Exposure, Texture, Clarity, Temperature, Contrast, Saturation, Sharpness, Dehaze, Noise, Moire, Color, etc. |
What You'll Learn
![]()
Using the Adjustment Brush in Adobe Camera Raw
Dodging and burning are techniques that come from the darkroom. Photographers used to either block light or cup their hand to direct light into certain areas of a photograph, allowing them to underexpose or overexpose different parts of an image.
Today, we can perform the same function in Adobe Camera Raw (ACR). The Adjustment Brush in ACR is possibly the equivalent of the Dodge and Burn tools in Photoshop. The Adjustment Brush allows you to make local adjustments to specific areas of your photo.
To use the Adjustment Brush, first, click on the Adjustment Brush icon. The right panel will change to the Adjustment Brush tab, where you can modify the size of the brush and determine the amount of feather and density (flow) to apply. Then, simply paint with the Adjustment Brush in the area of the image you want to adjust. A pin icon will appear to show where your adjustment has been made.
You can also create local adjustment presets in ACR so that you can quickly reapply an effect. To do this, click on the Camera Raw Settings menu button and select "New Local Correction Setting." Type a name and click OK. Saved presets will appear in the Local Adjustment Settings menu and can be applied to any image opened in ACR.
While the Adjustment Brush can be a bit cumbersome to use, it can definitely speed up your editing workflow with a bit of practice.
Correcting Warping: Camera Raw's Superpower
You may want to see also
![]()
Dodging and Burning With a Purpose
Dodging and burning are two of the oldest creative post-processing techniques in photography. They are local adjustments, meaning they target specific areas of a photo rather than the whole thing equally. Dodging involves brightening parts of a photograph, while burning involves darkening parts of a photograph. These techniques can be used to fix photos or for creative purposes.
In the darkroom, dodging is done by preventing some of the enlarger's light from shining on your light-sensitive paper. You could, for example, attach a piece of cardboard to the end of a thin handle, then hold it over the area where you want to block the light. To burn an area of your print in the darkroom, you would simply allow more light to shine on it. This can be done by using a large sheet of cardboard with a hole in the middle, then positioning it strategically over the area of the image you want to darken.
Today, we can perform the same function in Photoshop, Adobe Camera Raw, or Lightroom. The secret to dodging and burning is that it is not just about increasing or decreasing the exposure in the brush. It requires a little boost in Contrast, Clarity, and even the Whites and Blacks.
When dodging and burning, it is critical that you do so on a new layer. If you dodge and burn the base layer in Photoshop, you won't be able to adjust your changes aside from undoing them entirely. A good method for dodging and burning is to create adjustment layers and mask out the areas you don't want to apply changes to. This is an easy, flexible method that doesn't harm your base layer.
Applying Camera Raw Presets: A Step-by-Step Guide
You may want to see also
![]()
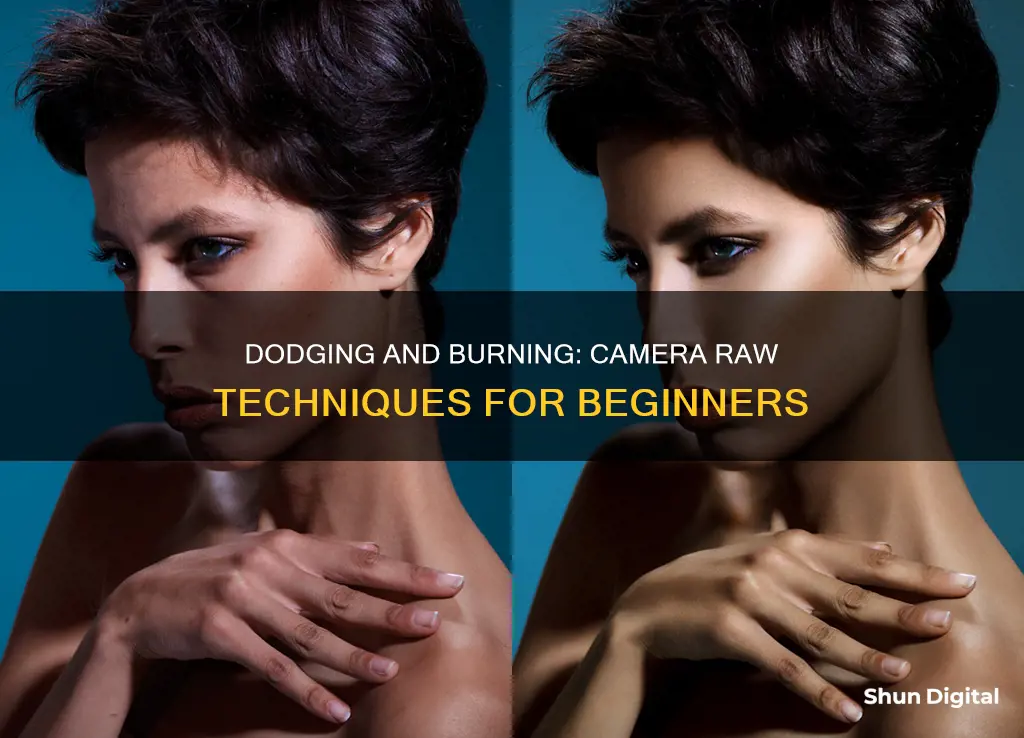
The difference between dodging and burning
Dodging and burning are two of the oldest creative post-processing techniques in photography. They are local adjustments, meaning they target specific areas of a photo rather than the whole thing equally. Dodging is brightening part of a photograph, while burning is darkening part of a photograph. Dodging and burning can be used to fix photos or for purely creative purposes.
In the darkroom, photographers would dodge an image by preventing some of the enlarger's light from shining on the light-sensitive paper. For example, they could attach a piece of cardboard to the end of a thin handle and hold it over the area where they wanted to block the light. To burn an area of the print in the darkroom, photographers would simply allow more light to shine on it. They could use a large sheet of cardboard with a hole in the middle, then position it strategically over the area of the image they wanted to darken.
Dodging and burning can be used to emphasise the parts of a photo that work well and de-emphasise the parts that don't. For example, photographers frequently 'burn' the corners of a photo to attract more attention to the centre. They might 'dodge' other areas, like people's faces or eyes, as well as foreground subjects in a landscape that are meant to draw a viewer's eye.
The dodge and burn tools in Photoshop mimic the shape of the tools used in the darkroom. They look like a lollipop and an open-hand circle, respectively.
Dodging and burning can also be done in Adobe Camera Raw (ACR) and Lightroom. In ACR, the Adjustment Brush is possibly the equivalent of the Dodge and Burn tools in Photoshop. It isolates a specific area by masking it, similar to using layer masks in Photoshop.
Charging the Digi Cool Camera: A Quick Guide
You may want to see also
![]()
Using the Graduated Filter tool in Camera Raw
Dodging and burning are techniques that come from the darkroom. When projecting a negative onto photo paper through an enlarger, photographers would either block the light or cup their hand to direct light into certain areas. This would allow them to underexpose or overexpose different parts of a photograph.
Nowadays, we can perform the same function in Adobe Camera Raw. One of the tools available is the Graduated Filter tool. This tool is useful when you want to lighten or darken a specific part of your image, such as the sky.
- Open your image in Adobe Photoshop CC. If you are working with a RAW file, it will likely open in Camera Raw automatically. If you are using a JPEG, go to Filter > Camera Raw Filter.
- After making your initial global adjustments, select the Graduated Filter tool (G). The sliders for the tool will appear in the right panel.
- Click the + or - button on any slider to reset all the sliders except the one you click.
- Shift-drag over the area of the photo where you want to apply the filter. Start from the location where you want the strongest adjustment. The filter will be fully applied at the green dashed border of the overlay and will gradually diminish to nil at the red dashed border.
- Adjust the characteristics of the filtered area using the sliders. For example, you can use the Temperature slider to make the area warmer or cooler, or adjust the exposure, sharpness, or noise.
- To lengthen or shorten the filter overlay, Shift-drag the green or red dot. To reposition the entire overlay, drag the line that connects the two dots.
- If you need to apply a separate filter to another area of the photo, click New, then repeat steps 2-4.
- To draw a diagonal overlay, simply drag without holding down Shift.
- To hide the filter overlay, uncheck "Show Overlay" or press V. To remove the overlay, click on one of its dots or the line connecting them, then press Backspace/Delete.
- You can also combine the Graduated Filter with the Brush tool to refine your adjustments further. After applying the Graduated Filter, click on the Brush icon and make sure there is a minus sign next to it. Then, simply brush over the areas you want to remove the filter effect from.
By following these steps, you can use the Graduated Filter tool in Camera Raw to dodge and burn specific areas of your image, creating more balanced and visually appealing photographs.
Outdoor Game Motion Cameras: How Long Do Batteries Really Last?
You may want to see also
![]()
How to create dodge and burn brushes in ACR
Dodging and burning is a powerful technique used to make incredible images in Photoshop. Dodging lightens specific areas of a photo, while burning darkens them. While Photoshop is a great source for dodging and burning your images, you can also use Adobe Camera Raw (ACR) or Lightroom.
- Open your image in ACR: This technique works best with RAW files, as they offer more flexibility in adjustments.
- Make initial global adjustments: Before creating your dodge and burn brushes, make any necessary global adjustments to your image, such as exposure, contrast, and white balance.
- Understand the Adjustment Brush: The Adjustment Brush in ACR is similar to the Dodge and Burn tools in Photoshop. It allows you to make local adjustments to specific areas of your photo by masking them.
- Select the Adjustment Brush: Click on the Adjustment Brush icon in the ACR toolbar. The right panel will change to the Adjustment Brush tab, where you can modify the size, feather, and density (flow) of the brush.
- Set your dodge and burn settings: For dodging, increase the exposure and decrease the clarity, contrast, and saturation. For burning, decrease the exposure and increase the clarity, contrast, and saturation. You may also need to adjust the temperature for both dodging and burning to match the surrounding areas.
- Create a new brush preset: Once you have your desired settings, you can save them as a brush preset. Click on the three dots in the top right corner of the Adjustment Brush tab and select "New Local Adjustment Preset." Name your preset and select the settings you want to include.
- Fine-tune your adjustments: After creating your dodge and burn brushes, you can now use them to make local adjustments to your image. Click on the brush icon next to each adjustment to activate it, then paint over the areas you want to dodge or burn.
- Compare before and after: To see the impact of your adjustments, you can use the "Y" key to toggle between the original and adjusted image. This will help you ensure that your dodging and burning look natural and balanced.
- Refine your adjustments: If needed, you can adjust the opacity or flow of your brushes to build up the effect gradually. You can also change the brush size to dodge or burn smaller areas more accurately.
- Practice and experiment: Dodging and burning takes practice to master. Play around with different settings and adjustments to get a feel for how they impact your image. Remember that less is more, and it's better to build up your adjustments slowly.
By following these steps, you can create effective dodge and burn brushes in ACR to enhance your images and take your photo editing skills to the next level.
Battery-Powered Wi-Fi Cameras: Night Vision Included?
You may want to see also
Frequently asked questions
Dodging and burning are techniques that come from the darkroom. Dodging lightens a specific area of a photo, while burning darkens it.
You can use the Adjustment Brush, the Graduated Filter tool, or the Radial Filter tool in Camera Raw.
First, select the Adjustment Brush tool from the toolbar. Then, choose the type of adjustment you want to make by dragging an effects slider. Finally, paint with the Adjustment Brush in the area of the image you want to adjust.