There are a variety of products available that allow you to control 4 cameras in your car. These products are known as video control boxes or switchers and they allow you to connect up to 4 cameras to your DVD player or monitor. They can be used to improve your rear view or to monitor security around your car, helping to eliminate blind spots and making parking and driving on narrow roads much easier. They also allow you to switch between different camera views, either automatically or manually.
| Characteristics | Values |
|---|---|
| Number of cameras | 4 |
| Camera views | Front, rear, left, right |
| Video input | 4 |
| Video system | NTSC, PAL |
| Display | Split-screen |
| Remote control | Yes |
| Power input | DC 9V-15V |
What You'll Learn
![]()
Using a camera switcher to connect multiple cameras
Using a camera switcher is a great way to connect multiple cameras to your car setup. Camera switchers allow you to easily switch between different camera views, giving you a more comprehensive view of your surroundings. Here's a guide on how to use a camera switcher to connect multiple cameras in your car:
Choosing a Camera Switcher
First, you'll need to select an appropriate camera switcher for your needs. Camera switchers come in different varieties, offering different numbers of inputs and outputs. For instance, a 4-way video switcher will allow you to connect up to four cameras, providing a flexible solution for a multi-camera setup. Some switchers also offer intelligent switching, automatically selecting a camera input when a signal is present. Additionally, some switchers have priority settings, allowing you to set which camera feed is displayed first.
Connecting the Cameras
Once you've chosen your camera switcher, it's time to connect your cameras. The process will vary depending on the specific switcher and cameras you're using, but here are some general steps to follow:
- Identify the inputs and outputs on your camera switcher. Typically, you'll have RCA inputs and outputs, but some modern switchers may use HDMI.
- Connect each camera to an input on the switcher using the appropriate cables. Ensure that the video connections match up correctly (e.g., RCA to RCA).
- If your camera setup includes audio, connect the audio cables from each camera to the corresponding inputs on the switcher.
- Power on each camera and ensure that their video signals are being received by the switcher. You may need to adjust priority settings or use a toggle switch to select the active camera input.
- Connect the output of the camera switcher to your display or recording device. This will allow you to view or record the footage from the selected camera.
Additional Considerations
When setting up your multi-camera system, there are a few additional considerations to keep in mind:
- Power Requirements: Ensure that your car's electrical system can handle the power requirements of multiple cameras and the switcher. You may need to install a power distribution block or fuse box to safely manage the additional electrical load.
- Camera Placement: Think carefully about where you position each camera. Consider the field of view and the specific areas you want to monitor. For example, you may want a rearview camera, a front-facing camera, and cameras on each side of the vehicle for a complete surround view.
- Camera Activation: Decide how you want to activate each camera. You can set up automatic activation based on certain triggers (such as putting the car in reverse), or you may prefer manual activation using switches or a control interface.
- Video Quality: Check that the camera switcher can handle the video quality of your cameras. For instance, if you have high-definition cameras, ensure that the switcher can pass through that video quality without degradation.
By following these steps and considerations, you'll be well on your way to successfully connecting and controlling four cameras in your car using a camera switcher.
Surveillance Cameras: Crime Reduction Backed by Evidence?
You may want to see also
![]()
Installing cameras on all sides and corners of the car
Installing cameras on all sides and corners of your car can be a great way to improve safety and gain peace of mind when driving and parking. Here's a step-by-step guide on how to do it:
Planning and Purchasing:
Before you begin, decide on the number and placement of cameras. You'll need at least four cameras for a comprehensive setup: one for the front, one for the rear, and one for each side. Consider your vehicle's size and any specific blind spots you want to address. Purchase a suitable multi-channel dash camera system, ensuring it includes enough cameras and has the necessary features, such as night vision and weatherproofing.
Installation Process:
- Mounting the Cameras: Start by mounting the cameras to the vehicle's body. For the front and rear cameras, consider mounting them at the centre of the windshield and rear window, being mindful of defroster lines. Alternatively, you can install the rear camera on the roof, above the rear window. For side cameras, consider mounting them on the side mirrors or the sides of the vehicle, ensuring they provide a clear view without obstructing airflow or styling.
- Connecting the Cameras: Connect the cameras to a power source, such as the vehicle's battery or fuse box. Ensure you use the correct gauge of wire for the distance and power requirements. Route the wires neatly along the vehicle's trim, using cable clips or electrical tape to secure them.
- Camera Configuration: Connect each camera to the appropriate input on a multi-channel video switcher or control box. This device will allow you to easily switch between camera views. Ensure you connect the correct plugs, as some systems have dedicated front and rear plugs.
- Video Output: Connect the video output from the control box to a display, such as a dedicated monitor or an integrated screen in your vehicle. Some systems may also allow you to connect a DVR for recording footage.
Testing and Adjustments:
Once the installation is complete, test each camera to ensure they are functioning properly. Adjust the camera angles as needed to ensure they capture the desired field of view without obstruction. Check that the video switcher or control box allows you to easily switch between camera views as intended. Finally, tidy up any loose wires and secure them to ensure a neat and professional installation.
By following these steps, you can effectively install and control four cameras on your car, providing a comprehensive view of your vehicle's surroundings.
The First Camera Phone: A Revolutionary Invention
You may want to see also
![]()
Connecting cameras to a DVD player or monitor
Connecting multiple cameras to a single monitor in your car can be a great way to enhance your situational awareness and improve security. Here's a step-by-step guide on how to connect four cameras to a DVD player or monitor in your car:
Step 1: Choose the Right Equipment
Before you begin, make sure you have all the necessary equipment. This includes:
- Commercial security cameras and monitors
- Network Video Recorder (NVR), Video Management System (VMS), or Cloud storage
- Video splitter or multiplexer
- Appropriate cables and connectors (HDMI, VGA, etc.)
Step 2: Connect Cameras to Video Storage/Management Devices
Use a coaxial or Ethernet cable to connect your cameras to a video storage and management device, such as an NVR. This device will receive and manage video data from your cameras.
Step 3: Connect the Video Storage/Management Device to the Video Splitter
Use an HDMI or VGA cable to connect your video storage/management device to a video splitter or multiplexer. This will allow you to display multiple camera feeds on a single monitor.
Step 4: Connect the Video Splitter to Your Monitors
Now, use additional HDMI or VGA cables to connect the video splitter to your DVD player or monitor. This will enable you to view the camera feeds on your display.
Step 5: Power Up and Test
Once everything is connected, power on your system and test it. You should now be able to see the camera feeds on your DVD player or monitor. If not, double-check your connections and ensure everything is plugged in correctly.
Best Practices and Recommendations:
- Opt for high-quality cables to ensure a clear picture and reliable connection.
- Consider the placement of your monitors to ensure they are easily viewable and accessible.
- Perform regular maintenance and stay up to date with firmware and software updates.
- If you encounter issues, check your connections and consider upgrading your cables.
Understanding Camera's CDS Mode: How It Works
You may want to see also
![]()
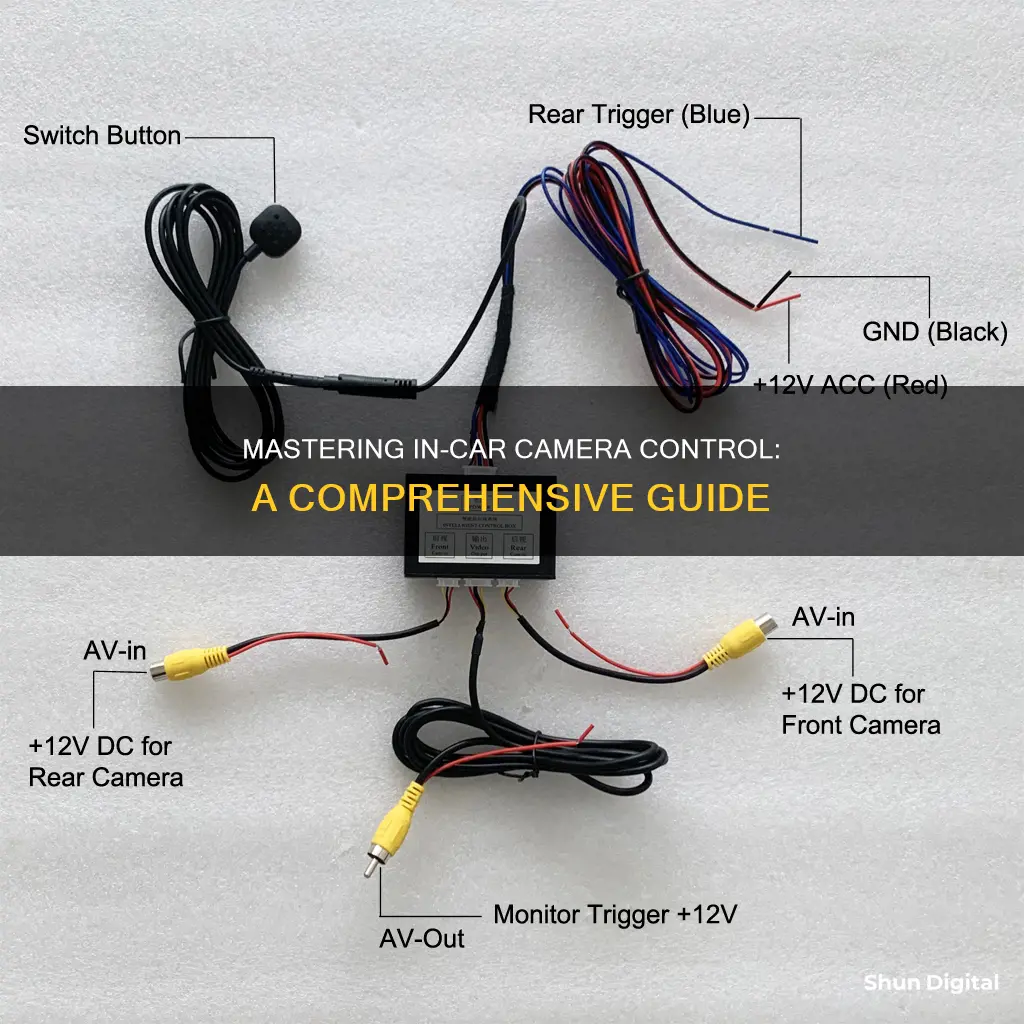
Using a camera control box to switch between camera views
Using a camera control box is a great way to easily switch between multiple camera views in your car. These control boxes are designed to let you connect and manage feeds from multiple cameras, offering a seamless way to monitor your vehicle's surroundings. Here's a detailed guide on using a camera control box to manage and switch between four camera views in your car:
Choosing a Suitable Control Box
First, you'll need to select an appropriate camera control box that can accommodate four camera inputs. Look for a control box specifically designed for automotive use, as these will be more compatible with your car's electrical system and are generally more compact for discreet installation. Some popular options include the JCOLI 4-Way Car Video Switch and the Auto Wayfeng WF IR Control 4-Camera Video Control Box.
Installation and Setup
The installation process will vary depending on your vehicle and the specific control box you choose. However, there are some general steps you can follow:
- Identify a suitable location for the control box, preferably somewhere discreet and out of the way.
- Connect the control box to your car's power source, ensuring it's properly fused and wired.
- Connect the video feeds from your cameras to the corresponding inputs on the control box.
- Connect the output of the control box to your display, such as a dedicated monitor or an integrated screen in your dashboard.
- Test the system to ensure all cameras are functioning properly and that you can switch between the different views.
Operating the Control Box
Most camera control boxes will have a simple interface for switching between camera views. This could be in the form of a physical switch or button, allowing you to cycle through the different cameras. Some more advanced control boxes may even offer remote control functionality, letting you switch views wirelessly.
Additional Features
Depending on the specific model, your camera control box may offer a range of additional features to enhance your driving experience:
- Split-Screen View: Some control boxes offer a split-screen mode, allowing you to view feeds from multiple cameras simultaneously. This can be useful for getting a more comprehensive view of your surroundings when parking or manoeuvring in tight spaces.
- Automatic View Switching: Certain control boxes can be programmed to switch camera views automatically based on your driving actions. For example, when you put the car in reverse, the control box might automatically switch to the rear camera view.
- Recording and DVR Functionality: Some advanced control boxes double as dash cams, allowing you to record footage from one or more cameras. This can be useful for security or for capturing scenic drives.
Tips and Troubleshooting
- Ensure you use high-quality cameras and wiring to get the best performance and avoid interference issues.
- If you encounter video distortion or interference, check your wiring and ensure there are no loose connections.
- Consider the placement of your cameras carefully to get the best field of view and avoid blind spots.
- Regularly update your camera control box's firmware (if applicable) to ensure optimal performance and access new features.
Where Does Your Device Store Camera Raw Presets?
You may want to see also
![]()
Understanding camera functionality and features, such as automatic switching
When it comes to understanding camera functionality and features, such as automatic switching, for a four-camera car setup, there are several aspects to consider.
Firstly, let's discuss the purpose of a multi-camera system in a car. The primary objective is to enhance safety and improve visibility around the vehicle. Modern vehicles often have larger blind spots due to smaller side and rear windows, as well as aerodynamic designs. A multi-camera system can provide a perfect view of the vehicle's surroundings, making parking and manoeuvring safer and easier.
In terms of functionality, each camera in the four-camera setup serves a specific purpose. Typically, you would have a front-view camera, a rear-view camera, and two side-view cameras (left and right). These cameras are strategically positioned on the vehicle to capture different angles, ensuring maximum coverage.
Automatic switching is a crucial feature in a multi-camera system. It allows the system to rotate between different camera angles without manual intervention. This feature ensures that the driver receives a continuous feed of their surroundings, making it easier to navigate and avoid obstacles. For example, when the vehicle is in reverse gear, the system automatically switches to the rear-view camera, providing a clear view of the rear. Similarly, when the turn signals are activated, the system can switch to the corresponding side-view camera, eliminating blind spots and improving safety during lane changes.
Some advanced multi-camera systems offer a 360-degree view or a bird's-eye view of the vehicle and its surroundings. This is achieved by stitching together the feeds from multiple cameras, creating a comprehensive overview of the vehicle's environment. Such systems may also offer different viewing modes, such as an aerial view or a "cross-traffic" perspective, which enables the driver to see around corners, making it extremely useful at junctions or when exiting a car park.
When considering a four-camera setup for your car, it is essential to choose a system that offers flexibility and customisation. Look for features such as multiple display modes, the ability to manually select camera angles, and the option to display a single image or multiple views on the same screen. Additionally, ensure that the system is compatible with your vehicle's display or head unit and that it supports the required video input and output formats, such as NTSC or PAL.
In summary, a four-camera car setup with automatic switching enhances safety and improves visibility. By understanding the functionality and features of such a system, you can make an informed decision when choosing a multi-camera setup for your vehicle, ensuring a seamless and customised driving experience.
Do Security Cameras Affect Property Values? Surveyor's Reporting Duty
You may want to see also
Frequently asked questions
Yes, you can connect up to four cameras to your DVD player or any monitor using a 4-channel car parking camera video image control box converter.
There are two ways to switch camera views. You can use a mini remote controller that comes with the control box, or you can dial the corresponding trigger to change to the camera view you want.
Yes, once the control box's light cables are correctly connected, you can have automatic control of the camera views. When a turn signal is activated, the corresponding camera video will show on the screen.