Camera Raw is a powerful tool for photographers, offering more control over images than traditional JPEGs. It is a file format that contains unprocessed data from a camera's sensor, including exposure, white balance, and sharpness. This gives photographers greater flexibility in post-processing, allowing them to tweak their images to perfection. While JPEGs are processed by the camera, locking in certain settings, Camera Raw files allow photographers to make these decisions themselves. They can adjust the white balance, exposure, shadows, and highlights to their liking.
To activate Camera Raw, users can open Photoshop and navigate to the File or Filter menu, depending on the version of Photoshop they are using. From there, they can select “Open” and choose the image they wish to edit, ensuring that the “Camera Raw” filter is selected from the drop-down menu. Alternatively, they can go to “Edit” > “Preferences” > “Plug-Ins” and ensure the “Enable Adobe Camera Raw” checkbox is ticked.
It is important to note that Camera Raw is primarily designed for raw files, but it can also be used with JPEG and TIFF files, offering more control over these formats as well.
What You'll Learn
![]()
How to enable Camera Raw in Photoshop
To enable Camera Raw in Photoshop, you need to have an active subscription to Adobe Photoshop or Photoshop Lightroom Classic. Launch either of these apps, then relaunch Adobe Bridge. Camera Raw editing should now be enabled.
To set a preference for your raw photos to open directly into Camera Raw, go to Edit/Photoshop > Preferences (Ctrl-K/Cmd-K) > File Handling in Photoshop. Under File Compatibility, check Prefer Adobe Camera Raw for Supported Raw Files, then click OK.
To set a preference for your JPEG or TIFF photos to open directly into Camera Raw, go to Edit/Adobe Bridge CC > Camera Raw Preferences in Bridge. At the bottom of the dialog box, choose Automatically Open JPEGs with Settings from the JPEG menu. If you shoot digital TIFF photos, choose Automatically Open TIFFs with Settings from the TIFF menu. If you only shoot raw or JPEG photos, choose Disable TIFF Support.
If you want to choose a host for Camera Raw, go to Edit/Adobe Bridge CC > Preferences (Ctrl-K/Cmd-K) in Bridge, then show the General pane. Check Double-Click Edits Camera Raw Settings in Bridge if you want Bridge to host Camera Raw when you double-click a thumbnail. If you would prefer for the file to open into Camera Raw hosted by Photoshop, simply leave this option unchecked.
Charging Your Nikon: A Quick Guide to Powering Up Your Camera 3700
You may want to see also
![]()
How to enable Camera Raw in Bridge
To enable Camera Raw in Bridge, you need an active subscription to Adobe Photoshop or Photoshop Lightroom Classic. If you have an active subscription, follow these steps:
- Launch Adobe Photoshop or Photoshop Lightroom Classic.
- Relaunch Adobe Bridge.
- Camera Raw editing should now be enabled in Adobe Bridge.
Alternatively, you can try the following steps:
- Open a picture in Photoshop.
- Go to File > Browse in Bridge.
- Once Bridge is opened, highlight the image you want to open in Camera Raw.
- Camera Raw editing should now be enabled.
If you are still unable to enable Camera Raw in Bridge, try updating your Camera Raw plugin to the latest version.
Charging the Fuji XT-30: A Quick Guide
You may want to see also
![]()
How to open an image using Camera Raw in Photoshop
Opening an image using Camera Raw in Photoshop is a straightforward process. Here's a step-by-step guide:
Method 1: Using Keyboard Shortcuts
If you're looking for the quickest way to open an image in Camera Raw, simply follow these steps:
- Load an image into Photoshop.
- If it's a RAW file, Camera Raw should open automatically. If not, proceed to the next step.
- Press Shift + Ctrl + A on Windows or Shift + Cmd + A on macOS.
- From the top toolbar, click Filter.
- Select Camera Raw Filter.
Method 2: Using Photoshop Menu
If you prefer using the Photoshop menu, here's an alternative method:
- In Photoshop, go to File > Open to display the Open File dialog.
- Select the image file you want to open and click Open. If it's a RAW file, Camera Raw will open automatically. Otherwise, continue to the next step.
- With the image open in Photoshop, click the Filter menu.
- Select Camera Raw Filter from the options.
- Make your desired adjustments in Camera Raw, then click OK to apply the changes.
Opening JPEG or TIFF Images in Camera Raw
If you specifically want to open a JPEG or TIFF image in Camera Raw, there are a few ways to do so:
- From Photoshop's File Menu: Choose Open As (Windows) or Open (macOS) and browse to find your image. Click on the file, then change the format to Camera Raw before clicking Open.
- From Adobe Bridge: Open Adobe Bridge and locate your JPEG or TIFF file. Double-click the thumbnail image, or click once and press Ctrl + R (Windows) or Cmd + R (macOS). Alternatively, you can choose File > Open in Camera Raw.
Setting JPEG and TIFF to Always Open in Camera Raw
If you prefer to have all your JPEG and TIFF images open directly in Camera Raw, you can set this up in the Camera Raw preferences:
- Go to Photoshop > Preferences > Camera Raw (Mac) or Edit > Preferences > Camera Raw (Windows).
- Click on the File Handling section and set JPEG and TIFF to Automatically Open All Supported Files.
- Click OK. This setting will take effect the next time you start Photoshop.
With these methods, you'll be able to easily open and edit your images using Camera Raw in Photoshop.
Camera Import: Can You Do It On Low Battery?
You may want to see also
![]()
How to install the Camera Raw plug-in
If you're a photographer, the Camera Raw plug-in for Adobe Photoshop is a must-have tool. It allows you to work with raw "digital negatives," giving you greater artistic control and flexibility while maintaining the original files. Here's how you can install the Camera Raw plug-in:
First, ensure you have the latest version of Photoshop. If you don't, download and install it from Adobe's website. Exit from any open Adobe applications.
Next, download the Camera Raw plug-in. The file will be in a `.zip` format. Double-click the downloaded file to unzip it. If you're using Windows, the system might unzip the file for you.
Once the file is unzipped, double-click the resulting file, which will have a .exe extension on Windows or a .pkg extension on macOS. This will start the installer. Follow the on-screen instructions to complete the installation.
After the installation is complete, restart your Adobe applications. Now you can start using the Camera Raw plug-in in Photoshop. Go to File > Open and select a RAW file from your camera. Alternatively, you can go to File > Open As and select "Camera Raw" from the Format drop-down menu. Your RAW file will open in the Camera Raw dialog box, where you can make adjustments before opening it in Photoshop.
If you're installing Camera Raw presets in Photoshop, the process is a little different. After downloading and unzipping the presets, place them in the following location:
For Mac: (user)/Library/Application Support/Adobe/Camera Raw/Settings
For Windows: (user)/Application Data/Adobe/Camera Raw/Settings or C:Users-[user name]/AppData/Roaming/Adobe/CameraRaw/Settings
Ensure that you only copy the preset files (.xmp) into the 'Settings' folder. Now you can apply the presets in Photoshop by clicking on Filter and choosing the Camera Raw Filter.
Dx Mark 11 Camera: Battery Included or Not?
You may want to see also
![]()
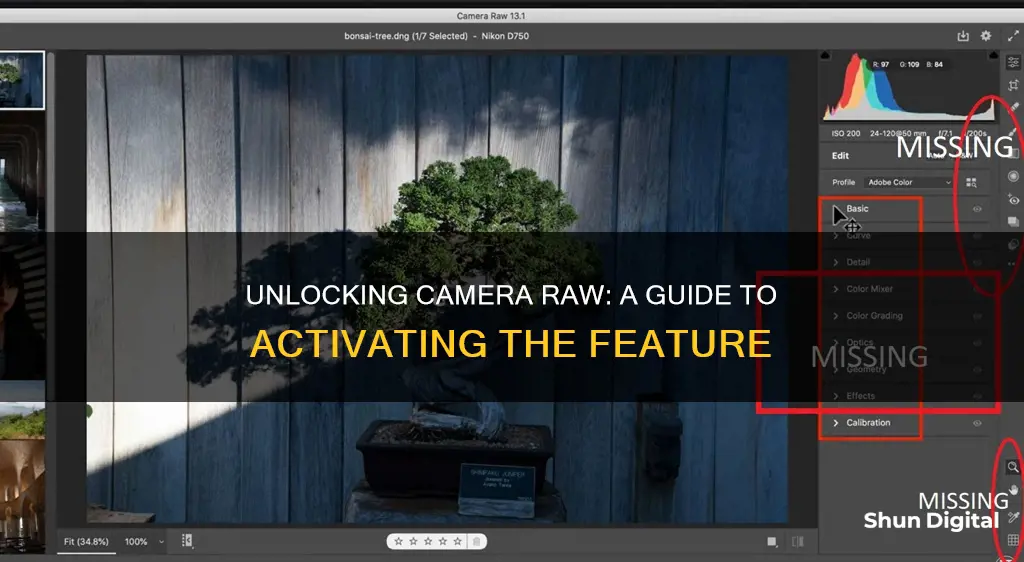
How to access the Camera Raw Filter in Photoshop
To access the Camera Raw Filter in Photoshop, go to the Filter menu and choose Camera Raw Filter (Command+Shift+A on Mac, or Control+Shift+A on PC). Before applying Camera Raw adjustments, it is best to first convert the image or image layer to a Smart Object (Smart Filter) layer. This will allow you to re-edit the Camera Raw settings just as you would when editing a raw image.
The Camera Raw Filter can be used to target individual layers or image channels. It can also be applied to multiple layers, which must first be grouped together within a Smart Object/Smart Filter.
The Camera Raw Filter is only compatible with RGB or greyscale images that do not exceed 65,000 pixels in either dimension. If your image type is not supported, the filter will be greyed out and inaccessible.
Charging Your 808 Camera: How Long is Too Long?
You may want to see also
Frequently asked questions
Go to Edit > Preferences > Plug-Ins and ensure the "Enable Adobe Camera Raw" checkbox is ticked.
You need an active subscription to Adobe Photoshop or Photoshop Lightroom Classic. Launch either of these apps and then relaunch Adobe Bridge.
Open Adobe Bridge and locate the JPEG file. Double-click on the file to open it in Camera Raw.
Open the file in Photoshop and go to File > Save As. Select the Camera Raw format from the Format drop-down menu and click Save.
Go to Help > About Photoshop. If you see "Camera Raw" listed under "Optional Plug-ins", then you have it installed. Alternatively, go to File > Open and check if "Camera Raw" is an option in the drop-down menu.