There are several ways to connect an outdoor camera to your computer. The most common method is to use a USB cable, which is usually included with the camera. You can also use an HDMI or VGA cable if your camera and computer have the appropriate ports. If your camera supports Wi-Fi, you can connect it to your computer wirelessly. Additionally, you can remove the SD card from your camera and insert it into your computer if your computer has an SD card reader.
| Characteristics | Values |
|---|---|
| Connection Type | Wired (USB), HDMI, VGA, Ethernet, Power over Ethernet, Wireless |
| Camera Type | Digital, CCTV, IP, Wireless, Wired, PoE, Wi-Fi, GoPro, Point-and-Shoot, DSLR, Action, Phone |
| Required Equipment | Camera, Computer, Power Adapter, Network Cable, Router, Wireless Receiver/Transmitter, SD Card, SD Card Reader |
| Steps | Check Camera and Computer Ports, Connect Camera and Computer, Use Software to Access Camera, Troubleshoot Common Issues |
What You'll Learn
![]()
Connecting a camera to a computer using a USB cable
Step 1: Gather the Necessary Components
First, ensure you have the correct USB cable. Most point-and-shoot cameras use mini-USB connectors, so you'll need a USB cable with the correct connector for your camera. The camera manufacturer should have included this cable in the box. If you can't find it, you may need to purchase a new cable with the appropriate connector. You will also need a computer with an open USB slot.
Step 2: Locate the USB Slot on Your Camera
The USB slot on your camera may be hidden behind a panel or door, so it might not be immediately visible. Look for a USB logo on the camera, which might be next to the panel. The USB slot may also be located in the same compartment as the battery and memory card. Check the sides and bottom of the camera for the slot. If you're having trouble locating it, consult your camera's user guide.
Step 3: Connect the USB Cable to the Camera
Gently connect the USB cable to the camera, ensuring that the connector is aligned correctly with the USB slot. Do not use excessive force, as this can damage the cable and the camera. Make sure any panel or door that hides the USB slot is completely out of the way to avoid pinching it between the cable and the slot, which can prevent a proper connection.
Step 4: Connect the Other End of the USB Cable to the Computer
Connect the opposite end of the USB cable to the computer. It should have a standard USB connector that fits into a USB slot on the computer. The computer should be powered on during this step.
Step 5: Turn on the Camera
With the cable connected to both the camera and the computer, turn on your camera. On some camera models, you may also need to press the photo playback button, usually marked with a play icon.
Step 6: Wait for the Computer to Recognize the Camera
Once everything is connected, the camera may display a "connecting" message on its LCD screen. On the computer, a pop-up window may appear with photo-downloading instructions. If the computer does not automatically recognize the camera, you may need to install the necessary software using the CD that came with your camera or by downloading it from the manufacturer's website.
Step 7: Transfer and Manage Your Photos
After the camera and computer are successfully connected, you can begin transferring and managing your photos. You can select an option from the pop-up window and follow the on-screen instructions to download and save your photos to your computer. You can then view, edit, or delete the photos as needed.
By following these steps, you should be able to easily connect your camera to your computer using a USB cable and take advantage of the various benefits this connection offers, such as photo transfer, video editing, or even using your camera as a webcam.
Mailing Rechargeable Camera Batteries: Safe Handling and Shipping
You may want to see also
![]()
Using an SD card adapter to transfer photos from the camera to the computer
If your camera uses an SD card, you can transfer photos from it to your computer using an SD card adapter. This is a useful way of transferring photos, videos, and other files from one device to another.
First, you need to check if your computer has a built-in SD card reader. Many laptops and some desktop PCs include one. If your computer has a built-in reader, you can simply insert the SD card and follow the on-screen instructions to transfer your photos.
If your computer does not have a built-in SD card reader, you will need to purchase an external card reader. These usually plug into a USB port on your computer and allow you to transfer files as you would with an external drive. Once you have an external card reader, follow these steps:
- Insert the SD card into the external card reader.
- Connect the card reader to an available USB port on your computer.
- On your computer, locate the destination folder where you want to store your photos (e.g. the Desktop or Pictures folder).
- Open the destination folder.
- If a pop-up window appears, click on "Import pictures and videos" and follow the on-screen instructions. Otherwise, manually copy the photos by following the next steps.
- Click on the drive that represents your memory card.
- Click on the DCIM folder, then the 100MSDCF folder (or a similar folder that ends with MSDCF).
- Select the photos you want to copy, then drag and drop them into the desired folder on your computer. Alternatively, use the copy and paste shortcuts on your operating system.
By following these steps, you can easily transfer photos from your camera's SD card to your computer using an SD card adapter.
Surveillance Cameras: Boston Bomber's Downfall
You may want to see also
![]()
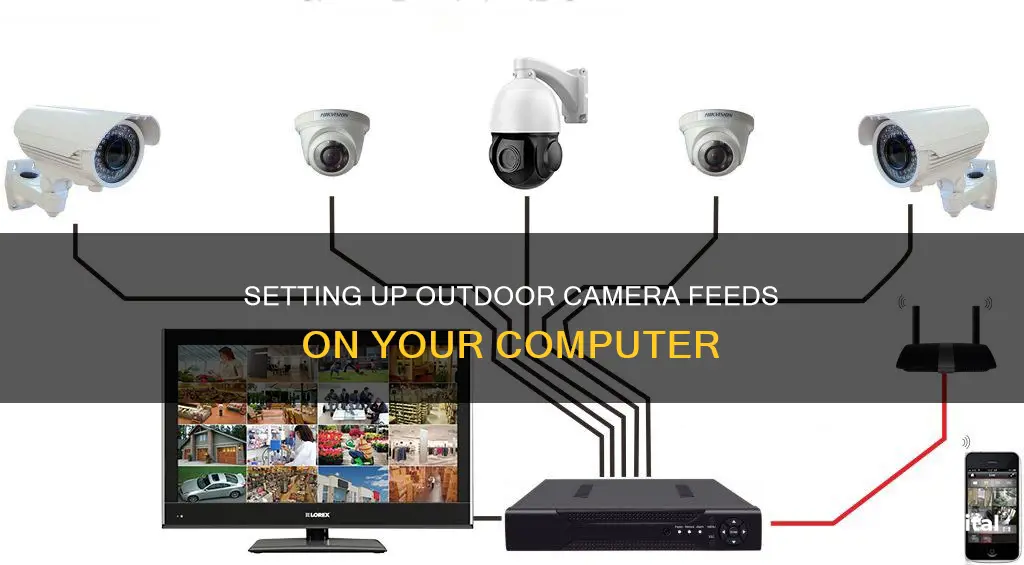
Connecting a camera to a computer monitor
Connecting an external camera to a computer monitor can be a convenient way to view security footage in real-time without needing a dedicated security monitor. This setup is commonly used for home surveillance systems.
The first step is to ensure you have the necessary equipment. You will need a security DVR or NVR (digital or network video recorder) base station, which the cameras will connect to for recording footage. You will also need the cameras themselves, which can be wired or wireless, and a computer monitor with an HDMI or VGA input. The final items are the video cables (HDMI or VGA) to connect the DVR/NVR to the monitor, and, for wired cameras, coaxial or CAT5e cables to connect the cameras to the DVR/NVR.
Once you have the equipment, the first step is to connect the security cameras to the DVR/NVR. For wired cameras, run a coaxial or CAT5e cable from the camera location to the DVR/NVR, plugging the cable into the corresponding channel input. For wireless cameras, power them on and pair them to the DVR/NVR according to the provided instructions. All connected cameras should now display a live feed on the DVR/NVR.
The next step is to connect the DVR/NVR to the computer monitor. This is done using an HDMI or VGA cable, with HDMI being the preferred option as it transmits both video and audio. Simply connect one end of the cable to the output port on the DVR/NVR, and the other end to the input port on the monitor.
Now, you will need to install the manufacturer-provided software on the computer connected to the monitor. This software will allow you to view and control the DVR/NVR system, and is typically included with the system or can be downloaded from the manufacturer's website. Open the software, add the device, and input the DVR/NVR IP address and credentials.
Finally, you can configure the display view on the monitor. This may involve cycling through full-screen views of individual cameras, displaying multiple cameras at once, or a combination of these options.
And that's it! You should now have a functioning setup with your external camera connected to your computer monitor.
Olympus Pen Camera Battery: Charging Time Explained
You may want to see also
![]()
Connecting a wireless security camera to a computer
Connecting a wireless security camera to your computer is a great way to enhance the security and surveillance of your home or office. Here is a step-by-step guide to help you with the process:
Step 1: Check Compatibility
Before setting up your wireless security camera, ensure that it is compatible with your computer. Check the system requirements provided by the manufacturer, including the camera's operating system compatibility, processor speed, memory, and network capabilities. Assess your computer's specifications to make sure they meet these requirements. Also, consider the wireless connectivity options, such as Wi-Fi, Ethernet, or USB connections.
Step 2: Set Up the Camera
Choose an ideal location for your camera, ensuring a clear and wide view of the area you want to monitor. Connect the camera to a power source, either through batteries or a direct power connection. Configure the camera settings by accessing the settings menu, usually through a companion app or software. Connect your computer to the camera's Wi-Fi network or establish a direct connection via an Ethernet cable. Set up a password, adjust video quality, and enable additional features as needed.
Step 3: Connect the Camera to Your Computer
To establish a wireless connection, access your computer's network settings and connect to the camera's Wi-Fi network using the provided credentials. For a direct Ethernet connection, use an Ethernet cable to connect the camera to your computer's network port. Pair the camera with your computer by following the instructions provided by the camera manufacturer, which may involve entering a unique code or scanning a QR code.
Step 4: Install Necessary Software
Check the manufacturer's website or documentation for any required software or drivers that need to be installed on your computer. Download and install them as instructed, following the on-screen prompts. This will allow you to access the camera's live feed and control its settings from your computer.
Step 5: Access the Camera's Feed
Open the camera's software or app, which will vary depending on the camera model and manufacturer. Log in using your credentials or the provided username and password. You should now be able to view the camera's live feed on your computer screen and adjust any necessary settings to customise the camera's performance.
Step 6: Additional Tips and Troubleshooting
- Position your router centrally within your home to ensure a strong wireless signal.
- Check your Wi-Fi signal strength near the camera, and consider relocating the camera or using a Wi-Fi extender if the signal is weak.
- Regularly update the firmware and software of both the camera and your computer to resolve connectivity issues and improve performance.
- Ensure a proper power supply for your camera, using rechargeable batteries or a stable power source for direct-connection cameras.
- Secure your wireless network with a strong password and consider using encryption and a virtual private network (VPN) for added security.
- If you have multiple connected devices, check for IP conflicts and assign static IP addresses to avoid interference.
- If connectivity issues persist, try restarting both the camera and your computer, and if necessary, reset the camera to its factory settings and set it up again.
Exploring the Sync Button in Adobe Camera Raw
You may want to see also
![]()
Using third-party software to connect a security camera to a computer
Using third-party software is another way to connect a security camera to your computer. Here's a step-by-step guide:
Step 1: Choose the Right Software
First, ensure the software is compatible with your camera model and computer operating system. Some common software options include Reolink Client, SmartPSS, and manufacturer-provided software.
Step 2: Install the Software
Download the software from the manufacturer's website and install it on your computer. This usually involves running an installer and following the on-screen instructions.
Step 3: Connect the Camera to the Computer
Connect your camera to the computer using a network cable (Ethernet) or via Wi-Fi. For a wired connection, use an Ethernet cable to connect the camera to your computer's network port or router. For wireless cameras, follow the manufacturer's instructions to connect to your Wi-Fi network.
Step 4: Configure the Camera Settings
Launch the installed software and locate the camera settings. Adjust the settings according to your preferences, such as resolution, frame rate, motion detection, and recording options.
Step 5: Access the Camera's Feed
Open the software and log in using your credentials to access the camera's control panel and live feed. You should now be able to view the camera's footage in real-time and adjust any necessary settings.
Step 6: Troubleshooting
If you encounter any issues, ensure all cables are securely connected and that your camera and computer meet the software's system requirements. Additionally, verify that your camera's wireless signal is strong and that your wireless network is secure.
Focusing Axis Communications Indoor Dome Cameras: A Step-by-Step Guide
You may want to see also
Frequently asked questions
You will need the camera, a power source, a wireless receiver or transmitter, and the necessary cables to connect the receiver or transmitter to the computer monitor.
Connect the camera to a power source, then connect the wireless receiver or transmitter to the camera. After that, use the appropriate cables to connect the receiver or transmitter to the computer monitor. You may need to adjust the monitor settings to display the camera feed.
Yes, but ensure that the monitor has enough inputs for all the cameras, and you may need a switcher or multiplexer to toggle between the camera feeds.
Connecting a wireless security camera to a computer monitor provides a dedicated display for monitoring the camera feed, which is useful for real-time monitoring of your home or business. It can also offer a larger and more detailed view compared to a smartphone or tablet.
Your camera manufacturer should have included the correct USB cable in the box. If you can't find it, take your camera to an electronics store to purchase a cable with the correct size USB connector.