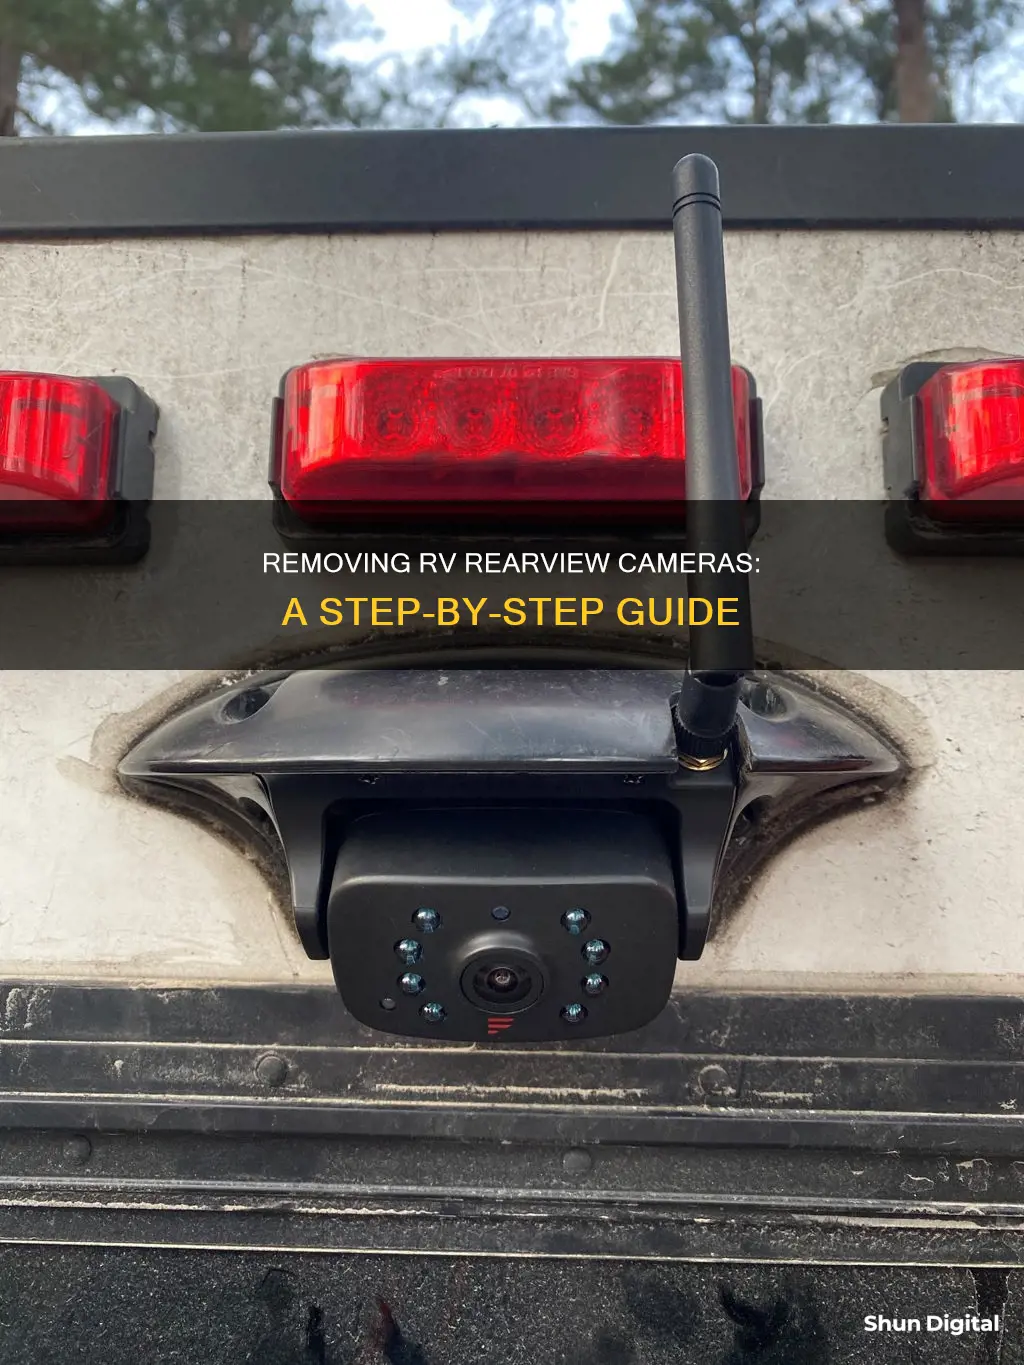
Rearview cameras are a great way to improve vehicle safety. They provide an extra layer of assurance that you haven't missed something when reversing, or that a person or animal hasn't entered your blind spot. While they have been made standard in new cars, trucks, and vans, they are not yet required equipment for RVs. However, given the size of an RV, a rearview camera can be invaluable when reversing or changing lanes. There are a variety of aftermarket rearview camera systems available for RVs, which can be wired or wireless. When removing an RV rearview camera, it is important to first identify the type of camera and how it is mounted. Some cameras are easy to adjust within their casing, while others require tools to remove, adjust, and refasten.
| Characteristics | Values |
|---|---|
| Installation Type | Wired or Wireless |
| Wired RV Backup Camera Installation | Can be installed on all types of RVs or other vehicles |
| Wired RV Backup Camera Cost | More than wireless |
| Wireless RV Backup Camera Installation | Simpler to install |
| Wireless RV Backup Camera Disadvantages | Potential issues with wireless connection |
| Aftermarket Rearview Camera Systems | Hardwired into the tow vehicle or motorhome, or transmit wireless signals between the camera and monitor |
| Camera Angle Adjustment | Adjust the angle of the lens within the enclosure, or adjust the angle of the entire enclosure itself |
What You'll Learn

Removing the camera enclosure
Gather Your Tools:
You will need a few tools to remove the camera enclosure. These include a drill or hand screwdriver, the correct bits for the fasteners on the camera and its mount, and possibly some washers, nuts, or grommets (preferably rubber to prevent damage).
Understand Your Camera Setup:
Before you begin, it's important to understand the type of camera and mounting system you have. Some cameras are easy to adjust within their casing, while others require tools to remove, adjust, and refasten. If your camera enclosure has screws and bolts, you'll need to use a drill or screwdriver to remove them.
Disconnect the Power:
Before you start removing the camera enclosure, make sure to disconnect the power source to the camera. This will ensure your safety and prevent any damage to the electrical system.
Remove the Enclosure:
Once you have disconnected the power, you can start removing the camera enclosure. If your camera has screws or bolts, use your drill or screwdriver to remove them carefully. Place the removed screws or bolts in a safe place so you don't lose them.
Carefully Lift the Enclosure:
After removing the fasteners, carefully lift the enclosure to access the camera inside. Be gentle and take your time to avoid damaging any wires or components.
Adjust or Remove the Camera:
With the enclosure removed, you can now access the camera. If you need to adjust the angle of the camera, do so carefully. If you are removing the camera entirely, disconnect any wires or cables attached to it.
Reinstall the Enclosure:
Once you have finished adjusting or removing the camera, you can reinstall the enclosure. Make sure to secure it properly with the screws or bolts you removed earlier.
Test the Camera:
After reinstalling the enclosure, reconnect the power source and test the camera to ensure it is functioning properly. Adjust the angle as needed to get the desired field of view.
Remember to take your time and be careful during the removal process. If you are unsure about any steps, it is always best to consult a professional or refer to the camera's user manual for detailed instructions.
Tesla Cameras: Unveiling Their Vision and Secrets
You may want to see also

Disconnecting the camera wiring
Firstly, locate the camera wiring. This may be found behind the camera itself or within the RV's wiring harness. Once you've found the wiring, carefully disconnect it from the camera. You may need to use a screwdriver or other tools to release any connectors or fasteners holding the wires in place. Be sure to take note of the wiring colours and their corresponding connections to facilitate the reinstallation process.
If your RV rearview camera is hardwired, you will need to cut the wires to completely disconnect the camera. Use wire cutters or snips to cut the wires, ensuring a clean cut as close to the camera as possible. Be cautious and avoid cutting any other wires that may be in the vicinity. After cutting the wires, use wire strippers to remove a small portion of the insulation from each wire, exposing the metal conductor.
If your camera uses a connector, you can simply unplug the connector from the camera. This is a more convenient option as it allows for easier reinstallation in the future. Once the connector is unplugged, carefully store it away to avoid damage or misplacement.
In some cases, the camera wiring may be fed through a small hole or conduit. If this is the case, you may need to feed the wires back through the hole to access the entire length of the wiring. This can be done by gently pulling on the wires or using a small tool to guide them back through the hole.
After disconnecting the wiring, it is important to properly manage the exposed wires to prevent any potential hazards. Use electrical tape or wire caps to cover the exposed wire ends. This will ensure that the wires do not come into contact with any metal surfaces or cause any short circuits.
Additionally, if your RV rearview camera system includes a monitor, you will also need to disconnect its wiring. The monitor is typically powered through the vehicle's 12V power supply or cigarette lighter. Disconnect the power source from the monitor and carefully store the wires to avoid damage.
Remember to handle the wiring with care to avoid any damage. It is always a good idea to take pictures or make notes of the wiring configuration before making any disconnections. This will serve as a reference for future reinstallation or maintenance.
Curved LG OLED TVs: Where's the Camera?
You may want to see also

Choosing a new camera
Camera and Video Quality
It is important to opt for a rearview camera with superior video quality to ensure a clear view of your surroundings. Look for cameras that offer a minimum resolution of around 800x400 and perform well in low-light conditions. CCD sensors are generally recommended over CMOS sensors as they provide better image quality, especially in low-light settings.
Monitor Quality and Size
A monitor size of 5 to 7 inches is ideal, depending on the size of your RV and the distance between the driver's seat and the dashboard. If you plan to install multiple cameras, a larger monitor will be more suitable for split-screen viewing. Additionally, consider the ease of installation and ensure the monitor can be mounted securely.
Ease of Installation and Mounting Options
Consider the type of installation required for the camera, whether wired or wireless. Wired systems tend to offer better image quality and stability but may be more complex to install. Wireless systems are easier to set up and transfer between vehicles, but the image quality may be less reliable, especially for longer RVs.
Backup Camera Field of View
The field of view refers to the width of the camera's viewing angle. A wider field of view will provide a broader perspective but may result in a distorted image. Aim for a camera with a field of view of at least 90 degrees, with 120-130 degrees being ideal.
Durability and Weather Resistance
Choose a rearview camera that is constructed with durable and weather-resistant materials. Look for features such as waterproof ratings, shock resistance, and vibration resistance to ensure the camera can withstand harsh weather conditions and the rigours of the road.
Additional Features
Some rearview cameras offer additional features such as night vision, infrared LEDs, audio capabilities, and motion-sensing for security purposes. Consider your specific needs and whether these features would enhance your driving experience.
Budget
Finally, consider your budget. Rearview cameras for RVs typically range in price from $100 to $600, with most options falling between $200 and $300. Decide on the features that are most important to you and choose a camera that fits within your budget.
Last Glimpse: Camera's Final Moments Before Death
You may want to see also

Adjusting the camera angle
- Assess the Situation: Before making any adjustments, evaluate the current angle of your camera. Common issues include an obstructed field of view, insufficient range of vision, or unideal positioning that shows the license plate or bumper.
- Enlist Assistance: It's recommended to have a helper during the adjustment process. One person can adjust the camera while the other monitors the display and provides feedback. This ensures a more precise adjustment with less back and forth.
- Gather the Necessary Tools: The tools you'll need depend on the type of camera and mount you have. Some cameras can be adjusted within their casing, while others require tools to remove, adjust, and refasten. Common tools you may need include a flathead or Phillips screwdriver, a drill or hand screwdriver with the correct bits (such as a hex or regular screw bits), and washers, nuts, or grommets (preferably rubber to prevent damage).
- Adjust the Camera Enclosure: If your camera sits inside an enclosure, you'll need to remove it from the mount by unscrewing it. Once the enclosure is open and the camera is free, you can adjust the angle of the lens. Afterward, secure the enclosure back onto the mount.
- Adjust the Mount: If your camera doesn't have an adjustable lens or enclosure, you'll need to adjust the entire mount. Remove the mount from the vehicle and place washers, bolts, or grommets between the mount and the vehicle surface to change the angle. Refasten the screws or bolts securely.
- Consider Drilling a New Hole: If you're having issues with the hole the camera is seated in, you can drill a new one, insert a grommet, and feed the camera wiring through. This may require cutting and splicing the wire connections.
- Fine-Tune the Angle: Once you've made the initial adjustments, test the camera to ensure it provides the desired field of view. Make any necessary fine-tune adjustments to perfect the angle.
Remember, the camera mount should be tight to prevent movement while driving, so you may need to use a firm grip or a bit of force when adjusting the angle. Additionally, always refer to your camera's manual for model-specific instructions or reach out to the manufacturer for further guidance if needed.
Playstation Camera: Always Watching or Just a Myth?
You may want to see also

Using a flathead screwdriver
Removing an RV rearview camera can be a tricky process, but with the right tools and a bit of patience, it can be done. Here's a step-by-step guide on how to do it using a flathead screwdriver:
Step 1: Gather Your Tools
Before you begin, make sure you have the necessary tools, including a flathead screwdriver, a new camera if you're replacing the old one, and any other basic tools like wire cutters or strippers.
Step 2: Access the Camera
Locate the rearview camera, which is usually mounted on or near the license plate. To access the camera, you will need to remove the license plate and any interior panels or covers that may be blocking it. Use your flathead screwdriver to carefully pry off these components, being careful not to damage them.
Step 3: Disconnect the Wires
Once you have accessed the camera, you will see a bundle of wires connected to it. These wires provide power and data transmission for the camera. Use your flathead screwdriver to carefully pry open the wire connectors and disconnect the wires. Be gentle to avoid damaging the wires or the connectors.
Step 4: Remove the Camera Mount
After disconnecting the wires, you can now remove the camera from its mount. Again, use your flathead screwdriver to loosen any screws or fasteners holding the camera in place. Be sure to keep the screws in a safe place so you can reuse them if needed. With the screws removed, carefully lift the camera off its mount.
Step 5: Clean the Area
Before installing a new camera or covering up the area, it's a good idea to clean the surface. Use a mild detergent or cleaning solution and a soft cloth to wipe down the area where the camera was mounted. This will remove any dirt, grime, or residue that may have built up over time.
Step 6: Install a New Camera (Optional)
If you're replacing the old camera with a new one, now is the time to do so. Follow the manufacturer's instructions for mounting the new camera, making sure to connect the wires securely. Test the new camera to ensure it's functioning properly before putting back any covers or interior panels.
Step 7: Reassemble the Components
Finally, use your flathead screwdriver to carefully put back any interior panels, covers, or screws that you removed during the process. Make sure everything is securely fastened and that there are no loose parts.
Removing an RV rearview camera can be a delicate task, especially when dealing with wires and electrical connections. Always take your time and be gentle to avoid damaging any components. If you're unsure about any part of the process, it's best to consult a professional or seek advice from a trusted source.
Teams: Viewing All Cameras Simultaneously
You may want to see also
Frequently asked questions
Removing an RV rearview camera depends on the type of camera and how it is mounted. Some cameras are easy to remove within their casing, while others require tools to detach. If your camera enclosure has screws and bolts, you'll need a drill or hand screwdriver and the correct bits for the fasteners on the camera and its mount.
You may need a flathead or Phillips screwdriver, a 3/32 to 1/8 drill bit, and washers, nuts, or grommets (preferably rubber to prevent damage).
For a license plate mount, adjust the camera angle by adding grommets or washers on the lower installation screws to tilt the bracket. For a surface-mount camera, place washers or screws between the surface and the mount, open the enclosure to move the camera, or unfasten and move the enclosure.


