Adobe Camera Raw is a plugin for Adobe Photoshop that allows photographers to edit photographs in a non-destructive way. It is a powerful tool that has been frequently updated to support more cameras and include more features. To upgrade Camera Raw, you need to download and install the latest version of the Camera Raw plugin that is compatible with your Adobe application. The process involves quitting all Adobe applications, unzipping the downloaded file, running the installer, following the on-screen instructions, and then restarting your Adobe applications.
| Characteristics | Values |
|---|---|
| How to update | Download and install the latest Camera Raw version from the Camera Raw plug-in installer |
| How to install | Quit all Adobe applications, unzip the downloaded file, double-click the resulting file to start the installer, follow the on-screen instructions, and restart your Adobe applications |
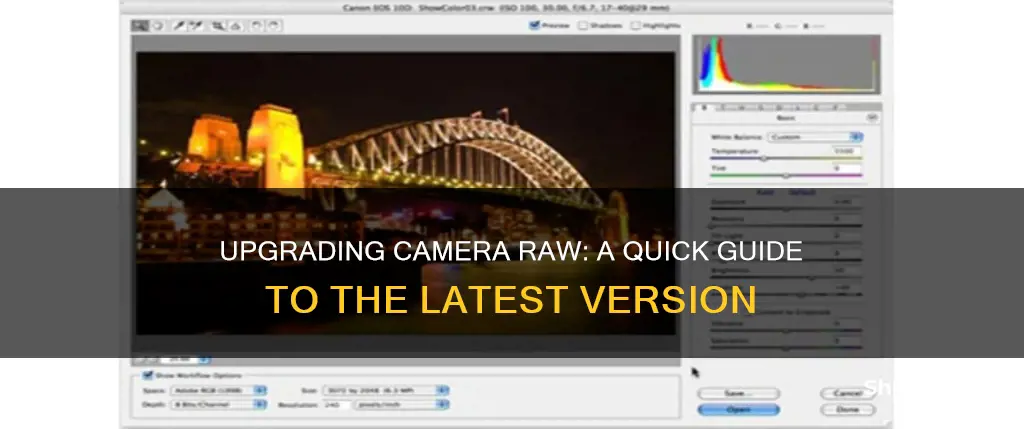
| How to open | Click the "Open in Camera Raw" icon, go to "File > Open in Camera Raw", right-click/control-click on the image thumbnail and choose "Open in Camera Raw", or double-click directly on the raw image thumbnail |
| New features | Enhanced GPU support for accelerated image editing, seamless edits to 360-degree panoramas, Enhance Details feature, Masking panel, Premium Presets panel, support for new cameras and lenses |
| Use cases | Editing and processing raw image formats from professional digital cameras, achieving greater artistic control and flexibility while maintaining original files, applying noise reduction based on ISO, saving images as JPEG without Photoshop |
What You'll Learn
![]()
Download the Camera Raw plug-in installer
To download the Camera Raw plug-in installer, follow these steps:
First, ensure that you have exited from all Adobe applications. This is important because you don't want any Adobe applications running in the background that might interfere with the installation process.
Next, download the appropriate installer file for your operating system. If you're using Windows, you'll be downloading a .zip file, and if you're on macOS, you'll be downloading a .dmg file. Once the file has been downloaded, locate it on your computer.
If you're on Windows, double-click the .zip file to unzip it. Sometimes, Windows might automatically unzip the file for you. After unzipping, you should see an .exe file. Double-click this file to initiate the installation process.
If you're on macOS, simply click the .dmg file to begin the installation. In the case of Camera Raw 10.5, you'll need to double-click the .zip file to unzip it first and then double-click the resulting .pkg file to start the installer.
Once the installer is running, follow the onscreen instructions to complete the installation. These instructions will guide you through the necessary steps to get the Camera Raw plug-in installed on your computer.
Finally, after the installation is complete, restart your Adobe applications. This step ensures that the changes take effect and that the Camera Raw plug-in is now available for use within your Adobe applications.
Charging the Kodak EasyShare Z650: A Step-by-Step Guide
You may want to see also
![]()
Quit all Adobe applications
To quit all Adobe applications, follow these steps:
For Mac OS:
- Quit all Adobe applications that are currently running. You can do this by either clicking Command + Q on your keyboard or by going to the top toolbar and selecting the "Quit" option from the Adobe application menu.
- Back up any personal files, including third-party plug-ins, that you want to save in the Applications/Adobe Photoshop [version] folder or the Applications/Adobe Photoshop Elements [version] folder.
- Remove Adobe applications by following the appropriate steps below:
- For Photoshop CS3 or later, or Photoshop Elements 6: Double-click the uninstaller for your application or for your edition of Adobe Creative Suite in /Applications/Utilities/Adobe Installers. Then, follow the onscreen instructions to remove Photoshop or Photoshop Elements.
- For earlier versions of Photoshop or Photoshop Elements: Drag the Adobe Photoshop [version] folder or the Adobe Photoshop Elements [version] folder to the Trash. These folders are located in the Applications folder.
- Restart your computer.
- Empty the Trash. If the Trash does not empty completely because it contains locked files, press the Option key and choose Finder > Empty Trash.
For Windows:
- Close all Adobe applications that are currently running.
- Back up any personal files, including third-party plug-ins, that you want to save from the Program Files/Adobe Photoshop [version] folder or the Program Files/Photoshop Elements [version] folder.
- Remove Adobe applications by following the appropriate steps for your Windows version:
- Windows XP: Open Add Or Remove Programs.
- Windows Vista, Windows 7: Select Uninstall A Program from the Programs section of the Control Panel Home, or open Programs and Features if you are in Classic view.
- Select your version of Photoshop or Photoshop Elements from the list of installed programs and click Change/Remove (Windows XP) or Uninstall (Windows Vista, Windows 7).
- Follow the onscreen instructions to remove Photoshop or Photoshop Elements.
- In Windows Explorer, navigate to Program Files\Common Files\Adobe and delete the Plug-Ins folder if it exists.
- After removing the applications, reinstall them using your original installation media.
Once you have quit and uninstalled the necessary Adobe applications, you can proceed with the Camera Raw plug-in installation process.
Repairing Camera Batteries: A Step-by-Step Guide
You may want to see also
![]()
Unzip the file
To unzip a file on Windows, locate the zipped folder you want to open, then do one of the following:
- To unzip a single file or folder, open the zipped folder, then drag the file or folder from the zipped folder to a new location.
- To unzip all the contents of the zipped folder, press and hold (or right-click) the folder, select "Extract All...", and then follow the instructions.
On a Mac, you can unzip a file by double-clicking the .zip file. This will prompt the macOS Archive Utility tool to unzip the file and create a folder of the same name in the current directory. The ZIP file will be automatically saved. Alternatively, you can right-click the .zip file and select either "Open" or "Open With" from the drop-down menu.
For Android devices, open the Files by Google app and navigate to the folder containing the .zip file you want to unzip. Select the .zip file and a pop-up will appear, showing the content of that file. You will be shown a preview of the extracted files. If you want to delete the .zip file after extraction, select the "Delete ZIP file" checkbox. The extracted files will be saved in the same folder as the original .zip file.
Trail Cameras: Raw vs JPEG Image Formats
You may want to see also
![]()
Double-click the .exe file
To upgrade Camera Raw, you will need to download the appropriate file for your operating system.
Once you have downloaded the file, follow these steps:
For Windows:
- Quit all Adobe applications.
- Double-click the downloaded .zip file to unzip it. Windows might unzip the file for you.
- Double-click the resulting .exe file to start the installer.
- Follow the onscreen instructions.
- Restart your Adobe applications.
For macOS:
- Quit all Adobe applications.
- Click the downloaded .dmg file. In the case of Camera Raw 10.5, double-click the .zip file to unzip it.
- Double-click the .pkg file to start the installer.
- Follow the onscreen instructions.
- Restart your Adobe applications.
Charging GoPro Hero 4: In-Camera Battery Charging Guide
You may want to see also
![]()
Follow the on-screen instructions
Once you have downloaded the appropriate file, you will need to follow the on-screen instructions to install the Camera Raw plug-in. If you are using Windows, first quit all Adobe applications. Then, double-click the downloaded .zip file to unzip it. If Windows doesn't unzip the file for you, you will need to do this manually. Next, double-click the resulting .exe file to start the installer. From here, simply follow the on-screen instructions and then restart your Adobe applications.
If you are using macOS, the process is slightly different. First, quit all Adobe applications. Then, click the downloaded .dmg file. If you are using Camera Raw 10.5, you will need to double-click the .zip file to unzip it. Now, double-click the .pkg file to start the installer. At this point, you just need to follow the on-screen instructions and then restart your Adobe applications.
If you are using Photoshop CS4 as a 64-bit application, you can use the Adobe Update Manager to install Camera Raw. If a manual update is required, you will need to install the Camera Raw plug-in in two locations. The CameraRaw.8bi found at the top level of the zip folder should be placed in the following directory: Program Files (x86)\Common Files\Adobe\Plug-Ins\CS4\File Formats. The CameraRaw.8bi found in the folder labeled 64-bit should be placed in the following directory: Program Files\Common Files\Adobe\Plug-Ins\CS4\File Formats.
Troubleshooting Camera Raw Command Issues
You may want to see also
Frequently asked questions
Download the latest version of the Camera Raw plug-in installer. Quit all Adobe applications, double-click the downloaded .zip file to unzip it, then double-click the .exe file and follow the installation instructions. Finally, restart your Adobe applications.
Download the latest version of the Camera Raw plug-in installer. Quit all Adobe applications, double-click the downloaded .dmg file to unzip it, then double-click the .pkg file and follow the installation instructions. Finally, restart your Adobe applications.
Install the latest version of the Camera Raw plug-in that is compatible with your Adobe application. Alternatively, remove and reinstall Photoshop or Photoshop Elements, or upgrade to the latest version of Photoshop or Photoshop Elements.