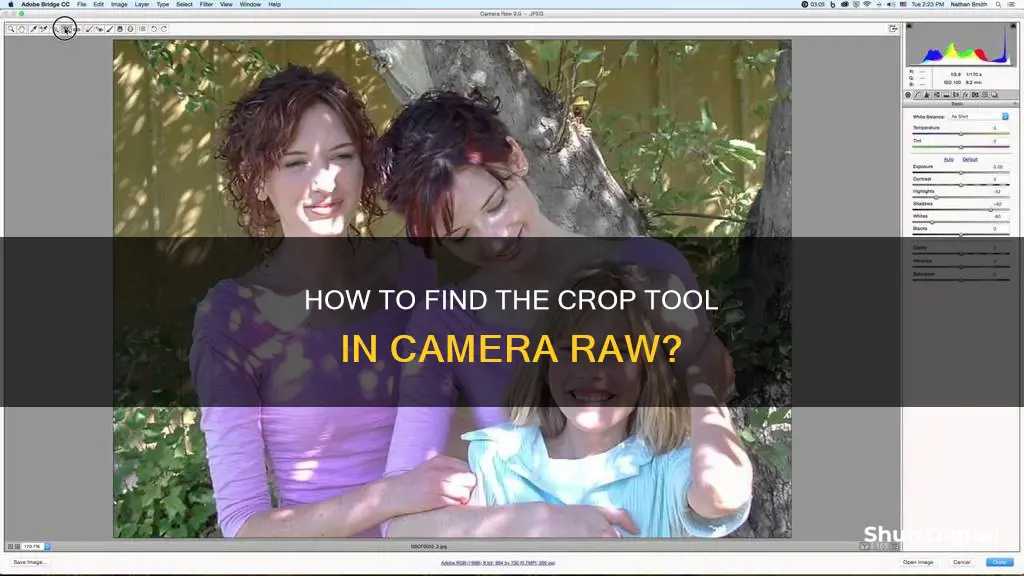
The crop tool in Camera Raw is an essential feature for photo editing, allowing users to select, adjust, and enhance specific areas of their images. This tool is particularly useful for cropping images non-destructively, giving users the flexibility to experiment with different compositions without permanently altering the original photo. While the specific steps for accessing the crop tool may vary slightly depending on the version of Camera Raw, it is generally located in the top toolbar or can be selected by pressing the C key on the keyboard.
| Characteristics | Values |
|---|---|
| How to access the crop tool | Click on the Crop Tool icon in the toolbar along the top left of the Camera Raw dialog box or press "C" on your keyboard |
| How to select an area to crop | Click and drag around the area you want to keep |
| How to resize the crop tool | Click and drag any corner, side, top, or bottom handle |
| How to use crop aspect ratios | Click and hold the crop tool, then select a ratio from the menu |
| How to use the crop overlay | Click and hold the crop tool, then select "Show Overlay" from the menu |
| How to use a custom crop ratio | Click and hold the crop tool, then select "Custom" from the menu and enter your desired ratio |
| How to apply the crop | Press "Enter" on your keyboard or double-click inside the crop area |
| How to edit a cropped area | Click the crop tool again to bring back the original image |
| How to cancel the crop | Press "Esc" on your keyboard or click and hold the crop tool and select "Clear Crop" from the menu |
What You'll Learn
![]()
Selecting the crop tool
The quickest way to select the Crop Tool in Camera Raw is by pressing the letter "C" on your keyboard. Alternatively, you can click on the Crop Tool icon in the toolbar found along the top left of the Camera Raw dialog box. However, clicking on the icon means you miss out on some useful and important options.
If you look in the bottom right corner of the Crop Tool icon, you will see a small down-pointing arrow. This indicates that there are additional options available for the tool. To access these, click on the icon and hold your mouse button down for a second or so. This will open a menu displaying various options for the Crop Tool, including some handy preset aspect ratios at the top that you can choose from. At the very top of the menu is an option called "Normal", which is the default mode for the Crop Tool.
In Normal mode, you can crop the image in any way you want. Simply click somewhere in the image to set a starting point for the crop box, then with your mouse button still held down, drag diagonally outward from that point. As you drag, you will see your crop box appearing as a selection outline. When you release your mouse button, the actual crop box will appear. The area outside the box (the greyed-out area) is what will be cropped away, and the area on the inside is what you'll keep.
If you want to force your initial crop box into a perfect square, press and hold the Shift key on your keyboard as you drag. Make sure you release your mouse button first when you're done, then release the Shift key. You can also draw the crop box out from its centre, rather than from a corner, by pressing and holding the Alt (Win) / Option (Mac) key on your keyboard as you drag. Again, make sure you release your mouse button first when you're done, then release the Alt / Option key. To draw a perfect square from its centre, press and hold Shift+Alt (Win) / Shift+Option (Mac) as you drag. Finally, you can reposition the crop box inside the image as you're drawing it by pressing and holding your Spacebar. Drag the crop box into position, then release your Spacebar and continue dragging.
Topping Off Camera Batteries: Is It Safe?
You may want to see also
![]()
Selecting an area to crop
To select an area to crop in Camera Raw, you must first open your image in Camera Raw. Once you have done that, you can select the crop tool from the toolbar at the top of the screen.
If you want to move the crop box, drag inside it. If you want to preview the results of the crop tool, press Enter/Return or click any tool except the Crop or Straighten tool. To exit the crop mode, press Esc.
Camera Battery Basics: What Photographers Need to Know
You may want to see also
![]()
Resizing the crop tool
To resize the crop tool in Camera Raw, you can click and drag any corner, side, top, or bottom handle. Dragging these handles inward will shrink the crop area, while dragging them outward will expand it.
The crop tool can be used to select an area to keep, with everything outside of the selected area being removed. The handles can be used to resize the crop box, and the box can be moved by dragging inside it.
The crop tool in Camera Raw allows for both constrained and unconstrained bounding boxes. A constrained bounding box applies a fixed aspect ratio for height and width, while an unconstrained bounding box lets you freely adjust the height-to-width ratio. The aspect ratio can be locked or unlocked by clicking the "Constrain Aspect Ratio" button in the "Crop" tab.
To set the size of the crop area bounding box, you can hover your mouse over the bounding box resizing handle and then click and drag inward or outward to change the size. The bounding box cannot be extended beyond the content of the image.
If you need to flip the height and width aspect ratio values, you can click the "Rotate Aspect Ratio" button in the "Crop" tab. To reset the size of the bounding box, click the "Reset Crop" button or press the "Esc" key on your keyboard.
Charging Your Polaroid Z2300: A Quick Guide
You may want to see also
![]()
Using crop aspect ratios
To use crop aspect ratios in Camera Raw, you must first select the crop tool. This can be done by either clicking on the crop tool icon in the toolbar or by pressing the letter "C" on your keyboard.
Once you have the crop tool selected, click and hold your mouse button on the crop tool icon for a second or two. This will open a menu displaying various options for the crop tool, including some handy preset aspect ratios at the top that you can choose from.
The default mode for the crop tool is "Normal", which allows you to crop the image in any way you want. You can also choose from preset aspect ratios such as 9x16, 2 to 3 (4x6), or 4 to 5 (8x10). If you select a preset aspect ratio, your crop box will instantly snap to that ratio. You can then use the corner handles to resize the box while maintaining the chosen aspect ratio.
If none of the preset aspect ratios suit your needs, you can set a custom aspect ratio by choosing "Custom" from the crop tool menu. This will open a dialog box where you can enter your desired aspect ratio. Camera Raw will remember your custom aspect ratio and add it to the crop tool menu for future use.
To apply your crop, simply press "Enter" on your keyboard or double-click inside the crop area of your photo.
Upgrading Your DJI Phantom 3: Camera Battery Replacement Guide
You may want to see also
![]()
Using the crop overlay
The "Thirds" overlay is the only crop overlay available in the Camera Raw plugin. This overlay is helpful for photographic composition and follows the Rule of Thirds, which states that placing the subject at or near the intersection of the horizontal and vertical grid lines will add more interest to the image.
To use the "Thirds" overlay, click and hold the mouse button on the Crop Tool icon in the toolbar, then select "Show Overlay" from the menu. Alternatively, you can right-click (on Windows) or Control-click (on a Mac) directly inside the image to access the Crop Tool menu and choose "Show Overlay".
The overlay will appear as a 3x3 grid. Once you start rotating the crop box, the 3x3 grid will change to a more detailed grid that will help you straighten the image. Rotate the crop box to align the grid lines with something in the photo that should be straight, such as the horizon line or any vertical or horizontal elements.
After straightening the image, you can resize the crop box by clicking and dragging any of its handles. Press Enter (on Windows) or Return (on a Mac) to apply the crop and straighten the image.
Remember, cropping and straightening in Camera Raw are non-destructive adjustments, so you can always go back and make changes if you're not satisfied with the results.
Replacing the Battery in Your Kangaroo Doorbell Camera
You may want to see also
Frequently asked questions
The quickest way to access the crop tool in Camera Raw is by simply pressing "C" on your keyboard. Alternatively, you can click on the Crop Tool icon in the toolbar in the top left corner of the Camera Raw dialog box.
Once you have selected the crop tool, drag in the preview to make a crop box appear. You can then drag this box to move it, or drag a handle to resize it.
Position your mouse cursor outside the crop box. When the cursor changes into a curved, double-sided arrow, click and drag your mouse to rotate the box.